
This how-I assumes familiarity with the GIMP. It also uses existing graphics from the game for demonstration purposes, combined into a larger graphic or renamed to comply with the MS-DOS naming standard. No infringement of intellectual/artistic property intended.
Update, end of 2014: it seems the isometric Vulture interface may soon become vintage, as its maker is looking at ways to make it fully 3D. The format of the tiles configuration file was already about to change, but replacing the tiles with 3D objects means that this how-I is about to become obsolete. However, I like this version enough to want to complete the tiles for it.
Sections:
To embellish the ASCII screen of Nethack, several graphical interfaces
have been made. The first one I saw was Falcon's Eye, by Jaakko Peltonen,
which had an isometric (45-degree skewed, look-down-from above) view. Like
letters in the ASCII screen, it reused the same graphic for monsters of the same
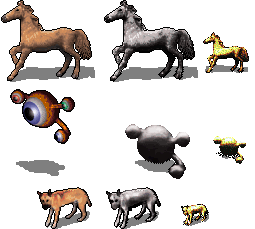
class, so that all dragons looked alike, and what appeared as a pinto horse
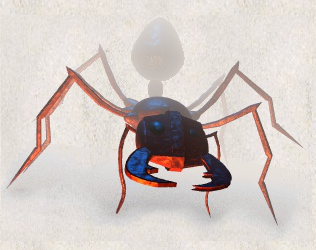
might equally well be a pony or a rothe. Presumably to get the angle and shading
right, the graphics were made in 3D, rendered and textured. In fact, an
illustration from the manual installed with the game shows the base of the giant
ant. After having waited, as he says, an eternity for his favourite interface to
be updated, Clive Crous made a fork of it called Vulture's Eye, with many
new tiles to make sure each monster had its own graphic. By now there was an
extended version of the game called "SLASH'EM" ("Super Lotsa Added Stuff Hack -
Extra Magic") and another version of this new interface was built around it,
called Vulture's Claw. Since more game variants were made, in time the
two interfaces were merged into one interface, Vulture, for all Nethack
variants. This single interface also has a directory for all monster/object
graphics, called tiles, and an editable tile configuration file, so that it is
now possible to tinker with the graphics or even point the game to new graphics.
In version 2.0.0, the first version I used, the tiles and configuration were
baked into one big unalterable binary, "gametiles.bin"; when I updated to
version 2.1.2, the tiles were uncompiled and in their own directory. It seemed
that the graphics in gametiles.bin were originally one big sheet of pictures,
and the configuration file told the game which part of this sheet showed what.
Such a sheet of pictures is called a tileset. For later versions, up to the
current version of Vulture (2.3.67 at the time of writing) it seems tilesets
were cut up into individual tiles, judging from the occasional tile that shows
old place markers which should have been snipped off (outlined in red in the
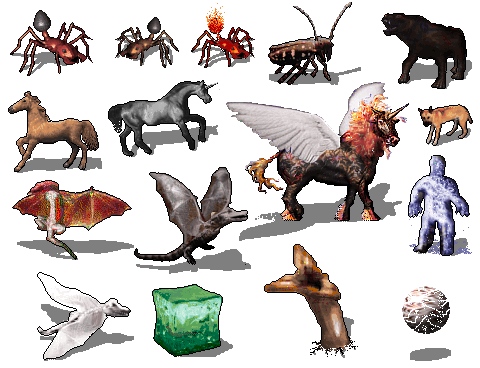
screenshot below): The current version of Vulture has tiles in five styles: By "five styles" I don't mean that just five people submitted tiles. What I
assume is that five artists supplied the bulk of the tiles (and that is purely
an assumption, as even the Absurd tileset could have been a collaborative
effort) and that other artists who contributed tiles tried to make their tiles
blend in with the others. Which is my intention: to add some tiles that would
fit right in. And the style I wanted to emulate was the fourth.
Since I'm an eternal beginner and lucky to get as far as the Oracle, the
three kinds of monster I wanted to make tiles for was:
Now, how to go about this. Before making any tiles, I had to know how to put
them in the game. After a bit of searching, I located these two directories:
The first contains the tiles in PNG format. The second contains
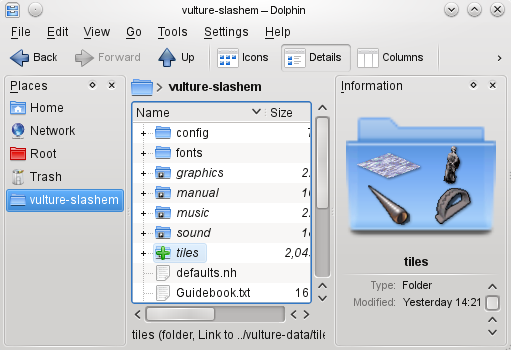
"vulture_tiles.conf" which declares the tiles to the game. In the file manager,
in this case Dolphin, I made a shortcut to /usr/share/vulture-slashem,
since that directory has a link to the tiles directory. Having located these two
directories in my openSUSE installation - they might be in a different place in
another distro or OS - I added a test tile to the tiles directory and changed
the conf file to display that test file. This had worked on an older Vulture
installed on an older laptop, but this time, no luck. So I found and downloaded
"nethack-tiles", a utility for making and adding new tiles. There were two
things wrong with it: all object tiles showed the same leather pouch, and it
wouldn't compile because of a missing "RMagick". It was still useful, though,
because it comes with a number of 2D tilesets and all the original Falcon's
Eye tiles, so I could compare them with their modern versions. Finally,
thinking something was wrong with the installed game, I downloaded the source
and tried to reinstall it. This failed with the following errors:
Vulture's tiles
Putting a tile in the game
Finding a base image
Making the monster tile
Making the statue tile
Making the figurine tile
Re-cropping a tile
Wizard mode
Vulture's tiles

The tengu tile and its little dotted line.

-the easy ones (it's a maggot, dammit, not a baby purple worm!)
-the deceptively harmless-looking ones (hey, a gnome - ack, it's a statue
gargoyle!)
-barnyard animals and anything else represented by a horse;
and after playing a lycanthrope, I also decided to tackle weapons, since any
silver weapon belongs either in my hands or in a locked trunk under a boulder.
Putting a tile in the game
/usr/share/vulture-data/tiles
/usr/share/vulture-slashem/config
calezane@linux-ftqg:~/vulture> make home
Setup NetHack build environment ...
Building and installing NetHack in /home/calezane/vulture
make[2]: sdl-config: Command not found
[...]
make[2]: sdl-config: Command not found
../sys/unix/unixmain.c:18:18: fatal error: SDL.h: No such file or directory
compilation terminated.
make[2]: *** [unixmain.o] Error 1
make[1]: *** [vulture-nethack] Error 2
make: *** [nethack-home] Error 2
I later read the on the DarkArts site that it has something to do with a missing "sdl11-config"? Nevermind, the problem was that tiles could only be added to the tiles directory, and the conf file could only be changed, by user root. So the changes I thought I'd made, were being discarded. The solution was doing everything in a file manager opened in super user mode.
Everything's editable in super user mode.
On with the syntax! The conf file starts like this:
# OBJECTS:
object.default                  => object.STRANGE_OBJECT
object.STRANGE_OBJECT            = "tiles/object.strange_object.png"   -11   -15
object.ORCISH_DAGGER            => object.DAGGER
object.DAGGER                    = "tiles/object.dagger.png"   -18   -27
The file is divided into several main sections, of which the only interesting ones for my purpose are the object/icon and monster/statue/figurine tile sections. The first section is the object section, and it starts with the tile to show for existing objects whose names are not in this file. This line for the default object doesn't contain a tile filename, it just refers to the line starting with "object.STRANGE OBJECT". And would you know it, that line is just underneath and points to the filename "object.strange_object.png" in relative path "tiles". So the naming convention is that object graphic files start with "object." plus a description of what they are, and lines in the conf file start with "object." plus that same description in capitals, followed by either a filename (with coordinates, I'll come to that later) or a reference to another line.
For instance, to avoid picking up inferior orcish daggers, I want these to have their own graphic, "object.orcish_dagger.png". Which has the same size as the old dagger graphic, it's just been changed very slightly to look more crude. So I can simply copy the dagger line, coordinates and all, and change the filename:
object.ORCISH_DAGGER             = "tiles/object.orcish_dagger.png"   -18   -27
object.DAGGER                    = "tiles/object.dagger.png"   -18   -27
That was easy! But I still see the same dagger in my inventory. That's because for every object graphic, there is an object icon graphic. The object icon tile is usually a shrunk version of the object tile, but because the dagger tile fits inside the inventory box, the dagger icon tile is simply a copy of the dagger tile. So I need to scroll down to the ICONS section and change
objicon.ORCISH_DAGGER           => objicon.DAGGER
objicon.DAGGER                   = "tiles/objicon.dagger.png"     4     7
to
objicon.ORCISH_DAGGER            = "tiles/objicon.orcish_dagger.png"     4    7
objicon.DAGGER                   = "tiles/objicon.dagger.png"     4     7
and now I'll see the orcish dagger with its cruder, duller hilt and rusty blade in my inventory.
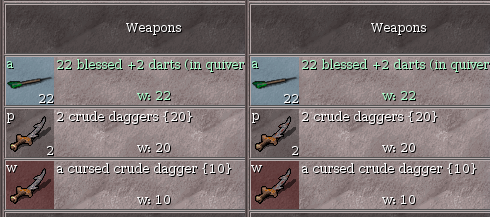
The inventory, before and after.
Note that the numbers following the icon tiles are very different from the numbers following the object tiles. These numbers are the tile's x and y coordinates. An ordinary object, that is, an object on a dungeon square, is basically placed with its top left corner in the very middle of that square, placing it too far to the right and half underground. The negative x coordinate pulls the tile to the left until it looks centered, and the negative y coordinate pulls the tile up until it appears to be resting on the ground, rather than buried in it. An inventory object rests on an inventory square, which appears to be 48x48 pixels, and has its top left corner placed at the inventory square's top left corner, so the positive, but very small (there's not much room to move!) x coordinate pushes the tile to the right, and the ditto y coordinate pushes it down, until it ends up in the middle. Getting the coordinates right can be a bit of a hassle: edit and save "vulture_tiles.conf" (in super user mode!), start the game (fortunately it will run while the tiles conf is opened in an editor), look at how the object is positioned, if it doesn't look good, save/quit the game, change the coordinates in the editor, start the game, see if it looks better now, if not, save/quit and edit, etc.
I've explained above that for every object, there should be an object icon. Similarly, for every monster (ie. living thing in the dungeon, including the player character) there should be a statue and a figurine. The statue is the same size as the monster, so the coordinates for monster and statue tile will be the same, unless the statue has a different position, like flying birds and their dropped-to-the-ground statues. The figurine tile is half as big as the monster tile, and it's usually enough to halve the coordinates, eg. "-16 -16" becomes "-8 -8". Shrinking a tile may make it seem off-centre, though, so the figurine tile should be tested in the game.
Testing a new monster tile's coordinates is relatively easy: start a game and go down the dungeon until you meet that monster; then go through the testing/editing process above. This can be difficult for a rare monster, and figurines are more rare than any monster, so here's an easier way. It requires getting bitten by a wererat (plenty of those on the upper levels), contracting lycanthropy, moving to a safe level and changing into a rat. Another were-animal is fine too, but can be harder to kill or escape from. The reason why I need lycanthropy is that I want to replace the player tile with the tile I'm testing, and while players can have various tiles, a wererat is always a wererat.
Okay, so now I've saved/quit while sitting on a pile of dropped belongings as a miserable little rat. I open the tiles conf, scroll down to MONSTERS and find the wererat line (not the wererat-human form!) and how convenient, the line for the tile I need to test - the packrat - is just above it. Now, I either copy the wererat line and paste it to a safe place like a text file, or I backup the whole conf file.
monster.PM_PACK_RAT                => monster.PM_GIANT_RAT
monster.PM_WERERAT                  = "tiles/monster.pm_wererat.png"   -34   -33
Next, I replace the wererat tile's filename with the packrat's filename and the estimated coordinates. If the two tiles are the same size, I copy the coordinates. If the packrat tile is ten pixels higher and six pixels wider than the wererat tile, I'll subtract 10 from the y coordinate and 3 (half of 6, to center the image) from the x coordinate, thereby making their numbers higher as they are already negative:
monster.PM_PACK_RAT             => monster.PM_GIANT_RAT
monster.PM_WERERAT               = "tiles/monster.pm_pack_rat.png"   -37   -43
and test until it looks satisfactory. Now I can restore the old wererat values and give the packrat its own filename:
monster.PM_PACK_RAT              = "tiles/monster.pm_pack_rat.png"   -37   -43
monster.PM_WERERAT               = "tiles/monster.pm_wererat.png"   -34   -33
If I have a statue tile of the packrat, I'll transfer the coordinates to the STATUES section:
statue.PM_PACK_RAT               = "tiles/statue.pm_pack_rat.png"   -37   -43
statue.PM_WERERAT                = "tiles/statue.pm_wererat.png"   -34   -33
But I'm not done yet! Just one last test to abuse the wererat with:
monster.PM_PACK_RAT              = "tiles/monster.pm_pack_rat.png"   -37  -43
monster.PM_WERERAT               = "tiles/figurine.pm_pack_rat.png"   -17  -16
The wererat tile is now... a figurine! Note that although the monster/statue/figurine tiles are named in a similar way to the object tiles, the descriptive part of the name always starts with "pm_" for some reason. The coordinates for the figurine have been halved, which for odd numbers means rounding up or down. If the result looks good, the wererat gets its old line back, and I add the packrat figurine under the FIGURINES section:
figurine.PM_PACK_RAT             = "tiles/figurine.pm_pack_rat.png"   -17  -16
figurine.PM_WERERAT              = "tiles/figurine.pm_wererat.png"   -16  -18
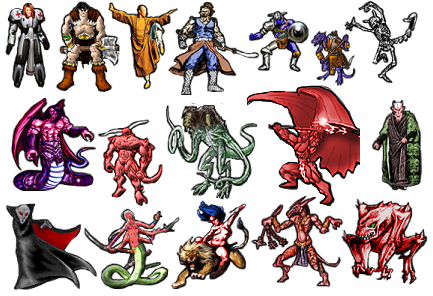
As a final observation, statues and figurines can be picked up and carried in one's inventory, but they don't have separate icon tiles. Since both statue and figurine tiles are usually far too big for the inventory square, the inventory will show the first 48x48 pixels of the image, starting in the top left corner. For tiles that have only space in the left-hand corner, like the marilith (second from the left in the bottom row of the Absurd tiles sample image) it is theoretically possible that their inventory graphic will be empty, although of course there will still be a text description.
There! Now that I know how to edit the conf file, I can start making graphics.
Ouch. That's actually the hard part.
The current game tiles are rather good; way, way above my artistic ability. If I want to make tiles that blend in, I'll have to cheat a little. My plan: to take existing graphics and shrink/edit them until they look good in the game. Don't be fooled, this is not as easy as it sounds! Actually, I'm sure many existing tiles were made from photographic images. Except for monsters like demons and dragons, because somehow I doubt there are photographs of those. But I was aiming at the low-level monsters anyway, so my subject for this how-to will be a chicken. The steps to take are:
The last three steps are already as good as done - I know how to edit and test the conf file, and on the game's site I've found the developer's email address - so I'll describe the first four. Firstly, when using what is basically someone else's intellectual property, make sure it's either free or public domain. If no free image is available, use one that is not jealously copyrighted (ie. yes, take an image from a webshop that shows pics of its wares, but NOT from a site where photographers are trying to sell their work) and change it so it is clearly different from the original, and the image owner won't be miffed at seeing it lifted straight off a website and into the game. There's only a small chance that the image owner will just happen to play Vulture and see the stolen image, go ballistic and threaten with a lawsuit, but I'd rather not risk it. Also, beware of the conditions attached to the use of "free" images: one site offered free images on the condition that everytime the image is used, it should be fully credited. So, each time the resulting monster tile shows up in the game, a balloon should pop up saying "this image was made by...." which would horribly hinder gameplay, if it were even technically possible.
Base images can also be scanned in from books and magazines, in which case the same caveats apply. When I submit tiles that are not drawn by me, I state in the accompanying email where they came from. After all, someone might throw a fit at the game developer over supposed copyright infringement when I'm no longer around to refute those claims.
Three sites that I use free images from are:
Dreamstime Stock Photography, a site
selling royalty-free photographs and art. The images themselves still have to be
paid for, but the site has a section of free images. To download the free images
at full resolution I would have to make an account, so I just save the
thumbnails, which, for my purpose, are the right size anyway.
123RF.com, which works the same way,
although the free section contains pics that are only free for a certain period,
so download quickly. Also, the site keeps switching to its Dutch version in my
browser, so, for convenience, here's the link for a search for knife pictures in the free section of the English site.
Image*After - the raw base for your
creativity, a truly free resource for photographs, which, as the site
creators explain, have been put up in their unpolished glory for the downloader
to process and refine. Being non-commercial, it doesn't offer me as much as the
above two, but it does have some material - like a series of photographs of an
insect collection - that I wouldn't expect to find elsewhere.
Someone kindly mailed me a link to a fourth site with a repository of free
resources, including images, that Wikipedia and other wikis get their material
from:
Wikimedia Commons
One would expect any image used on Wikipedia to be free of copyright, but
the wasp picture under the "yellow jacket" entry, which would have been perfect,
wasn't on the Wikimedia Commons site; I did however find it, mirrored, on some
pest prevention site, so clearly Wikipedia images can't always be trusted. But
even if I can find only a copyrighted image, all is not lost: I can use it as
a reference. The two sword images below, which are found on various
sword-selling sites, were used as examples to make the two tiles out of
different images.
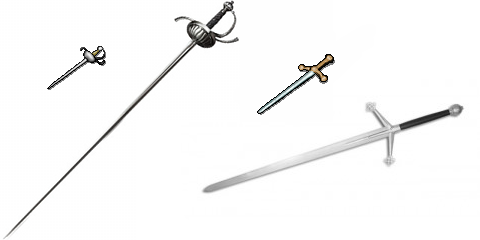
Not a pixel from these examples was used for the tiles.
The next consideration is: will the base image be suitable? Is it small or will it retain its detail when shrunk? I try to go for the isometric look: the image must look as if viewed from above, with light coming from the left and a shadow thrown backwards and right. If the original is lit from the right, no problem, I'll flip it horizontally. If a quadruped, it should ideally stand diagonally, its rear higher than its shoulders.
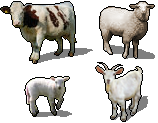
Cow, sheep, lamb, goat: lit from the left, more or less isometric.
If a big animal, it should be as forward-facing as possible, to narrow it. In the bull example below, I also applied some in-game logic: since this always aggressive monster is more dangerous and high-class than the always peaceful cow, it made sense to use a horned bull and a de-horned dairy cow (look closely to see her yellow plastic ear tag). It also made sense that the bull should be a little bigger, although comparing the heads shows that the bull is one and a half times as big; a ridiculous proportion, but that's as far as I dared to shrink the graphic. Its head-on angle not only makes it fit in the square, but tones down the size discrepancy.

The bull: much bigger than the cow even after shrinking.
A too-wide image, such as the widely used screencap of the African honey badger, can be narrowed with the graphic editor's "perspective" tool, which can also do wonders for repositioning apparently unusable graphics, such as the rummaging dingo (a free image from somewhere) and the recluse spider (one of the few images from Mr. Packrat with no copyright watermark in it).
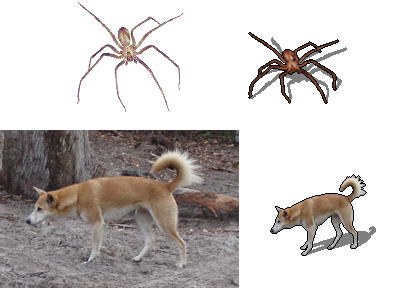
Big images: what they were, and what was made of them.
These examples also illustrate how making a graphic from a photograph isn't just resizing, shearing, and slapping on a pixel line and a shadow: the recluse spider was a grainy GIF whose colours needed brightening, and the dingo had to be supplied with missing bits of paw. The image below, used as an example for the yellow jacket, was heavily skewed with the perspective tool to get the position right.
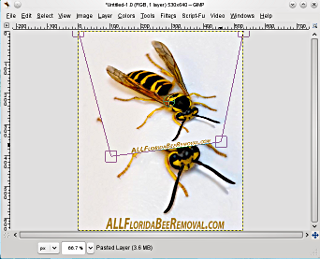
Perspective works wonders.
For that matter, the graphic need not exactly be what you want. An ornamental dagger from Dreamstime became a rapier and claymore, while a humble breadknife from 123RF.com, first became, after some shearing and rotating, a family of broadswords, then a scimitar and finally Stormbringer.
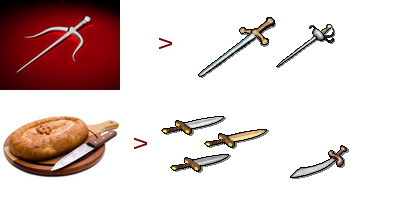
Just so long as it's sharp and pointy!
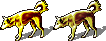
The dingo pup was a Golden Retriever pup, chosen for its dingo-coloured fur and curving tail, with the rummaging dingo's ears pasted on it, which is why the ears are not the best part of the picture. In cases where the tiles are variations on a theme, size is something to think about. Confining images to tiles means that huge monsters will be relatively smaller just to fit, and tiny ones will be relatively large, for the sake of visibility. Still, taking the existing dingo tile as a guide, the pup had to be smaller and the large dingo noticeably bigger.
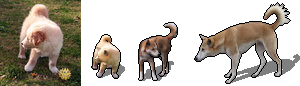
Our dingoes come in three sizes.
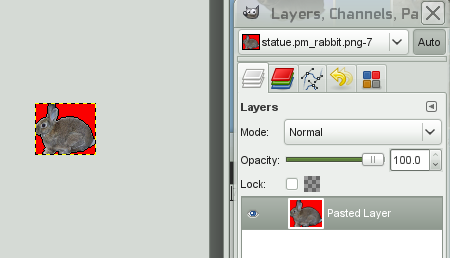
Sometimes, only a small part of the image is needed. The visibly uncomfortable bunny's position lent itself to the deranged rabid rabbit. (And it was white. A vicious man-eating rabbit has to be white. It's a Monty Python reference.) The flashing blade in the picture of the wiccan was just right for the athame.
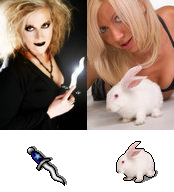
Courtesy of Dreamstime.
When the only suitable graphics are non-free, maybe several free, or not-quite-free, graphics can be combined into the desired image. I couldn't find the flying cockatoo I wanted, but Dreamtime had a free cockatoo on a branch, and the paradise island graphic on a site called "Vladi's Private Islands" had a flying white bird who I decided was going to lend me its wings, even though the shadows were the wrong way round (I needed a back view, not a front view) and I would have to switch them with clever editing. (Later I did find a suitable graphic, so the editing was never finished, but I'm keeping this graphic as an example of how to mix and match different images.)
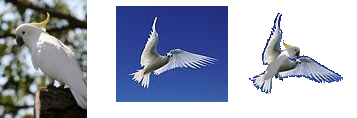
What do you get if you cross an X and a Y?
In some case, a bit of research is needed. I thought the packrat was just a subspecies of rat, but it turns out to be no real rat, just a close relative. Barking spiders really exist, although, given the sound they make, they might as easily have been called "farting spiders". The name "bloodworm" is used for different animals, but judging from the description it has to be Glycera, a burrowing marine worm commonly used as bait that has a nasty bite - and I had no idea that "lightning bug" is just another name for firefly. The aklys or "thonged club" is in fact a variety of weapons, their common point being that they are meant to be thrown. Most of the research, though, is necessary for fantasy animals that exist only in D&D manuals, if at all: that's how I found out that deep dragons are purple, deep gnomes are hair- and beardless, and the death dog is two-headed.
In a few lucky cases, the image can and in fact, for the sake of consistency, must be based on already existing graphics. The killer food ration, killer tripe ration and killer piles of coins would lose their significance if they looked totally different from what they try to mimic. And the rogue, plus mask, minus one sword, plus oilskin sack makes an ideal mugger. Not to mention that the snow ant should be in keeping with the rest of the ant family. (Far from being a mirrored recolour, this cyanide-blue ant involved remaking the shadow and repixelling the outline.)
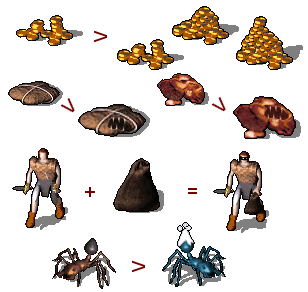
Derivatives and combinations of existing in-game graphics.
Of course, real artists draw their tiles from scratch and only look up images by way of example. There are some very simple tiles that I've made this way: the grub/worm tiles, the Hand of Vecna and the Eye of the Beholder. (The Vecna/Beholder items used the food ration tiles, and you really don't want to eat them by mistake!) First, I would draw a rough squiggle just to get an idea of the size, and put that in the game to test the X and Y coordinates. Then I would keep doodling in the GIMP, typically working on an expanded image so that I could then shrink it to smooth out the jaggies, and using half transparent brushes and filters and all sorts of tricks, until the result was acceptable. I would test it in the game again to see if its coordinates needed adjusting, and then make object icons or statues/figurines as applicable.
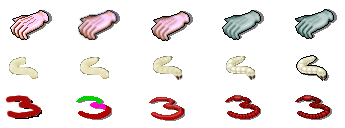
Steps in the creative process.
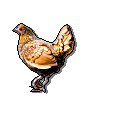
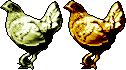
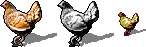
Anyway. I'm going to make a chicken. There are several free images of chickens on Dreamstime, like this white one:
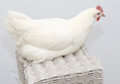
But it doesn't have visible legs, and I already have three white barnyard animals. A black one, then?
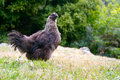
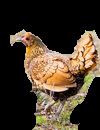
Nicely sized, but still no legs. Hey, here's a beaut! It has legs (hazy against the grass, but that's what editing is for) and clearly outlined plumage so the finished tile will not just be a unicoloured blob. The only problem is that it may need shrinking.

I've found a base image. Goody! Now to make a tile out of it. The steps are:
1. Open the image in a graphics program that has layers, like the GIMP.
Remember: for finicky tile editing, layers are your best friend! If it
needs to be sheared/rotated/flipped, do that now, but don't recolour anything
yet.
2. Add a second layer above the original. On this layer, paint away (but
with anti-aliasing off!) all the background; you just want the detached object.
(Originally I painted away the background on the original, which is annoying
when I find I've erased too much and there's no way to get it back.)
3. If the image needs to be shrunk, better shrink it now, unless it needs
lots of editing, see point 5.
4. Add a third layer (and keep saving the file in a format that supports
layers, so you don't lose them) and on this layer, make a one-pixel-thick black
outline. Meadow pictures of grazers, like the sheep graphic I used, often show
them hoof deep in grass and maybe with vegetation covering part of their bodies.
This will have to be edited out, and the outline shows what parts to edit. When
the outline is done, use it to make a new layer of the object minus its
background.
NB! The older images have a pixel outline that is
black. This may look strange on very fancy or photographic images. The black
pixel outline is still needed for editing, but if it looks too harsh on the
final image, make the "outline" layer half transparent, so it just slight
darkens the outline, when merging the layers to make the tile.
5. On the isolated object layer, use the clone tool to edit out bits of
background like grass blades where applicable, and draw in missing bits, like
those invisible hooves.
6. Do any recolouring and general editing on that same layer. The sheep
graphic was tinged green, so, as it was mostly white, I changed that tinge to
sepia. Parts like eyes and noses may be too light and may need extra contrast.
Extra markings, like the blotches on a cow, may have to be edited out or added.
7. If the image needs shrinking and wasn't shrunk yet, do it now. Upside:
this smoothes any harsh lines. Downside: details are lost, and the pixel outline
has to be drawn again.
8. On a new layer, make the shadow. The monster graphic is now ready to be
made into a tile. Save the whole thing as a layered file for the statue and
figurine tiles, and in case you want to make alterations later; then delete or
merge down layers as needed, crop it, and save it again to PNG.
My first tile, working with one single layer. Bad idea.
Once these steps have been completed, it's possible to add the filename to the tiles conf, test it in the game to find the right coordinates and leave it at that. A number of monster tiles already in the game don't have their own statue or figurine tiles; the game just displays a default tile for either. But as I find that jarring, my hen will have all three tiles.
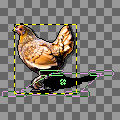
Anyway, here's how it goes for the chicken tile: steps 1 and 2 show that some of the chicken's second foot will have to be reconstructed, that there are bits of grass showing against the body and that the image will have to be resized.
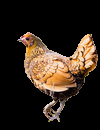
Steps 3 and 4: so, resize it I do, to 75 percent of its old size (still too big really, but any smaller and it becomes an ugly blob), and then use the unsharp filter with a radius of 2 to bring some of the lost sharpness back. I then use a strongly contrasting colour for the outline. Here, the chicken's foot hasn't been fully reconstructed yet because I still had to think out the shape. However, I've already started to smudge out the blades of grass against the chest and wing. For the next step, I will make a new layer combining the visible layers, select the black background with the magic wand tool with feathering turned OFF and delete it, and then use the colour selection tool, again with feathering turned OFF to select the red outline and fill it with black. It is very important to turn off feathering in any type of selection, since this leads to unwanted semi-transparencies and smudging of outlines.


Steps 5 and 6: editing. The rest of the grass was smudged out and the foot finished. No recolouring was necessary, and step 7 could be skipped. If only all images were this easy!


Step 8: the monster image being finished, it now needs a shadow. Since image transparancy is supported, the shadow is a black shape with a transparency setting of 50 percent. It slopes to the right, and to the back or front, generally the back, depending on how the monster is standing. I can use the existing shadow, if any, in the graphic, or guess the shadow shape myself, or use the GIMP's drop shadow functionality. For that, I will clearly have to change the canvas size of the picture first. I make it quite large, as the extra space will be cropped away later. Next, to make sure the drop shadow function will work, I select the chicken layer - the one I'm doing all the editing on - and increase the layer size to the image size. To avoid unsightly dotted lines (showing the layer boundary) in the image window, I do the same for the outline layer.
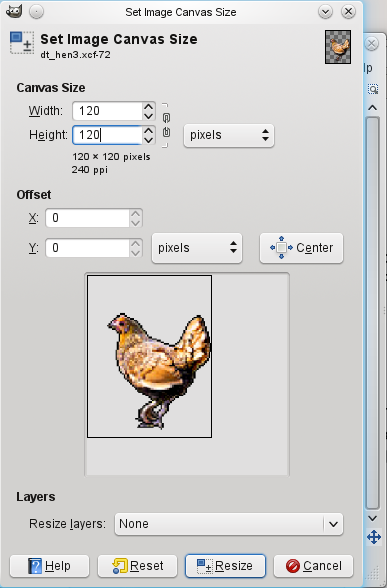
Increasing canvas to a safe size.
The drop shadow function basically takes the image, makes it all black, shears it and/or moves it some pixels away from the original, reduces the result's transparency and makes the final result into a new layer. If the drop shadow is larger than the image and the box "Allow resizing" is ticked, the image's canvas size increases, but I've already made the canvas so large that using this setting shouldn't be necessary. As the shadow should be clearly delineated, the "Blur radius" should be zero.
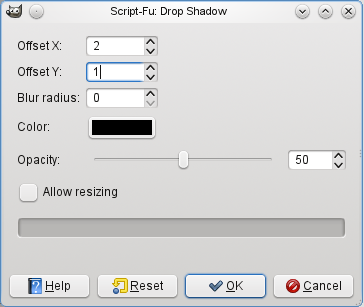
Settings for making a shadow.
Oops. That works well for objects lying flat on the ground, but the chicken now looks like a cardboard cutout seen from above. The GIMP doesn't shear the shadow, but it does have a lovely perspective tool to let me shear it myself. As a result the shadow will develop fuzz around the edges, so I have to set the layer transparency to 0, edit the shadow until it's a sharp black silhouette again and then reset the transparency to 50. The shadow layer may also have to be dragged around a bit for better alignment with its caster, after which, for the sake of a tidy working screen, I again set the layer boundaries to the image size.
Now that the graphics are finished, I first save the layered image, in this case (using the GIMP) of filetype XCF (in Paint Shop Pro it would be PSP), for easy statue/figurine-making, and in case I want to change some detail later. This file I will move to a directory called something like "backup" or "rough_version". Then, I use "Save a copy" to save the whole file, with only its main, outline and shadow layers visible, to PNG - a dialog will open to ask if I want to export the image, which will merge the layers for me - and reopen this image to autocrop it, trimming away all the empty space around it. I can also merge the layers myself and then autocrop before saving to PNG, but it is essential not to use "Flatten image", as this will replace transparent parts of the image with the background colour.
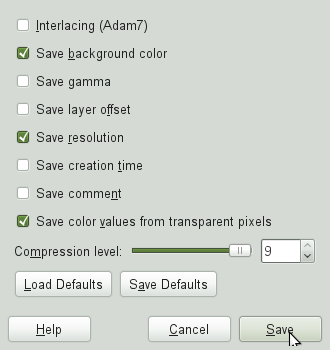
Settings for saving to PNG.
The name I save to is, of course, the name of the tile as it will be called in the conf file: "monster.pm_chicken.png".

Ta-daa! A new monster tile.
NB. This tile is huge. It's bigger than the dog and as big as the larger barnyard animals. But that's the problem with small animals: their tiles turn out so much bigger proportionally. I will be shrinking this tile to three-quarters of its size, but first I want to make the statue and figurine layers while the image is still big and showing all its details. Once shrunk, it will lose these details, including those lovingly reconstructed chicken feet. This is why it's better and less heartbreaking to choose a suitably small image from the start.
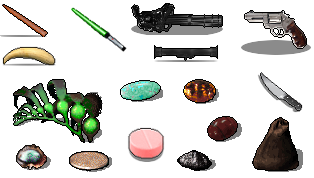
Not all Vulture tiles are monster tiles. Some are background tiles for things like walls, pools or explosions. Many are object tiles, like weapons. These don't need statue and figurine tiles, but icon tiles, sized at maximally 48x48 pixels and displayed in the inventory. To make icon tiles, I simply resize the object tile, not bothering to clear up the resulting fuzzier lines, and save them to PNG with the "object" in the name replaced by "objicon".
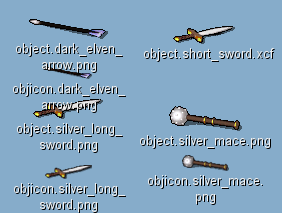
Some examples of weapons and their icons.
The statue tile is the monster tile in greytones. In the statue examples below, the horse statue shows that for some monsters, the statue tile is simply the monster tile, greyscaled. This only works for monsters in one colour, where the darker and lighter spots are purely highlight and shadow. It doesn't work for the floating eye, which has an iris, yet its statue is a sphere with no eye visible (and also, cleverly, lying on the ground as opposed to floating). It also doesn't work for the dog, whose darker muzzle would have affected its stone look.
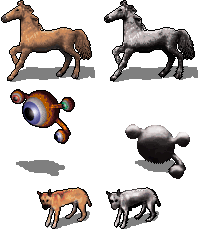
I strongly suspect that the floating eye was a 3D object which was simply rendered with a different texture, or no texture at all. The dog doesn't look like a rendered 3D object, so there the suspect is a clever Photoshop filter that guesses a shape's 3D appearance, makes it all one colour and then applies the guessed shadows and highlights. The statue seems coated in mercury, but neither the "molten wax" filter in Paint Shop Pro nor various other filters (I even installed NeoPaint to check out its old filters) came anywhere close. Clearly, I am not a professional artist, or I would know these tricks of the trade.
The steps for making a statue tile are:
1. Make a convincingly stone version of the monster tile.
2. Choose position (usually same as monster tile) and add shadow (usually
same as monster tile).
3. Crop any excess space and save to PNG with same name as monster tile,
only, replace "monster" in the name with "statue".
4. Add filename to tiles conf, usually with same coordinates as monster
file.
See, only half as many steps as for the monster tile! Only, step 1 is not a step, it's a hurdle. Step 2 only matters in cases where the statue is, for some reason, different from the monster, as for the floating eye which, when statue-fied, drops to the floor. Steps 3 and 4 likewise are a doozy. But step 1...

Stone rabbit, attempt #1: more slate than statue.
I pulled a number of statue tiles from the game directory and lined them up on the desktop to get a feel for what the end result should look like. Generally, they are dark grey, lit from the top left, with strong shadows and highlights. Since both the rabbit and the rabid rabbit were pretty evenly lit, I painted on white and dark patches on the greyscaled images, which as a result ended up looking like stone chocolate Easter bunnies.

Stone rabbits, attempt #2.
So from then on I tried to use base images that were already shaded, and needed little editing.

The lamb, pre-shadowed.
For all three tiles, I'd discovered how to make an image look more brightly lit with the Curves tool. I painted in dark and light spots if needed, then used this on the image to really make it glow. (I later discovered that the Unsharp filter can give very good results, too.)
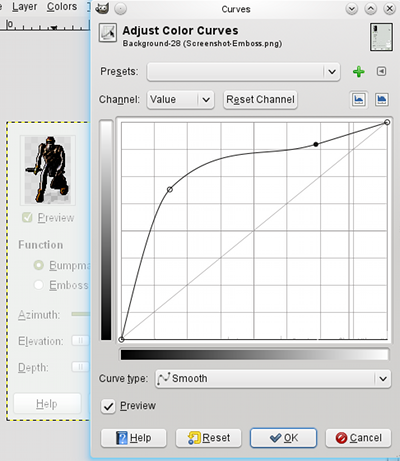
Pull the elastic line for instant shine, whee!
This works on evenly coloured images; ones with lines and spots need those painted out. The cow wasn't much of a success (I tried to save the spots to a mask and then mask them out, but traces remained) but painting out the white parts of the large dingo's belly and tail went better. (The face and lower legs were meant to look lit up anyway.)
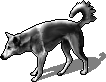
Perfectly chiselled dingo.
For images that have a 3D look to them, the "Emboss" filter can give a nice stony look (choose Bumpmap, then greyscale afterwards) but why this works for barely any images can be seen from the ruffled-looking chicken example. Also, filters like this tend to make the image leak beyond its outline, which is why I have a separate outline layer: so the leaked pixels can be trimmed off.
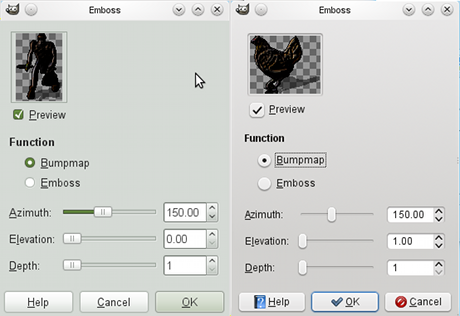
Embossing a mugger and a chicken.
How the image is greyscaled can affect the shadow/highlight contrast. The GIMP, in which greyscale is called "desaturate", has three greyscale methods: Lightness, Luminosity and Average. Luminosity may give better results.
So, step 1 is divided into four substeps, making eight steps after all:
1. Greyscale the image in the way best suited to the envisioned end result.
(What a mouthful.)
2. Paint out any spots, dots, lines, patterns etc. that shouldn't be visible
on a statue. If this is best done in colour, do steps 1 and 2 in reverse order.
3. If needed, paint in shadows/highlights or use the embossing tool.
4. If that isn't enough in terms of light and shadow, use the Curves tool or
the Unsharp filter. I usually skip step 3 and go straight to step 4.
How to do this with the chicken, which is a tricky tile to statuefy? Once again, layers are your best friend. Often, I don't apply an effect directly to the base image, but instead duplicate the base image's layer, apply the effect to (or do the painting on) the duplicate layer, look at the result and, if not satisfactory, make the duplicate layer more or less transparent to let the original shine through and, at the transparency which shows the best combination of the two, merge down the duplicate into the base image. In this case, my first step is to open the XCF file made for the monster tile. The monster tile image layer is duplicated, after which it, its shadow and its outline are made invisible. They are now backups, exempt from editing. The copy of the monster tile image layer is greyscaled, named "chicken statue" and also duplicated, so now there are two identical grey chicken layers. The second grey chicken layer, which overlays the first one in a "Normal" way, is changed to overlay with "Grain merge". This brings out the highlights. But a statue should also look a bit blurred and blunted, so I apply the Blur filter to the second layer. This smoothes down the plumage to make a very nice statue, so I merge the top layer into the greyscaled one. Wow, fastest statue ever. I didn't even have to use the Curves tool.

The magic of filters and layers.
See anything wrong? Yes, that white stripe under the wing, that I should have painted out beforehand. Still, now might be an even better time to do it. I make a new layer, draw a black line over the white band, use the blur filter and the smudge tool until it blends in, and merge the layer down.

Grey all over.
The image has no shadow, and only has an outline because I happened to paste the black pixel outline onto the base image as well as storing a copy of it in a separate layer. Normally, the image's own outline would be imperfect. So now I make the shadow and outline layers visible again - the shadow layer should be below, and the outline layer above, the statue layer - and save a copy to PNG as done for the monster file, this time with the name "statue.pm_chicken.png".

The finished statue of a chicken.
If I were altering a statue based on an existing monster/statue, as with the mugger (rogue plus oilskin) and snow ant, I would load the old statue tile as a layer and either edit that, or use it as an example. For the figurine tile, I would do the same. In the case of the mugger, a new statue had to be made, which is how I hit on the embossing method.
Existing monster tiles, even those more recent than the old Falcon's Eye tiles, don't always have statue and figurine versions; in the tiles conf, their statue/figurine lines point to other images (like the green slime tiles for a number of blobs) or are absent, so that the default statue or figurine tile is shown.
Some monsters can't become statues, because they are stoning-resistant, or already made of stone, or will change to something different if stoned, like any non-stone golems changing to a stone golem; they have statue tiles anyway, because if already made of stone they may still change into a "statue" when they die, and otherwise their statue may be randomly generated as part of a dungeon or wished for by a player. In the case of stone monsters, like the statue gargoyle, the statue tile is simply a renamed copy of the monster file. A good reason to always make a statue file, even if it's unlikely to show up in the game, is that it is used as a base for the figurine file.
As with the statue files, I copied a number of figurine tiles to desktop to get an idea of what a figurine should look like. They are half as big as the monster/statue tiles, clearly based on the statue tiles, but even shinier, and a shade of old gold that I can almost reproduce by making tiles that look bright golden, then decreasing saturation. They are also clearly delineated, both the figurine and the shadow, although the outline is recoloured and irregular. (On my first two tiles I recreated a one-pixel black outline, a bad idea, as it makes the figurine look less shiny and golden.) In other words, I can't simply shrink the bigger tile, as for objects and object icons; it has to be edited after shrinking.
From monster to statue to figurine.
The steps I've devised to make a figurine from a statue, are:
1. Make a copy of the statue layer. Copy and paste the outline on it, if you
didn't already do this for the monster and/or statue tile, then make the outline
layer invisible. Make the shadow layer invisible too. All you should see now is
the grey statue image.
2. Recolour the grey statue image to pale yellow by using the Colorize
function with Hue at 65; any other settings can stay the same. (The Colorize
function exists in the GIMP and Paint Shop Pro and possibly most graphics
programs out there.)
3. Make a new layer, the so-called "burn" layer. Flood-fill it with a colour
of RGB values 255, 112, 55. Set the layer mode to Burn. The pale yellow image
should now look a glowing orange-red.
4. Switch to the pale yellow image layer, with the burn layer still visible,
and alter its contrast with the Curves tool until it looks like molten gold,
possibly with some existing figurine graphics lined up on the desktop for
reference. When it looks good, either make a new layer out of the visible layers
(GIMP does this), copy visible and paste as new layer (GIMP does this too) or
duplicate both layers, make the originals invisible, and merge the duplicates.
Don't merge the originals, as you may want to change some detail in the base
image later (I sometimes do). Alternatively, don't merge anything at all until
step 5 (see also step 7). You now have a figurine, but it's twice as big as it
should be.
5. Make the following layers visible: figurine (or pale yellow and burn
layer if you didn't merge them) and shadow. Save your file: it is now ready to
be banished to the backup directory, so, to prevent anything happening to it,
save it again to a different name, so that you are now working on a "new"
file and the old file remains unchanged. A good filename choice would be its
final name, "figurine.pm_[monstername].png". GIMP will ask to export all layers
to write the PNG, but as long as the image is open for editing, the layers will
still be there. If you didn't merge the figurine and burn layer, do that now.
(Read step 7 first for a possible way to decrease saturation and make the image
less gaudy.) Next, delete all layers except figurine and shadow.
6. Shrink the two-layered image to half its size. If the graphics program
has several shrinking methods, choose the one that causes the least jaggies. Now
fashion both figurine and shadow into clearly outlined shapes with no
anti-aliasing; you may want to temporarily set the shadow's transparency to 0.
Do any final editing needed; once this image is saved to PNG and closed, you
can't go back.
7. Merge the layers, crop the image, save it again (it already has the right
name), and, to age the gold a little, decrease saturation by about -10 to -40.
If this darkens the highlights too much, lighten by whatever method works best
(curves tool, colour balance, brightness-contrast). Another way of decreasing
the saturation before merging the yellow and burn layers is to make the
burn layer transparent; depending on what the yellow layer is like, a
transparency of 65% to 75% may dull the shine enough.
8. Put it in the game directory, edit the tiles conf and test it in the
game. Congratulations! Your monster is now done!
The result can look ugly or, if the monster image was large enough not to become an indistinct blob, surprisingly pleasing:
Large dingo figurine. Would look good on mantelpiece.
Now, to run the chicken through this. Colorizing and adding the burn layer are easy enough.
Colorize; burn.
In the Curves dialogue, I just pull the line around until the image looks white-hot in the light areas, red-hot in the dark areas and shades of gold everywhere else.
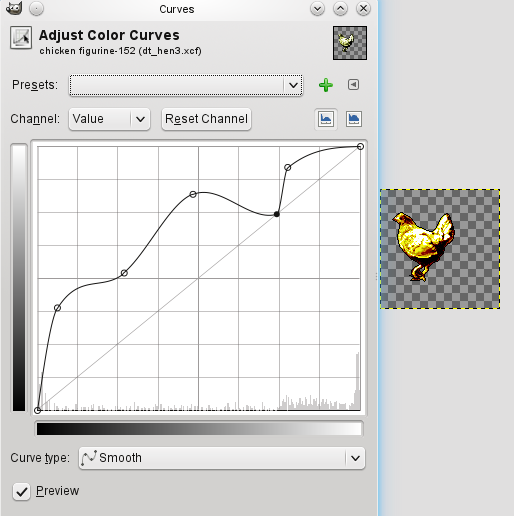
Extremely wiggly curve.
Now comes a difficult moment: shrinking the image. As the other two tiles need to be shrunk too, I shrink the layered image file by 75%, save, shrink again by 50% and save to "figurine.pm_chicken.png". The result is... oh, my.

Triple arrghh!
Instead of just the figurine, I will now have to clean up all three tiles, and the two larger ones will need their outline redone. Below, I will show how to clean up the figurine. I'm going to tackle the image first, then the shadow. Good thing they're on separate layers, right? And that the shadow layer can be made untransparent? Because the shadow should be uniformly transparent throughout. Which is impossible to achieve if this shadow is mottled with anti-aliasing pixels of various transparencies from the shrunk chicken.
Of the chicken figurine image, the outline will be the most transparent, so I'll add a new layer under the chicken, flood-fill it with the colour I'd like the outline to have, and add a new layer above the chicken where I chip away at its shape in a different colour until the shape looks right - just as when I isolated the original chicken image from its background. Then, these three layers are merged and the background is selected and deleted. (Remember that antialising should be OFF when selecting the background colour, or the outline is made partly transparent again, and the effort will be wasted.)

Cleaning up the image.
The chicken layer is then hidden, and the transparency of the shadow layer set to 100, so it becomes solid black. I add a white layer under the shadow layer to show up the still transparent outline pixels and, on the shadow layer, paint the pixels either black or white, depending on what makes the best shadow shape. That done, I merge the layers to a single new shadow layer, select the white background and delete it, and change the shadow layer transparency back to 50.
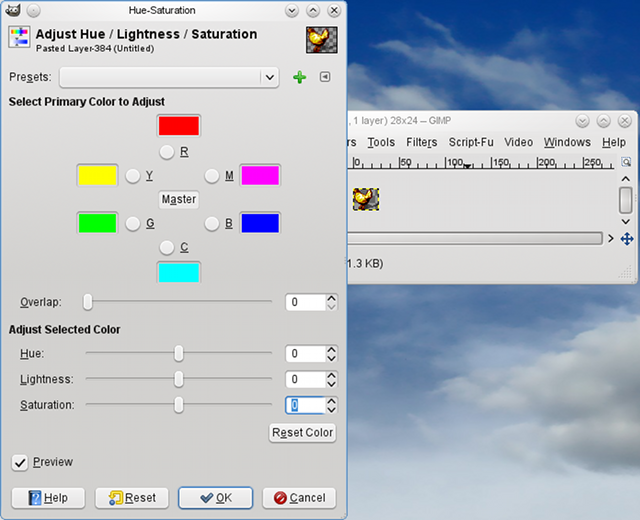
Now, the figurine tile should be finished, although it's bright enough to hurt your eyes. But while I was cleaning up the dragon tiles, I found a way to tone the bright figurines I'd been making down to the existing figurines: in the GIMP, go to Colors, Hue-Saturation, and decrease saturation with the slider or by typing a negative number in the box. The value "-20" generally works, although for the chicken I used "-40". Alternatively, a solution I only discovered after making a pile of figurines and then desaturating them: I should have reduced the transparency of the burn layer just after adding it, and before doing the rest of the processing. This dulls the shine without darkening the colours too much.
About to be desaturated.
For the other two tiles, since they were shrunk this late in the creation process, I make a new outline, superimpose it on the monster and statue images, crop any pixels outside it and make sure there are no transparent pixels inside it by putting a coloured layer under it and seeing if this affects any pixel's colour. The shadow is cleaned up in the same way as the figurine's shadow. Finally, the appropriate layers are saved to monster and statue tiles, and the layered image goes into a backup directory.
All tiles finished.
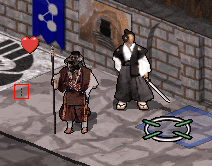
As mentioned under the first heading, tiles may be improperly cropped. As the tengu example shows, this is hardly noticeable, because the coordinates ensure that the tile looks properly centered. So why is it a problem? Because the pet highlight, the little heart over your doggy, kitty, horsy, or, in some rare cases, tengu, takes its coordinates from the top left corner of the tile, which for the tengu pet means that when it's engaging an enemy, it's hard to tell which is the friend and which is the foe.
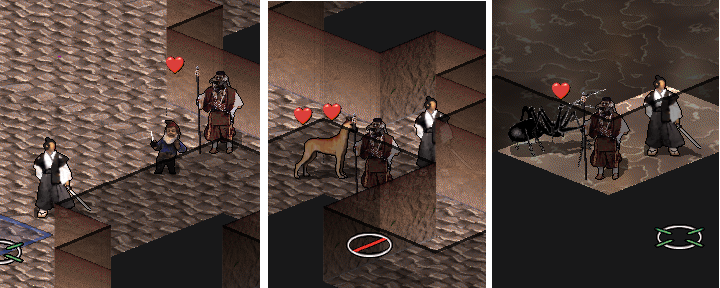
So, who is the tame one, the tengu or the gnome? Is the dog doubly tame?
And did the tengu transfer its pet status to the spider?
This is very simply solved by deleting the extra pixels that made the tile too large, re-cropping the tile, changing the coordinates in the tiles conf, and optionally submitting the cropped tile in the same manner as a new tile. I plan to submit fixed versions of all badly cropped tiles that currently exist in the game, making these instructions rather obsolete, but who knows, new monsters may be added to the game at some time, and some of their tiles may have cropping mishaps. The tile I've used in the example below is from the Absurd Tileset, and I aim to replace it one day, because the tile of its adult form doesn't fit very well in Vulture. There is a small bit of dotted line to the left which I've erased, after which I've autocropped the tile. Now, I have to know the original and new size of the tile. The Linux filemanager Dolphin conveniently tells me both when I copy the new tile over the old.
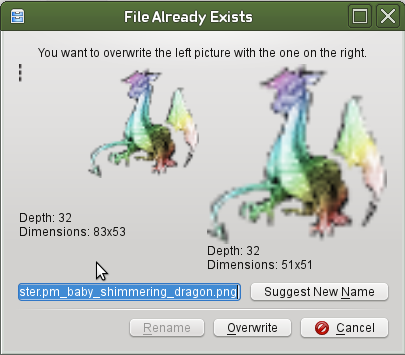
One baby shimmering dragon, uncropped and cropped.
If the old tile looked properly centered (which is not the case with the baby shimmering dragon, whose odd positioning first alerted me to the cropping problem) then the knowledge that the tile's dimensions have changed from 83x53 to 51x51 is enough to correct the tiles conf without needing to test the new coordinates. The X and Y coordinates are often negative, because they pull the tile sideways and upwards from a point 0,0 in the middle of the floor tile. So if the old coordinates were -100 and -60, the new coordinates will be the negatives of (100 - (83-51)) and (60 - (53-51)), making them -68 and -58.
If the tile has a statue and figurine version, these may also need to be cropped and have their coordinates adjusted in the tiles conf. In practice, the problem is restricted to statue tiles, presumably because figurine tiles are scaled down to half their size, which makes stray pixels disappear, before being re-cropped.
While exchanging thoughts on a weapon tile, I was alerted to something called Wizard Mode, not to be confused with Explore Mode. To quote from the mail:
In wizard mode, press ? to get a list of commands including the whole debug list...things like Ctrl-W to wish, Crtl-F to map the entire level, etc. You can even summon monsters to you, create altars and other hardware on the fly.
How do I activate Wizard Mode? Quoting again:
In DOS, the tag to use Wizard Mode is:
Type that after the command line to run it:
-D -u wizard
C:\Program Files\NetHack\nethack-343-win\NetHackW.exe" -D -u wizard
If in Windows, stick the "-D -u wizard" on the end of the Start In field on the Properties tab of a new icon. I have one for regular game play and one for testing when I am making images. Also there is a key combination that will reload the tiles file on the fly so you don't have to restart all the time to see changes. Press ALT + SHIFT + F11 in game to reload on the spot. That really helps when trying to get the X and Y positions set just right.
Under Linux, I expected the command to be:
vulture-slashem -D -u wizard
Which didn't work for me since my username was not "wizard", and I just got a randomly created character called "wizard". As compensation, my character was created in Explore Mode, with a wishing wand.
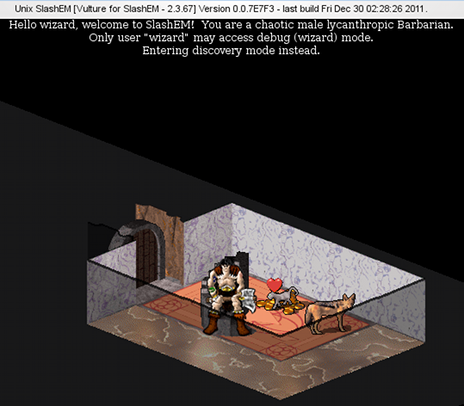
Normally I start a game with an icon in the KDE/Gnome menu, but for wizard mode I would have to start from the console. So here's a screencap of the console output. First, I stupidly used "vulture" before realizing I should have used "vulture-slashem", which got me my chaotic male lycanthropic Barbarian. Next, I created a user "wizard" so I could "su wizard" and try again. This time the result was error messages.
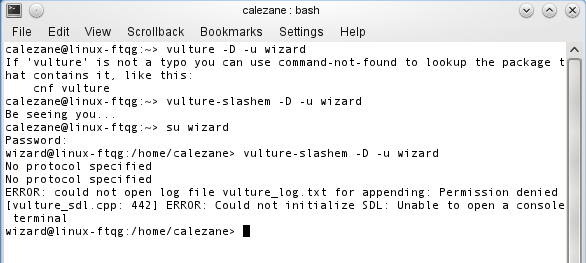
So I deleted user "wizard". After some surfing, I found out how to make it work. First, I logged in as root and created user "wizard" again, then logged out and back in as user "wizard"; no "su wizard" from another account this time. Then, since the "-u wizard" was now superfluous, I used:
vulture-slashem -D
Success!
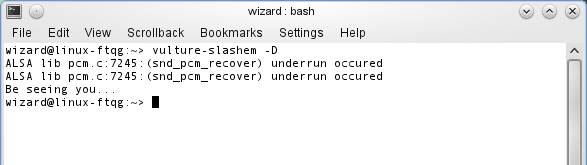
Ignore the underruns. It works!
Addendum: I stopped using wizard mode when I found the game would suddenly quit for no reason - and Vulture's didn't seem to include the Nethack recovery utility - and there was this problem when the keyboard seemed to hang, interminably passing the same keypress to a flickering game screen until the game process was killed from a terminal. The reason for these two hitches has been found, and yes, there is a recovery utility.
First, the repeated keypress: this was the fault of SCIM, a utility to enter foreign characters that I generally hide whenever it pops up. In this case, it was hidden, but stuck in a loop where it was still passing its last bit of input to the game. I restarted it and sent it to the system tray; problem solved. In subsequent games, the SCIM input dialogue didn't even appear.
Secondly, this may be a bug in the version I'm using (2.3.67-1) but of the various buttons in the bottom right corner of the screen, right-clicking the "Extended commands" button will make the game quit instantly with a segmentation fault. Since these are the commands that require a "meta key", I was worried about this until finding out that on my keyboard, the meta key is simply the Alt key.
Finally, the syntax to recover a crashed game is vulture-slashem-recover [-d directory] base1 [base2 etc.] where "directory" is the place where the game-in-progress files are, "base1", in this case, "500wizard.0" and base2 and onwards, the files "500wizard.1", "500wizard.2" andsoforth. Two things I've discovered: firstly, probably due to security settings, I must use the "-d" flag and specify the directory even if I'm currently in it, and secondly, including all the game files from 500wizard.0 to 500wizard.65 won't work, only the first game file is processed and any progress after that is lost, so I just use "500wizard". Below is the screen output of the recovery attempt:
wizard@linux-ftqg:/var/games/vulture-slashem> vulture-slashem-recover
Usage: vulture-slashem-recover [ -d directory ] base1 [ base2 ... ]
wizard@linux-ftqg:/var/games/vulture-slashem> ls
500wizard.0  500wizard.2  500wizard.4  500wizard.63  500wizard.65  bones       bonM0.5.gz  logfile   perm    save
500wizard.1  500wizard.3  500wizard.5  500wizard.64  bonD0.6.gz    bonM0.3.gz  bonM0.T.gz  paniclog  record  vultures_log.txt
wizard@linux-ftqg:/var/games/vulture-slashem> vulture-slashem-recover 500wizard
Cannot open level 0 for 500wizard.
wizard@linux-ftqg:/var/games/vulture-slashem> vulture-slashem-recover ./500wizard
Cannot open level 0 for ./500wizard.
wizard@linux-ftqg:/var/games/vulture-slashem> vulture-slashem-recover -d /var/games/vulture-slashem 500wizard
recovered "500wizard" to save/500wizard
wizard@linux-ftqg:/var/games/vulture-slashem>
