This how-I assumes passing familiarity with Linux (especially the notion of desktop environments and user rights), KiSS, and layered images.
It is perfectly simple to cut up an image into puzzle pieces to drag around
and fit together on a computer screen. Image processing programs may even come
with a jigsaw overlay to do just that. Two jigsaw puzzle games for Linux simply
let you import the image, slice it up and present it as a puzzle to be loaded.
And KiSS viewers can also display jigsaw
puzzle pieces. Or if you don't want to make your own, but are happy to play
puzzles online, there are sites that cater to your jigsaw pleasures for free,
bearing in mind that if you're getting a product for free, then you are the
product. See the links at the bottom of the page for the big
sites that will turn up in any Google search.
To make puzzles, I collected a number of images from the internet, and made
one myself. A word of caution: if you plan to distribute the puzzles, you
must ask for permission to use other people's images, which especially
abovementioned puzzle sites are not likely to grant, because they want their
puzzles played online so they can show ads, harvest your data or whatever their
business model is. But as long as it stays private and on your computer,
anything is game: photos posted on Twitter, catalogue pictures, desktop images,
cartoons, hilarious or poignant panels from webcomics, or your own snapshots.
Most of my image collection are photos posted on forums, then there's a few wiki
images (including an ancient, decorated terracotta bathtub), some elegant
interiors from property sites, and choice photos from a gardening newsletter.
Palapeli is a Linux puzzle game written for KDE. To those not
acquainted with Linux, there are two main desktop environments (graphical user
interfaces comparable to the Windows desktop, and extras that integrate
seamlessly into those interfaces) called Gnome and KDE. In the past, Gnome stood
for simplicity, and KDE was the bloated blingy one. Gnome has since branched
into Gnome 3, Unity, Mate and Cinnamon, while KDE has kept its name, but changed
dramatically after version 3, which has been forked to Trinity. There are a
number of other desktop environments, but, Gnome and KDE being the main players,
Linux software can be written with one of these two in mind. The issue being
that these desktops use different software libraries, and installing a KDE
program on Gnome - or, in my case, Cinnamon - meant installing a good part of
the KDE core, too. It was worth it, though.
Palapeli presents a background with puzzle pieces and, if you click on the
Preview button at the top right, a preview window with a small version of the
image (enlarged on mouseover), usually to the left of the puzzle screen; I
dragged the preview window over the puzzle screen for a more compact screenshot.
Palapeli can be configured to pick a different background from
/usr/share/palapeli/backgrounds (where you can copy a 512x512 pixel
background of your own, using sudo; restart Palapeli to have it show up, but
this can cause problems, see final note) and to show the puzzle pieces flat (for
older processors) or with a bevel, for that authentic 3D puzzle piece look. A
selected piece will be outlined by a blue glow; this colour can be altered in
Palapeli's settings (Menu, Settings, Configure Palapeli). When two fitting
pieces are close enough - this distance can also be adjusted in the settings -
they snap together. The pieces are shrunk in size, because the window needs to
have enough room for both the growing assembled puzzle, and the unplaced pieces
around it; once the last piece is in place, the image swells to its full size.
Adding a new puzzle to Palapeli is simple. If you're in the middle of a
puzzle, click "Back to collection" (top right) to go to the main screen. (Your
puzzle progress will be saved.) In the main screen, click on "Create puzzle"
(top left, right net to "Delete puzzle").
A dialog window shows up where you can fill in (or browse for) the image file
name (it will be copied, the original will stay, unaltered, where it is), give
the puzzle a title, add a comment to be displayed in italics under the title,
and attribute the image to an author. This last field must be filled, or the
Next button remains greyed out. I don't know the author for most pics, so I
added either a site name or "from internet", which appeared in the puzzle
selection screen as a clunky "by from internet". Be careful: I haven't found how
to correct any typos in these fields. If a puzzle's title ends up misspelled, I
have to delete the puzzle and import the image again.
Next, the chosen image can be sliced into pieces in a number of styles. For
the most normal appearance, in keeping with Palapeli's default puzzle
collection, choose "Rectangular grid". Choosing "Classic jigsaw pieces" makes
the pieces come out with shallow ear-like plugs, rather than the properly
interlocking tear-shaped ones.
Finally, set the details for the chosen style, and then click on the Finish
button. I leave these at their defaults, except for the number of pieces
(default 30), which I increase to anything between 50 and 100, because when it
comes to the real thing, I prefer puzzles of anything between 400 and 2000
pieces, the kind that take weeks to finish. Sadly, a computer screen doesn't
offer that kind of playing space, and 100 pieces makes for a cramped playfield
with teensy pieces all over the place, hard to keep track of even when the
window is maximized. Obviously, smaller image files should have less pieces
while bigger images can have more. Setting 90 pieces is good for a large scene;
the total may be rounded down to 88 or 84 pieces depending one how the image is
sliced. Feel free to experiment; if the puzzle turns out awful, it can be
deleted from the collection with the "Delete Puzzle" button (top left), an
action which, as the game reminds, can't be undone, but all you have to do to
get the puzzle back is create a new puzzle using the same image file and
settings.
The toggle box "Dump grid image" is usually left unchecked, but I was curious
where this file is dumped and whether it could be used as a template. It was
dumped in my home directory as the black and white jigsaw puzzle line file
"goldberg-slicer-dump.png", and I kept it for later use.
As said, the Rectangular grid option makes "normal" jigsaw puzzles, the
Classic option makes puzzle pieces with ear-like plugs, the Rectangular pieces
option makes squares (for the masochists; really, this is the hardest kind) and
the Cairo, Hexagonal and Rotrex make for some crazyweird puzzle pieces! I chose
one of them to see how it looked, but can't get over the disproportionate sizes,
some pieces being huge, and others mere slivers.
Having made a number of puzzles this way, I found that they had not been
added to /usr/share/palapeli/collection, where the default puzzles are.
That's understandable, as only a user with root privileges can write to
/usr and its subdirectories. I expected the files to be added to my home
directory under the catch-all hidden directory ~/.local. Here I did find
a share/palapeli/collection subdirectory, only the created puzzles didn't
have their titles for a name, but alphanumerical jumbles.
I thought I could use "Export to file", which exports a self-created puzzle
to a file with the puzzle title as name and ".puzzle" as extension (eg. "Ancient
Bathtub.puzzle"), to the home directory. (The file manager Nemo offers to open
files with this extension in Palapeli, but that only works if the file is in
~/.local/share/palapeli/collection, and even then it just opens the
Palapeli collection screen, not the specific puzzle.) Then I would delete the
messily named puzzle, and import the exported and properly named file, or just
copy it directly into ~/.local/share/palapeli/collection. Importing it
gave it a jumbled name again, while copying it to
~/.local/share/palapeli/collection meant that it didn't show up in the
Palapeli collection screen. Clearly, exporting the files serves to have a backup
and to exchange puzzles with others, and I'll just have to live with the local
funny filenames.
Why not move them straight to /usr/share/palapeli/collection? Because,
apart from the fact that I can't directly write into that directory, it doesn't
contain puzzle files. It contains five images and five configuraton files which
make puzzles out of these images when Palapeli is installed, and put these
puzzles in ~/.local/share/palapeli/collection. The configuration files
contain translations: a configuration for a horse image might come with the
titles Horse, Pferd, Cheval, Caballo, Kon etc. so that, on being installed,
Palapeli can use the system's language setting for the puzzle title and
filename. It's an elegant way to deal with the fact that not every Linux user
speaks the same language.
Final note: Palapeli apparently has an internal database, and version 2.1, at
least, quits with a segmentation fault if anything is added or removed from any
of its directories, by, for instance, creating a new puzzle. Maybe it's not
happy running in Cinnamon? To fix this, just keep restarting Palapeli until it
stops crashing. On adding non-puzzle files: I added an extra background
(experimental and ugly) to /usr/share/palapeli/backgrounds using sudo,
but the .save files that are created for the puzzles include, and export,
settings like what background the puzzle has, and if I export a puzzle with this
extra background and import it on another computer where that background is
missing, the game might crash. So I deleted that extra background, and would
advise against adding any.
xjig is a puzzle game like Palapeli, and likewise installed from Linux
Mint's repositories. Its puzzle pieces are bevelled by default, its window title
is "xpuzzle", and a timer goes "boop" when the puzzle is completed. Where
Palapeli's puzzle pieces are static, xjig's pieces revolve as I drag them
(because I hold down the left mouse button; if I drag with the right mouse
button, the piece stays still), and may only fit after being flipped. The
bevelling is not very smooth, and when two pieces connect, they blend into a
seamless whole. Rather than slicing up an image, xjig calculates puzzle piece
shape, so pieces can have inverted, negative parts that become visible again
when they fit onto other pieces. It's hard to explain, you have to see it for
yourself.
The difference between xjig and Palapeli is that while both leave the source
image file untouched, Palapeli makes an actual puzzle file that can be stored,
while xjig, using a filename and other options, creates a puzzle on the fly that
exists only in memory. The only way to "make" a puzzle that looks the same every
time is to build a "menu", like the old batch menus that could be built under
MS-DOS, where each entry runs a (line from a) script that reads "xjig -file
filename -[options]". An interesting project, but outside the scope of this
how-i.
As the x at the start of the name implies, xjig goes back to a time before
Gnome and KDE, and though under Linux Mint Debian Edition 4 it can be started
from the Games menu (where it always comes up with he same graphic of Tina
Turner on a motorbike), it should be called from the command line, from where it
will present any picture as a puzzle, no preparation needed. Typing "xjig" in
the console does the same. Typing "xjig -file doggy.jpg" should, if doggy.jpg
exists, slice it up for me in a jigsaw puzzle of, by default, 24 pieces.
Typing "xjig --help" directly into a terminal displays the following:
Typing
Being so old, xjig has its own man page (type: "man xjig"). This page states:
And:
Here "double-sided" means that a puzzle piece may be mirrored, not that I can
combine two images into one puzzle. An option prevents this mirroring:
So a six-piece non-flippable puzzle requires typing the following at the
prompt:
That was fun, but I'd like to play a puzzle game without first having to look
up where the picture file is, then what size I should display it at, then how
many pieces it should have both vertically and horizontally, and then type all
this into a terminal. There is another menu option "xjig (Random Picture)", but
that option doesn't work. The underlying executable is xjig-random, and its very
short manpage reads:
Typing "xjig-random --help" in a terminal causes the following to be spat out
(formatted a bit for legibility):
So I Google "File::HomeDir module". (Well... I DuckDuckGo it.) It is, as
expected, a perl module to find a user's home directory on any platform.
Searching for the same term in Synaptic Package Manager, I find and install
"libfile-homedir-perl". Now the menu entry for xjig-random works, and serves me
up "tina.gif", which is the only image file in /usr/share/games/xjig.
Which is of course owned by user "root", but my file manager, Nemo version
4.8.6, has the option "Open as Root", with which I can open this directory and
drag any file into it.
Making a screen capture of the current wallpaper, and using GIMP to carve a
nice swirly rectangle out of that ("Select", "Crop to selection", "Export as",
"swirlywallpapersnippet.jpg") gives me an image to drag into the xjig directory.
It is not moved but only copied into the xjig directory, and the copy is still
owned by my username, instead of "root". In this directory window, opened as
root, I right-click on the copy and set its permissions to match those of
"tina.gif"; then I close the window. From now on, random-xjig presents me with a
puzzle of either one picture or the other, although I can't set any options
(like number of puzzle pieces) for it.
I'm not satisfied; there has to be an easier way to make a puzzle. There are
two GUI programs for xjig - see links - xJigsaw which now
works with xpuz, a newer fork of xjig, and xjiggui for xjig itself, both bundled
with the puzzle program they support. As xpuz can be installed alongside xjig
without conflicts, I download xjigsaw_MI19_64.tar.gzv, a 64-bit binary
compiled on Linux Mint 19, from the xJigsaw Help page. The archive is a
directory "xjigsaw" in which I find a readme file, a picture of balloons and a
binary called "xjigsaw". As the xJigsaw Help page says you can just put the
binary anywhere and run it from there, I extract the directory to my home
directory, open a terminal, and type:
Nothing happens. I consult the readme file and check for missing
dependencies; there are none. Then I remember that sometimes an executable has
to be told to look for itself in the current directory, represented by a dot:
A window opens. Two big buttons on the left, "Choose Image" (which looks for
files in, by default, /home/username/Pictures) and "Make Jigsaw" let me
quickly pick an image (I choose my swirly snippet) to generate a puzzle out of,
while to the right, the first tab, "Options", lets me set size and number of
puzzle pieces, and choose from a range of puzzle piece styles. (If the puzzle
width is deemed too narrow, the fill-in field turns pinkish, and I can't choose
a puzzle piece style until I enter a bigger width.) Under the second tab, "Extra
Options", I tick "Fix to 90 degree" so each piece rotates per 90 degrees instead
of spinning round madly, or, to get the Palapeli experience of simple dragging,
"No rotation"; "Two sided", which causes pieces to be possibly flipped as well
as rotated, is unticked by default. "Help" explains all the options, while
"Tools" lets me create a standalone executable puzzle (how, is explained under
the Help tab), change the interface language, and add an xJigsaw menu item to
the menu under Games. If I want more control, xJigsaw has created a hidden
directory ".xjigsaw" in my home directory, where I can find and edit the file
"xjigsaw.ini".
Unlike xjig, xpuz does accept PNG files. After choosing an image and options,
I click the big button "Make Jigsaw", and the puzzle creation screen disappears
to make way for a big puzzle board, showing the total number of pieces followed
by the same timer and keyboard shortcuts in its title bat as xjig-random, and a
preview window with a button "Start New Jigsaw", which destroys the current
puzzle board and brings the puzzle creation screen back up. By default, all edge
pieces are sorted in a column on the puzzle board, to the right of the other
puzzle pieces. The only thing missing is the "boop" sound when a puzzle is
finished, but instead I get a "tingg!" when I start a new jigsaw.
If I want to store puzzles as files, or manage without xJigsaw altogether, I
set the image and options in the puzzle creation screen, but instead of clicking
on the big "Make Jigsaw" button, I go to the tab "Tools" and click on "Create an
executable puzzle", after ticking "no preview" if I don't want a preview window
for the puzzle. This opens a Save File dialog, default filename "puzzle.xpuz",
default directory "/home/username", to save a file of, in my case, 1.5MB -
comparable to a Palapeli puzzle file of the same dimensions - that starts the
puzzle when I click on it. This is perfect - I don't need xjig any more.
But curiosity killed the cat, and I want to try out xjiggui, even if the new
xjig it comes with might conflict with the old version already installed. I want
to download it from SourceForge, but as it is a deb file that actually requires
installing, FireFox helpfully suggests I open it with the appropriate installer.
The installation screen tells me what's in the package, and a quick tap
installs it.
I can't find xjiggui in the Games submenu, because it's called itself "Jigsaw
Puzzle" under a new submenu: "Other". Typing "xjiggui" in a terminal also works.
The installation screen didn't lie: the game screen really is adorably simple,
but I go for the Advanced Settings to change most of the settings I found so
annoying about xjig version 2.4. Overall, xjiggui offers the same settings as
xJigsaw, but instead of an .ini file to edit, the Advanced Options screen has
a button "Show xjig options" which opens a text editor that shows what would be
the output of typing "xjig --help" for this new version in a terminal. Its
options are a bit wider than those of the older version. Interestingly, pressing
"S" would "Save a puzzle (for future use)".
After choosing an image, it is displayed with a grid overlay to give an idea
of how the image will be sliced up. The choice of puzzle piece styles equals
that of xJigsaw. The big Go button opens the familiar xjig puzzle screen, while
the small Stop button on the preview window closes it again. The initially empty
rectangle to the left of the Go button displays an image collection that you can
add to or delete from; if any image is still in the collection, but deleted from
disk, the image after it will be loaded with a false warning that its format is
not supported. There is a button to add player names, to make the game
"multiplayer", ie. let people play under different names so they can keep their
scores separate. Again, the "boop" is missing, but otherwise, it's an enormous
improvement on the old xjig.
What happened to the old xjig, though? Its menu item no longer works,
although the xjig-random menu item does. If I type "xjig" in the terminal, it no
longer grabs the first file from its own directory, but produces the same output
as if I'd typed "xjig --help". It is version 2.6, so the old version is well and
truly overwritten. This means that if I supply it with a filename, I can test
how it saves a puzzle. (The S key does nothing on the xjiggui puzzle board. I
tried.) For a start, I discover xjig wants absolute pathnames, not "~/".
The puzzle board appears, and I press Shift-s. The puzzle board title bar
briefly displays "Game Saved (Debug Only)" but I can't find any saved puzzle
file. Oh well. I assume saving was planned but never implemented.
I should edit the Games submenu to get rid of the xjig entry or give it a
filename as parameter, but don't know how; that will be for a different how-i.
For now, I will move to the next step: making a puzzle out of an image from
scratch.
Layered image files are a feature of all the big graphics editors, who
typically save them in their own format. Paint Shop Pro, before it was acquired
by Corel (and possibly after, I only used it up to version 7) has the PSP
format. That staple of graphical designers, Adobe Photoshop, has PSD. GIMP,
multiplatform but the pride of Linux users, has XCF. The principle is the same
in all cases: an image file has layers, each layer contains part of the image,
and the layers can be moved around in the graphics editor, which functions as
viewer. It's a bit clunky to have to load up behemoths like Photoshop or GIMP
for one small game, with no features like puzzle pieces snapping together or a
main screen presenting a choice of puzzle titles, but you can import from any
file format and use any colour depth you like. Paint Shop Pro 7 even came with a
filter that superimposed jigsaw lines on an image, which could then, using these
lines, be manually chopped up into pieces. That filter is now on an old laptop
in a box somewhere, so I'll use the "goldberg-slicer-dump.png" that Palapeli provided.
As an aside, the highest possible colour depth of layered images may be why,
in a time when KiSS viewers supported palettes of 16 or rarely 256 colours,
artists made "pseudo-KiSS" sets that were essentially PSD files where each "cel"
was a layer. Of course, nowadays all monitors and graphics cards are truecolour,
the dithering days of limited colour depth forgotten.
Using GIMP (version 2.8, but any version that supports layers should work) I
will make a pseudo-puzzle game. First, I open "goldberg-slicer-dump.png" and
instantly save this as "PseudoPuzzle.XCF", after which the PNG file can be
deleted or left for later, if I'm making more puzzles. Next, I'll make a new
layer, name it "Example" and, on that layer, lazily create "modern art" (a
doodle run through multiple filters). That layer will be the base image. It has
the same size as the puzzle grid, so I won't have to mess up that grid by
resizing it.
I then drag the puzzle grid layer on top. The puzzle grid layer is white and
black, but I can make the white parts transparent by adding a mask to the layer.
I duplicate the layer, which can be done by choosing "Layer" from the menu
(making sure the right layer is active!) and then "Duplicate layer"; this copied
layer, I drag below the base image to get it out of sight; it will be used later
to help slice the image into pieces. Going back to the puzzle grid layer, I
choose "Layer" from the menu, then "Add mask to layer".
In the dialog that follows, I choose "Greyscale copy of layer" as a basis for
the mask, and "Invert mask" because normally the black parts of a mask are
see-through, but it's the white parts of the puzzle grid that should disappear,
so the mask, in being made, also becomes a negative version of itself.
Now I can see the grid overlying the base image. This is a good moment to
save the XCF file, so I can reload it if anything goes wrong.
The duplicated puzzle grid layer I made earlier will now be dragged to the
top of the other layers, obscuring the base image, so I can flood-fill every
puzzle piece with a colour. It can be alternating colours or a different colour
for each piece, so long as no two same-coloured pieces touch. And this should be
done in a way that will remove the need for later editing, because the puzzle
grid is anti-aliased (has partly transparent edge pixels to make edges look
smoother) with black lines in the middle, and I don't want that, I just want
solid interlocking blocks of colour. So, for each puzzle piece, I choose the
Magic Wand, with NO "Antialiasing" or "Feather edges", BUT with "Select
transparent areas" and Threshold at 15.
I then click on a puzzle piece, and in the menu, choose "Select", then
"Grow", then set enlargement at 2 pixels. This takes a bite out of the grey and
black areas of the grid that I would otherwise have to painstakingly paint out
by hand. I delete the selection, then flood-fill it with a chosen colour. In
fact, if that chosen colour is already selected as background colour, and the
layer doesn't have transparency, the deleted area will automatically take on
that colour, no floodfill required. A layer's transparency can be set somewhere,
but, to keep it simple, if the deleted part becomes transparent, it must be
flood-filled, else it becomes the background colour.
Next piece, same procedure. Enlarging the selection will now steal a bit of
the edge of the previous piece, but that is not a problem. If you drag the
transparent grid on top of the pieces, they'll still look fine.
I've done these two pieces separately, but for the rest, I'll simply select
all pieces I want in that colour - for the second and subsequent selections, I
hold down the Shift key when clicking - grow all these selections in one step,
and delete the selections, which should colour the selected pieces. If it
doesn't, set Flood Fill (or Bucket Fill as GIMP calls it) to "Fill whole
selection" instead of "Fill similar colours", and one flood fill should take
care of the lot of them. The main thing is that no two pieces of the same colour
should touch, so four colours, and therefore four flood-fill actions, should be
enough. There are various ways to tackle this, but the point is to end up with
something like this:
When this layer is finished, I'll call it "Slicer", and make a duplicate of
Example, named "Slice 1". This duplicate will be sliced into pieces. The masked
puzzle grid layer can be deleted, unless you want to keep it as a background.
When singling out puzzle pieces, it really matters which layer is active. If
you've selected part of the image, and click on "Delete", and the selected part
doesn't disappear, you can bet on it that the layer you see is not the active
one, and you're deleting part of a different layer. GIMP has an Undo function,
but I'd just as soon not risk making that mistake in the first place. So, first
I make Slicer active by clicking on its name in the layer list. Since Slicer has
four colours, I'll select all pieces in the same colour. Then, with that
selection still in place, I make "Slice 1" active, and choose "Cut"; all
selected pieces are punched out, as it were. Then I go to "Edit" and "Paste as",
where I pick "New layer", and get a layer of one-fourth of the puzzle's pieces,
all separate from each other, which I name "Slice 2". I repeat this for two
other colours to create the layers "Slice 3" and "Slice 4"; the last colour can
be skipped, as it corresponds to the pieces remaining on "Slice 1".
Due to the automatic cropping that happens when pasting a selection as a
layer, you may notice a yellow dotted line that indicates layer size as opposed
to image size. If this bothers you, get rid of this line with "Layer", "Layer to
Image Size". (The pieces will be individually cropped later to save space, so
that dotted line will become unavoidable.)
Next, the pieces in these four layers each need to be on their own layer. Why
make these four layers of puzzle pieces anyway? Because on these layers, the
pieces are separate from each other, and can be easily deleted or have a filter
applied without affecting the other pieces. It makes editing so much simpler.
If you're as paranoid as me, save the file at this point. Then consider two
things: layer names, and puzzle piece embellishment. As every piece is a layer,
it would be confusing to have them all named "Pasted Layer" followed by a
number. I will be calling them only by numbers; to be exact, by their column
number (horizontal position) and row number (vertical position). So the top left
piece will be "1-1" and the bottom right piece will be "9-6".
Next, the pieces can be kept as they are, or given a black outline, or a more
threedimensional appearance using the "Add bevel filter" under "Filters",
"Decor". Now that the pieces are still collected on four layers instead of on 54
separate ones, whatever editing you want to do on them only has to be applied
four times.
To add a black outline, I duplicate each Slice, and call the copy "Slice [n]
outline". I go to that new layer (ie. make that layer active), and, with the
Magic Wand, but NO antialiasing or feathering, select the space between the
pieces. I then grow this selection by 1 pixel, and fill the selection with black
(or any colour not found in the pieces themselves). This bathes the pieces in
the outline colour, which covers not only the space between them, but also their
outer edge to a depth of 1 pixel. Then, I go to the original Slice layer, select
the empty space between the pieces again, go back to the Slice outline layer,
and delete the selection, leaving only the pieces with one-pixel-thick outlines.
To be repeated once for each Slice.
To add a bevel, I duplicate each Slice and call the copy "Slice [n] Bevel",
go to the Slice Bevel layer, select the empty space between the pieces (again,
with NO antialiasing or feathering), invert the selection so that now all pieces
are selected, and use the "Bevel" filter on them. The filter's default setting
works very well, although bevelling the pieces does bring out their
non-antialiased and therefore jagged edges. Again, to be repeated once for each
Slice.
In GIMP 2.8, the filter dialogue has "Work on copy" ticked by default; this
takes the result and puts it in a new file, suddenly switching the view away
from the file you're working on. This option was new to me, and the first time
it happened I panicked, thinking I'd somehow lost all my work. Now I untick that
box, or, if I forget, use Ctrl-X on that new file and paste its content back
into the main file as a new layer.
There are different ways to slice up the Slice levels into separate pieces.
Two that I can think of: either duplicate each Slice fourteen times and from
each of the sub-Slices, delete all but one puzzle piece; or - a safer way -
select each puzzle piece and make it a new layer. As every Slice contains 12 to
15 pieces, it's a lot of dull work either way, and care must be taken to make
sure the right layer is active when cutting, pasting or deleting, and whatever
the selection method, feathering and antialiasing must be off.
Here's how I did it: first I went to Slice 4, because it has the puzzle piece
in the top left corner, in row 1 and column 1 of the puzzle, so the puzzle
piece's layer name will be 1-1. With the rectangle selection tool, I drew a
rectangle around this piece, that doesn't touch the other pieces. For neatness'
sake, although it's not necessary, I then clicked on the empty space within the
selection with the Magic Wand while holding down the Ctrl key, so that the
selection marquee now hugged the piece's outline. Next, I cut the piece (Ctrl-X)
and chose "Edit", "Paste as", "New Layer In Place". (In either an older GIMP
version or Paint Shop Pro, I remember using "Promote Selection to Layer".) I
renamed the new layer "1-1". Done! Next piece is in first row, third column, and
its layer will be "1-3", else all steps are the same. Also, I am now still on
layer 1-1, and must return to Slice 4 to select the next piece. In the course of
cutting and pasting, I forgot this several times, wondering why my selection was
empty.
Note: pasting the puzzle piece automatically crops the layer size to a box
enclosing that puzzle piece, showing a yellow dotted line around the piece when
its layer is active. To get rid of that dotted line, I chose "Layer", "Layer to
Image Size", but doing that for every puzzle piece swelled the filesize to over
100Mb, as all that empty layer space still padded the file. Resizing the layers
back to piece size shrunk the file to around 15Mb.
For the last piece left on the Slice layer, of course, don't cut and paste:
just rename the Slice layer to the right numbers.
If you're a completist like me, you may have each piece in flat, outlined,
and bevelled form. You can separate these into three puzzle files by copying the
file twice and, from each file, deleting all but the flat, outlined or bevelled
pieces. Or, if you're using the shiny new GIMP that has the layer group feature,
sort the layers into three groups: turning off a group makes all layers in that
group invisible. I dragged all layers into their numerical order per group,
which allowed me to check if I'd accidentally maimed any pieces with all this
cutting and pasting, which of course I had, so I had to re-copy and paste them
out of the Example layer. Then, I named all puzzle piece layers after their
piece position and style, so "1-1o" for the first outlined piece and "1-1b" for
the first bevelled piece.
The puzzle is now almost done, but needs some refinements. Firstly, at
1000x750, it's a bit big. Fortunately, GIMP can display it at a reduced size.
Secondly, the playfield is only as large as the puzzle itself. No problem: I can
enlarge the image by choosing "Image", "Canvas size", and setting the new height
and width to 200 pixels larger than the puzzle size. The Center button puts the
picture where I want it, the "Resize layers" dropdown is set to "None" so I
don't have to crop all layers manually later, and the "Fill with" dropdown is
set to "Transparency" to prevent any layers having an unwanted border added,
although any imported image layer, having no transparency, would get a border in
the background colour, which in this case is white.
I would like to create an actual playfield, though. A textured green
background with a lighter rectangle in the middle, on which is projected a
ghostly version of the puzzle image. I create a new layer, flood-fill it with a
pattern, duplicate the Example layer, pull the duplicate layer up above the
flood-filled pattern layer, reduce the duplicate's layer opacity to make it look
like the ghost of the original image, and merge down this duplicate layer to the
playfield layer to combine them into a playfield with an example in the middle.
This done, I go through all layers, delete any I don't want (like the original
puzzle grid layer, if it's still there), and crop any that have extra
transparent space with "Image", "Crop to Content" to bring filesize down to a
minimum. Finally, I drag the pieces around the edges of the playfield. This is
what it looks like:
The puzzle pieces are dragged with the Move Tool. If you want to "save your
progress" with this puzzle, just save the file. If you want a fresh start every
time you open the puzzle, just don't save. Want to try it? The pseudo-puzzle
(15.3MB, XCF) can be downloaded here.
This format has definite drawbacks. The filesize is big, due to the many
layers. Pieces have a yellow dotted box appear around them when selected (when
their layer is made active) and disappear under each other because they are
layered. Every dragging motion is added to the Undo History, gobbling memory. If
you're not careful, you'll pick up and drag the background. Also the playfield
is too small and cramped, because I underestimated how much size the scattered
pieces would take up.
KiSS is short for Kisekae Set System, where Kisekae stands for
"kisekae ningyou", which is Japanese for the kind of paper dolls that can have
cutout "clothes" affixed to them. As with jigsaw puzzles, this placing of bits
of paper or cardboard is easily recreated in software. Simple KiSS viewers load
a bunch of images and a configuration file, which ties the images together into
something like the layered image file format above. The more advanced FKiSS
("French KiSS", a pun that stands for added functionality) viewers interpret
commands in the configuration file, which can be used to make pieces snap
together. Note that although it's possible to make simple games using FKiSS,
this is not what it was designed for; early FKiSS versions do not, for instance,
recognize variables. But dragging images around is what both jigsaw puzzles and
paper dolls are all about.
KiSS sets are like layered images, where every layer is a "cel" and all
layers are tied together by the "cnf" or configuration file. (See the KiSS page for more information.) A cel file is
converted from a regular image file: CKiSS (short for Cherry KiSS) cels contain
their own colour information and can be of any colour depth, while normal cels
are linked to a palette, the "kcf" (KiSS Colour File), which has 16 or 256
colours. To keep it easy, the first example of a KiSS puzzle will use the CKiSS
format, and its cels will be the layers from the pseudo-puzzle that I just
laboriously constructed.
Since the image is really too big - I would like the resulting puzzle to be
playable under smaller resolutions, too - I'll first scale the XCF to 40% of its
size. This will make all the puzzle pieces anti-aliased, which I don't want. So
I separately scale back the Slicer layer, whose puzzle pieces are a solid
colour, with Interpolation: none. The result is uglier, but still of solid
colour, with no half-transparent pixels. And now I will have to slice the base
image again! And re-outline the pieces! And re-bevel them! Aaagh!
(I didn't completely reslice them, as the puzzle pieces were fine, only their
edges needed work, and the bevelling and outlining would not have worked as well
at this size. So I made both the Example layer and the pieces visible, and, for
each piece, I selected its template from the non-antialiased Slicer layer, went
to the piece layer, chose "Edit", "Copy Visible" (copying both the puzzle piece
and its part of the Example layer, to get rid of see-through edge pixels), and
then "Edit", "Paste into Selection in Place", followed by "Layer", "Anchor
Layer" to merge the floating selection with the piece layer; then I inverted the
selection and pressed Delete to trim off any pixels smudged beyond the piece's
outline. I did this 54 times per set of pieces.)
A long time ago, there was a Photoshop plugin for making cels from images,
that GIMP could apparently use. Googling "KiSS cel plugin" turned up an actual
GIMP plugin for making KiSS cels by Nick Lamb, coincidentally also the main
author of GnomeKiss, a viewer that I'll be
using, as it's in the Debian repository and handles everything from plain KiSS
to FKiSS3. I was poring over the GIMP Manual's instructions to find how to
import this plugin when it occurred to me to check if GIMP already supports
saving to cel format - which it does, since the plugin is already incorporated!
Silly me.
If editing the puzzle piece edges was tiresome, exporting is even worse.
Here's how it went: make the layer of a piece active. Select all (or a wide
rectangle around the piece) and copy ("Edit", "Copy"). Paste to new image
("Edit", "Paste as", "New Image"). This switches the view to the new image, a
puzzle piece floating in an empty rectangle. The rectangle should be hugging the
puzzle piece's outline; if not, crop it ("Image", "Crop to Content") to trim
away the excess space. Save to a cel ("File", "Export as") with the right name,
like "1-1.cel". Don't forget to close the new image, choosing "Discard Changes"
on the closing dialog.
After editing and exporting the puzzle pieces, I increased the canvas again
for a bigger playfield and created three backdrops - green, blue and red - by
adding new layers and filling them with the patterns found in GIMP. I made a
black/white version of the Slicer layer, so I would have two "example" cells:
the base image, and a layer of shapes. To complete the cels needed for a simple
KiSS set, I made a backdrop-sized intro screen of the base image with a milky
green border and some lettering.
By old KiSS standards, CKiSS cel files are huge. The opening screen is more
than one Mb. In the time when KiSS sets preferably had to fit on a diskette,
that's roughly three-quarters of the maximum total filesize. KiSS sets are
compressed files, but CKiSS cels don't compress very well. So, as it appears I
can directly edit cels in GIMP, I first tried to reduce the colours, and thereby
the size, of the big screen-filling cels by making them indexed. (Trimming off
the excess transparent pixels around the image helps too, but I already took
care of that by cropping all layers to their actual content.)
"Indexed" means that a pixel can't be just any colour, but needs to have a
colour in a palette of, typically, maximally 256 colours. So instead of having
its own colour information, the pixel refers to a colour slot in the palette.
This saves space enormously. Of course, for that to be possible, the number of
colours in an image must be reduced to 256. The Example image can't be
colour-reduced without serious quality loss, but the red, green and blue
backgrounds should contain not much more than 256 colours each. And the
black-white slicer cel can be reduced to 2 colours. To make an image indexed,
choose "Image", "Mode", "Indexed". This opens a dialog where the default number
of colours to convert to is 255, but I'd like the full 256, please. And I'm so
confident this will be enough colours, that the "Colour dithering" style is
"None".
Sadly, it was not to be, as any indexed cel needs a kcf (KiSS palette file),
and the automated way in which GIMP saves cels doesn't allow me to request that
palette files be saved, too. Once I've saved indexed cels, I can't reopen them
in GIMP for lack of a kcf. Plus, if I did find a way to save the indexed image
palettes as kcf, I'd end up with several palettes of 256 colours each, and there
are viewers that happily mix normal and CKiSS cels, but balk at more than one
256-colour palette. Modern viewers don't have a problem with several 256-colour
palettes, but they also don't have a problem with cels of over 1 Mb. So I
deleted this experiment, and hit on another way to reduce filesize, at least for
the screenwide cels.
Tiling! Since said cels were the result of flood-filling with a pattern, why
not "flood-fill" the set with the same cell placed in rows and columns like so
many piled-up blocks? There should not be too many of those blocks, since every
block means another object with coordinates to add; but the filesize of CKiSS
cells depends solely on their height and width, so if I could tile the whole
background with one square, it would dramatically decrease the size of the KiSS
archive.
By looking closely at the green background, I can see that its pattern
repeats every 50 pixels in both directions. So I could make a cel of 50x50
pixels and display that across the screen, erm, how many times? The screen size
is 580x480, which is not a multiple of 50. What if I make horizontal bands, so
the extra space at the end of a row of tiles is not an issue? Then I've still
got a vertical problem. What if I make one band narrower than the rest? A plan
is born. The top band will be 80 pixels high, while the 'tiling' band will be
100 pixels high and placed 4 times, requiring as many extra object numbers. The
red pattern repeats at 64 pixels, so that would mean a band of 96 pixels high
followed by three bands of 128 pixels high. The blue background repeats at 64
pixels, too. Because of their fixed sizes, it's easy to calculate the
coordinates for these cels. The introduction screen has been chopped up into a
title bar above the example file, a subscript bar below it, and an identical
block on either side: three cells that will become four objects.
Which leads to the coding part of making a KiSS set. Objects have numbers,
cels have filenames, and the numbers and filenames are linked to each other and
to a "set", which is like a page. A KiSS configuration file (cnf) consists of a
header for palette filename, screen size and border colour, a block for
declaring cels and objects, an optional block for FKiSS code (which I'll get to
later), and a block for object positioning per set. A KiSS set (collection of
files, typically archived in LZH format) has ten sets (scenes, numbered 0 to 9),
each numbered set displaying the objects assigned to it in the first block, at
the coordinates specified in the last block. Here is a highly simplified
one-cel, two-object cnf as an example, where everything after a semicolon is a
comment, and ignored by the KiSS parser:
That was a lot of comments jam-packed into a tiny cnf, wasn't it? It's a
quick way to explain things - look at this
section of the KiSS page for a more in-depth explanation, notably about how
one cel can be two objects, and what objects are for anyway - but for clarity,
below is the same file with all the fat trimmed out:
And now, ta-daah! I am going to write a KiSS puzzle cnf. The header is
simple.
The next step is a list of all the cels and what their object numbers are,
and which sets they appear in, and if maybe they should be a bit transparent.
(For legacy reasons - the earliest KiSS viewer was for MS-DOS - all files in a
KiSS set have names of 8 characters.) Snipped for space:
Some comments on this file: the same cel can be in two objects, as was shown
before. The same cel can be fully opaque (base image as part of intro screen)
and transparent to some degree (base image used as example of what the finished
puzzle looks like). The same object number can (and should) be shared by more
than one cel; one object number can refer to different cels on different pages,
like the objects 55 to 58 or 59 for background cels. It is best to limit object
numbers by recycling them, as each object number equals a pair of coordinates
that I'll have to work out and manually add to the next part of the cnf. When to
recycle an object number? When different cels fill the same gap on different
pages; the slicer and example cel are the same size and centered in the same
way, while the backgrounds are all similarly tiled. Last but not least, object
numbers have nothing to do with layering. The line order is the layer order.
That's why "example.cel" superimposed on the intro screen is the topmost line in
the block, while "example.cel" as a ghostly image of the puzzle is right at the
bottom, just above the backgrounds, even though they are both object #0.
As can be inferred from the numbers between colon and semicolon, set 0 shows
only the intro screen, which refers the user to sets 1 to 9. The first three of
these sets show flat pieces, the second three show pieces with a hint of
outline, and the third three show pieces with a bevelled edge, like real puzzle
pieces. The first of every three has a green background, the second of the three
has a blue background, and the third, a red background. This is because pure
KiSS is entirely static, and if you want a different playfield, you have to put
it in a different scene.
These three triplets follow the same pattern: on the first, the puzzle is
assembled on an empty background, and the player can scatter and reassemble the
pieces. On the second, the puzzle pieces are scattered around a rectangle of
puzzle piece silhouettes to show where the pieces should go. On the third, they
are scattered around a faded example. There is no way to "save progress" in a
traditional KiSS viewer, so on loading the set, the pieces will always be in the
same initial position.
That code so far should be enough to open the cnf in GnomeKiss, which will
show all cels clustered in the top left corner, since there's no coordinate
block yet. Coordinates count down and right from the top left corner. Which is
why all objects, having no coordinates and therefore defaulting to 0,0, are
stuck there.
In the coordinates block, object numbers determine order. There are ten
lines, one for each set, all starting with "$" and a number. That number refers
to an internal palette in a kcf file, of which there are none in this set, so
it's just the default, 0. After that comes a list of coordinates or asterisks,
as many as the highest object number in the cnf. So if I defined only a single
object and gave it the number 43, all lines in the coordinate block would need
44 coordinates, because the viewer counts from 0. Specifically, they would need
43 asterisks, signifying that no object of that number is in that set, and one
set of coordinates for that one forty-fourth object. That's why objects should
be numbered contiguously, with no gaps between numbers.
What if there are only three sets showing objects, and the rest are empty?
Then three lines starting with "$" would contain coordinates, while the
remaining seven would be a line of asterisks to signify for every object number
that it is not defined for that set. It depends on the viewer whether the
undefined sets show all objects in the top left corner, or are greyed out.
Given that the highest object number I have is 59 (less than the maximum of
63 for the earliest KiSS viewers!), I need ten lines with, as placeholders, 60
asterixes each:
The first set, 0, is simple. Object #0 in that set is the centered example
cel, which is 180 pixels shorter and narrower than the screen size, and
therefore 90 pixels down and to the right. There are no puzzle pieces in set 0,
so that's 54 asterixes. There is a title bar which starts at the top, so its
coordinates are 0,0. Then two bars (one cel, two objects) flanking example.cel.
They are both 90 pixels down, but one hugs the left side (that's 0) while the
other, 90 pixels wide, is to the far side of the 580x480 screen (580 - 90 makes
490). The coordinates are x,y where x is to the side and y is down. In short,
here is the first line:
That was easy. For subsequent sets, the coordinates for the first puzzle
piece are 90,90 but the rest of the pieces have to be dragged in place and their
position noted; GnomeKiSS displays the last clicked-on object's coordinates in
the status bar under the playfield. In PlayFKiSS for
Windows, I could drag every object to where I wanted it, then save the cnf,
which would write the coordinates into it, but also flush any comments.
GnomeKiSS doesn't save anything, but shows the name and coordinates of the last
clicked cel, which I then enter into the cnf using any editor that saves to
plain text. It took ages, but I got it done.
KiSS viewers are like browsers: they all have their quirks, and some are more
forgiving than others. Each time I loaded the cnf into GnomeKiSS, every line in
the coordinates block produced the message: "line is too long, should be 256 or
less characters". Possibly related to this, GnomeKiSS displayed objects at
coordinates that belonged to a different cell that the one I was looking at, and
didn't seem to want to display the same cel under two object numbers in the same
set. If I broke up the set coordinate line, all coordinates after the line break
were ignored. Until I found you can continue the set coordinates on a new line,
so long as that new line begins with a space. The odd positioning of some screen
elements continued, although the same set showed up just fine in the latest
version of UltraKiSS that I'd ferreted out, just
to reassure myself that I wasn't going insane.
It took me a while to work out the blindingly obvious: that combining cels
into an object makes the object as large as the shapes of all its cels combined,
including cels not appearing in every set. And when a viewer won't let a cel
stick out beyond its border, if the same object is a block-shaped screen-filling
cel in one set and a tiny dot-shaped cel in another, the tiny dot will be pushed
to the middle of the screen even if its object coordinates place it at the edge,
because of its invisible huge block outline straining against the sides. In this
case, the problem was using object numbers #57 and #58 for both background tiles
(which, being as wide as the playfield, must always have x coordinate 0), and
pieces of the intro screen, placed at the right and bottom of the screen. In
short, I needed to renumber the bottom and right side of the intro screen to
objects #60 and #61, and add two sets of coordinates to the end of the cnf.
As a traditionalist, I also create an archive of type "lzh" containing the
cnf, a readme-file, and all cels, to which I will add any further cels and cnfs
I make until the set is complete. I don't have the non-free Unix archiver
"lha.exe" installed under Linux Mint, and barely use other operating systems any
more, so I use the archiver built into UltraKiSS.
It's not the most challenging of puzzles, as the object numbers of the pieces
appear in the status bar, making it easy to guess which piece comes after which.
Due to the layered nature of KiSS, pieces can slip under each other, and under
the finished part of the puzzle. And to show off its piece styles and
backgrounds, one puzzle needs nine different sets! There is an answer to this in
the form of the so-called FKiSS extensions: additional scripting commands in
incremental versions, starting with just FKiSS and going up to FKiSS4 (and
FKiSS5/UltraKiSS, but that's beyond this how-I's scope). A KiSS set can have
more than one cnf, and this one will get a cnf for every version.
To summarize what each FKiSS version adds: FKiSS allows the mapping and
unmapping (appearing and disappearing) of cels, moves them, and detects if these
cels are being dragged with the mouse. It also introduces timers, playing sounds
and some other basic stuff. FKiSS2 adds collision detection (is one puzzle piece
touching another?) and both relative and absolute movement; FKiSS2.1 refines
collision detection, and adds conditions (is this cel is mapped, is this object
moved or fixed) and the ability to set a fix value. FKiSS3, beginning to
resemble a programming language, has variables, labels (like alarms, but with no
delay), extra syntax to test for situations like "is the mouse cursor hovering
over this cell?" and a new concept, "ghost", when cels are mapped and visible,
but ignored by mouse events (notably, they can't be dragged). FKiSS4 has extra
object definition tags, improved variable names, keyboard support, "attachment"
which makes two objects move together, cel groups to apply one action to a list
of cels, and "frames", a faster way of (un)mapping groups of cels. FKiSS5, which
I won't be using for this set, is only supported by UltraKiSS, displays a number
of image file formats, adds a lot of Java-based syntax, and allows cels to move
to a different layer on the fly.
Since I don't want to redo all the object coordinates, I'll copy the
KiSS-only cnf, "puzzkiss.cnf", to "puzzfks.cnf", and add a FKiSS code block.
FKiSS code has its own block that either comes between the object declaration
block and the coordinates block, or goes below the coordinates block, at the
very bottom of the file. Every line of a FKiSS block starts with a semicolon, to
let KiSS-only viewers think this is a comment, immediately followed by an at
sign, to let the FKiSS parser know it isn't. Normal comment lines are still
allowed, of course. A FKiSS block starts with a single word, EventHandler,
followed by three commands that are optional, but should be at the top, in this
order:
What do these three commands do? Nothing. Because they're events (hence the
header, EventHandler). More accurately, they refer to events. The basic
syntax of FKiSS is: if event happens, then do actions. The actions
are the commands that do something, but they always fall under an event. The
names of both actions and events are followed by brackets, that may contain
information for the event or action to work with.
The event initialize() always comes directly under EventHandler, and
happens when the set loads, before the cels are shown. This is the event at
which to unmap any cels you don't want to be seen at the start. The second
event, begin(), happens when the KiSS set has been fully loaded, ready to
play. In viewers that support it, the version() event happens if the
viewer knows the FKiSS version number in the brackets; its standard use is to
unmap a screen-filling cel that reads "THIS VIEWER CAN'T HANDLE THIS FKISS
VERSION". The order in which the last two are processed isn't the same in every
viewer; in UltraKiSS, version(), no matter where its position in the cnf, is
processed before begin(), and if I put any other event than version() above
begin() in the cnf and then load the set, I get the following error message:
(Why would I even want to put version() or any other event above begin()? To
use a dummy alarm() event to avoid confusing FKiSS-only viewers, which don't
understand version(); see further down.)
With its ability to unmap any unwanted cels, FKiSS can fit the intro screen,
all backgrounds and all puzzle pieces in one single set. This means that the
subscript cel in the intro scene, which tells the player to change to a
different set, must be replaced. The intro scene can be clicked away to get at
the playfield. The player can cycle through the three background colours of the
playfield by clicking on each background, which unmaps it and reveals the
background underneath, until reaching the lowest background, which remaps all
backgrounds. Same goes for the puzzle underlay, the dimmed image that serves as
example. Don't want it? Click it to make it disappear. But you can't cycle
through the three puzzle piece styles that way, because you click the puzzle
pieces to drag them, so they would change their appearance every time they were
moved. So the puzzle piece style has to be chosen in a little Settings box.
Ditto for the puzzle underlay, actually, because unlike the background sequence
of green-blue-red, the example sequence is picture-pieces-nothing, and you can't
click on nothing to make something reappear.
FKiSS (or FKiSS1 to distinguish it from later versions) does not support
version(). That it recognizes "EventHandler" and "initialize()" is proof enough
that the viewer is FKiSS-capable. There is also a version FKiSS1b that adds
transparency. Strictly speaking, a plain KiSS viewer should not be able to
render cels transparently at all (although the viewer programmer might have
decided to incorporate the "%t" transparency tag while ignoring actions and
events) which is why old FKiSS viewers may show cels with a %t setting as fully
opaque. That would not apply to CKiSS cels, which can be of any colour depth and
transparency, but the oldest viewers also tend not to support CKiSS. Anyway, for
legacy's sake, I'll display two warning cels: one that the viewer does not
support FKiSS, and one that it does not support transparency. The first will be
unmapped under initialize(), the second will have a %t value of 255 (invisible)
so that it's only visible if transparency is not supported, and will be unmapped
along with the intro screen, because transparency is not such a big deal. So if
the viewer doesn't know FKiSS commands or the transparency tag, both will show
up when the set is loaded. It will look like this:
Below is the FKiSS code for making both warning and intro screen disappear.
If the viewer supports FKiSS, the version warning is unmapped before the set is
loaded; the intro screen and transparency warning, after 3 seconds. Note, in
addition to the new objects with cels "warning.cel" and "warningt.cel", the
reassigning of the top three intro screen cels, which were originally part of
objects #0, #55 and #56, to new object numbers, so they can be unmapped
separately; and the new intro screen subscript cel that replaces the cel of
object #60, telling the user to wait for the puzzle instead of referring to sets
1-9. Also, since the lower instance of example.cel, which covers slicerbw.cel
and would normally block it from sight, is see-through, and therefore doesn't,
slicerbw.cel has to be unmapped along with the warning.
Under initialize(), either the warning cel or its object number is unmapped,
it doesn't matter which. Under the event begin(), there is an action, timer(),
which sets the event alarm(0) (the first defined alarm; everything starts
counting at 0) to 3000 milliseconds, which is 3 seconds. After those 3 seconds,
alarm(0) causes all objects AND NOT CELS of the intro screen to be unmapped, as
well as the transparency warning. The intro screen contains ambiguous cels, so
here it does matter whether object or cel is unmapped.
An ambiguous cel is one that occurs twice or more in the object declaration
block. For instance, example.cel occurs twice as part of object #0 in the
KiSS-only cnf, although in the current FKiSS cnf it has been split into object
#0 (transparent puzzle underlay) and object #62 (new object that is part of
intro screen on top of puzzle) so that the intro screen can be unmapped without
unmapping a part of the background. The two sidebars using introb.cel have
different object numbers, in order to place them at different coordinates in the
same set. The unmap() command can be used with cels to unmap part of an object
(as part of a blinking animation, for instance) but should never be used with
ambiguous cels; those should only be unmapped via their object number. GnomeKiSS
will warn about ambiguous cels when loading a set.
Speaking of which, I see two new problems, now that I've put all backgrounds
on the same set and am planning to map and unmap them. Each of the three
backgrounds consists of a top bar cel and a tiled bar cel, the second repeated
three or four times under different object numbers so they could be positioned
at different coordinates. In other words, the tiled bars are ambiguous cels. The
object numbers were recycled by repeating them across the sets, but green tile
#57 is not at the same position as blue tile #57. Since they're on the same page
now, the green and other tiled bars will need separate object numbers. The blue
and red tiled bars are at the same coordinates, but they still need separate
object numbers, because I want to be able to change from a green to a red to a
blue background. If I add "unmap(#57)", that will make a tile disappear from all
three backgrounds, and if I add "unmap("bluetl.cel"), that applies to three
cels, only one of which may end up unmapped.
How did I get into this mess? Oh yes, tiling. And why did I want to tile
cels? To keep the filesize down. And why did I want to do that? So I could use
CKiSS cels, which are huge. And why CKiSS cels? Because I can't make the kcf
palette files for indexed cels right now, and besides, the kcf format is a bit
complicated to explain. Sigh.
All right then, what do I have. The top bars of the backgrounds (green.cel,
blue.cel, red.cel) are all object #55 at coordinates 0,0. The cels only occur
once. Those can stay. Of the tiled cels (greentl.cel, bluetl.cel, redtl.cel) the
green tile bar occurs four times under object numbers #56 to #59; it can keep
them. The red and blue tiles each occur three times and need three new objects
each. As the highest object number so far is #66 for the warning, the blue tiles
will number #67 to #69, and the red ones #70 to #72. Their coordinates will be
added at the end of the set coordinates line.
If the user clicks on the green background, all its mapped cels disappear,
showing the blue background underneath. Clicking the blue background will unmap
its cels to show the red one underneath. Clicking the red one remaps all
backgrounds, so the green one, being above the other two, will become the
visible background. For simplicity's sake, since each background consists of two
cels, of which the second is ambiguous (so the code would have to refer to the
object numbers of that cel), the backgrounds will only change colour if I click
on the bar at the top. I could repeat the code below for every background
object, but I ain't gonna. (The FKiSS2 cnf will have a button to deal with
this.)
Two comments. First, the cels I unmap all belong to object #55, which is the
top tile of all three backgrounds, so I must never unmap the whole object, but
only its cels. However, I can map the whole object as a quick way of remapping
all its cels. Second, the quotes around the cel names, just like the hashes
before the object numbers, are not optional! (Higher FKiSS versions introduce
variables, which have neither quotes nor hashes.)
The other cels that cycle through different looks, need a Settings panel. The
puzzle piece objects are, for now, showing all their cels, which, since the flat
puzzle pieces are on top of the outlined and bevelled ones, means that the
puzzle presents as a flat image. The settings panel needs to cover all puzzle
pieces, so the user can't start dragging them until the settings have been taken
care of. So, I'm going to make a screencap of all flat pieces fitting together,
a "dummy puzzle" image. On that image, I'll draw a Settings box background with
some text. This will be one cel. I'll assign it to the new object #73 and add
extra coordinates 90,90 to the set coordinates line. Next, I'll make seven
separate button cels that start in the same top left corner as the settings cel,
so I can make them part of object #73. This is how the object declaration for
object #73 looks (nb. its cels are above the puzzle pieces, but hidden under the
intro cels):
Note how, in the definition above, the shorter buttons cover up the part of
the longer buttons that should not be clickable.
This is what the user sees:
The topmost button will cycle through puzzle piece type (both button image
and actual pieces) in the same way as the background does: unmap topmost layer
to uncover second layer, unmap second layer to reveal bottom layer, completely
remap all layers. (The bottom layer always stays mapped.) There are 54 pieces,
if I didn't mention that before, so I've got my work cut out for me. Note here
that to remap the button I can't use "map(#73)", as that would affect the other
settings button.
How many unmaps, or other actions, will fit on a line? I've no idea, but 256
characters is a safe maximum. For legibility you could break it up into lines of
maximally 80 characters each, just so long as every line begins with
semicolon-at. Indenting action lines (adding tab or extra spaces) is done to
make the code legible, the parser doesn't need it.
The second button has a complication: example.cel is ambiguous (used in two
objects) so I can't directly refer to it. Instead, I either unmap #0 and then
instantly remap slicerbw.cel (the part of object #0 that I want to make
visible), unmap #0 completely, or remap #0 completely and then instantly unmap
slicerbw.cel so that example.cel remains. This way of coding depends on the
actions being carried out one after the other, as is standard for FKiSS viewers;
a viewer that is a multi-threaded java application and carries out all actions
simultaneously, may show a different result.
The Start button unmaps the whole Settings object, leaving the user to get on
with the puzzle; the only way to change the settings again is to reload the set.
But! The puzzle is already assembled (so all the pieces would fit under the
settings dialog). What to do? Fortunately, the KiSS-only cnf has the coordinates
for the scattered puzzle pieces in the coordinates line under set 2.
Unfortunately, moveto(), which moves an object to absolute coordinates, is not
supported in the first FKiSS version. I can use move(), which moves an object
the given number of pixels on the x and y axis. So, for each of the 54 puzzle
pieces, I would have to compare the "assembled" coordinates to the "scattered"
coordinates and "move" the difference. For instance, puzzle piece object #1
belongs at 90,90, and is scattered to 505,37. I subtract 90 and 90 from 505 and
37 to get 415 and -53, leading to "move(#1,415,-53)". There, 53 more
calculations to go.
I'm going to have to do it, aren't I.
With gritted teeth, I present the first few lines of what happens when the
start button is pressed, and refer anyone interested to "puzzfks.cnf" in archive
"puzzconc.lzh" (download link at the bottom of this how-I) for
the rest.
Okay, is the puzzle done now?? No, there are empty sets to take care of. To
avoid preventable error messages on loading the set, I fill out the set
coordinate lines for sets 1 to 9. There are 74 objects in total and they're all
in set 0, so the coordinate lines for the other sets are all "$0" followed by 74
asterisks. I type 15 asterisks with spaces between them, copy and paste four
times, and delete the last asterisk; then I copy the whole line and paste for
each empty set. Now, some viewers grey out empty sets and their go-to buttons,
while others show them as "default", containing all objects, every object at
coordinates 0,0. Because no one has to see that, I will use set(), the event
that triggers if that set (as in, scene) is made active, and changeset(), the
action to, you guessed it, move to another set:
This cnf could be finished now, but because I hate myself, there is another
improvement I want to add. Since the puzzle pieces are layers, some will slip
under others when dragged. Wouldn't it be great if they could be lifted above
the other levels for the duration of dragging? Standard FKiSS does not allow
that. To simulate that, I could take all the puzzle pieces and make new versions
of them with a drop shadow (to the bottom right, so that the top left, which
determines the object coordinates, stays unchanged) and then add them to the
object declaration block, ABOVE the old pieces.
First, the time-consuming labour of making these pieces. Having layer groups
in GIMP means that I can take one of the three layer groups containing all
puzzle pieces done in one style - I pick the bevelled pieces layer group - and
simply duplicate it, dragging the duplicate layer group under the other puzzle
piece group layers. I make the first layer in that group active, make sure that
only this layer's piece is visible, choose "Filters", "Light and Shadow", and
then "Drop shadow (legacy)" because it follows the shape of the piece. In the
dialog that pops up, I leave the x and y offsets at 4, but change the radius
from 15 to 5, as the shadow area shouldn't be too large. This creates a layer
called "Drop Shadow" under the active layer - the layer containing the puzzle
piece - so I merge the active layer down and rename it to something like
"6-8bds" (piece in row 6 column 8, bevelled, drop shadow). It appears that even
with reduced size, the drop shadow extends one pixel above and to the left of
the piece, so I select the rectangle of apparently empty space to the left of
the piece, right up to its outline (taking care not to shear off any of its
pixels) and press Delete, then do the same for the space above, to trim off this
invisible and undesirable bit of drop shadow. I then copy the layer and paste it
as a new image, use "Crop to Content" on this image (checking again if the piece
has extra space to the top and left, which means I haven't trimmed off the drop
shadow well enough) and export it to "6-8bds.cel", after which I close the image
without saving. (After adding all these layers, I do save the puzzle XCF, of
course.)
Of course, I don't bother giving the flat and outlined pieces a drop shadow
too; for each drop-shadowed piece, I make the layer of the equivalent flat or
outlined piece active and visible. This layer will perfectly overlay layer
"6-8bds" so that the drop shadow now seems to belong to the flat or outlined
piece (this is why I dragged the duplicate layer group under the other ones). To
make the cel, I choose "Edit", "Copy Visible" and "Edit", "Paste as New Image"
(keyboard shortcuts: Ctrl-Shift-C, Ctrl-Shift-V), crop, and export the resulting
image to "6-8ds.cel" or "6-8ods.cel" before closing it without saving.
Obviously, I have to do this for every. Single. Piece.
(After doing the flat and outlined pieces, I don't save the puzzle
XCF, since the only changes are which layer is active. I either close and reload
the puzzle XCF, or empty the Undo buffer.)
This is where CKiSS really shines. Regular cels don't support varying levels
of transparency in the same cell; I would have to make the drop shadow a
separate cel, or several separate cels, each of decreasing transparency.
Click and drag a piece, and its dropshadow version is mapped, making it seem
to jump up above the other pieces. Release the mouse button, and the dropshadow
version disappears. It doesn't matter that the dropshadow versions are also in
layers, because only one of them is visible at a time. Here's how to code that
with a dropshadowed version of a puzzle piece (the one with "ds" added to its
name), using catch(), which is like press(), but for items that are either
draggable, or, if fixed, not fixed to the maximum value; and drop(), which is
what happens when you release the mouse button on such items.
The drop-shadow cels will have to be added to the object declaration block
under the settings panel, but above the regular pieces. They will be assigned to
objects #1 to #54, just like the regular puzzle pieces, so they will always be
in the same place as the cel I just clicked. This means that (i) I have to unmap
162 dropshadow cells under initialize(), and (ii) in the settings panel,
clicking button1c.cel shouldn't remap the whole puzzle piece objects, but just
all flat and outlined puzzle piece cels. Ye gods and things on toast, there has
to be an easier way to code this. (In FKiSS4, this is what groups and frames are
used for.)
I'm not going to quote even a snippet of that huge slab of code, it should be
obvious how to declare objects and use map() and unmap() by now. Suffice it to
say that the cnf for the first KiSS version is now done, so onto FKiSS2, which
does support version().
The version levels for version() are:
For FKiSS1 and FKiSS1b the level numbers are supposedly 0 and 1, but that's a
moot point as they don't support version(). Which is why, after making a new
warning cel for FKiSS2 and copying "puzzfks.cnf" to "puzzfk2.cnf", I'm changing
the object declaration and FKiSS block as follows:
The event alarm() happens when the duration for the corresponding
action timer() runs out, so when there is no timer of the same number,
the alarm is never triggered, and any code under it is never carried out. The
alarm above version() is a dummy (does nothing) wrapper (hides syntax from the
viewer). Normally, "alarm(1)" presumes a "timer(1,[duration])" somewhere, but
since there is no "timer(1)", a FKiSS-only viewer will think that version() is
an action under alarm(), rather than an event, and because alarm(1) is not
triggered, version() is not processed and found to be an unsupported command
that may or may not crash the viewer. This matters because if the viewer is
FKiSS2-capable, there is no problem; the warning in this cnf is for viewers that
recognize at most the simplest FKiSS syntax. In this cnf, version() assumes the
tasks that had, in the previous cnf, been divided between initialize() and
begin().
The alarm-wrapper trick stops a FKiSS-only viewer from choking on version(),
but there is other unsupported syntax further down. So begin() sets a 2-second
timer for alarm(2) which issues a quit() that should shut down the set, close
the viewer or even do absolutely nothing, but if the set acts funny from trying
to carry out code it doesn't understand, hopefully quit() will cut that short.
Under version(2), this timer is cancelled with "timer(2,0)".
(There should never be a timer under initialize(), as, when the set takes
time to load, the timer may have run out and triggered the alarm before the set
appears.)
But now I run into a viewer-specific problem: the other viewers I used will,
if I put begin() before version(), process them in that order, but UltraKiSS
insists on first processing version(), which turns off the timer for alarm(2),
and then begin(), which sets the timer for alarm(2) again, so the set shuts down
after two seconds. The formerly dummy wrapper alarm finds a use after all: its
timer is set under version() - which means that in a viewer that doesn't
recognize version(), it will still never be triggered - and it also, after
begin() is done, turns off the timer for alarm(2).
FKiSS2 has two huge advantages over FKiSS. The first is collision detection:
knowing when an object touches, or stops touching, another object, which
triggers the events in(), stillin(), out() and
stillout(). The second is being able to move an object to relative or
absolute coordinates using the action moveto(). These two features are
used for "snap-to", which is when you pull a clothing cel over a doll cel and it
jumps to the right position. Or you drag a puzzle piece cel to... you get the
idea. Snap-to code has met with some resistance, the idea being that one should
be able to put a shoe on a doll's head if one so desires; but there is no
reason, aesthetic or otherwise, to deliberately put pieces of a puzzle in the
wrong place. I can now scatter the puzzle pieces using moveto() instead of
move(), and because moveto() always puts them in the same place no matter where
they were before, I can do it more than once. I can also use collision for a
mechanism to detect that the puzzle has been completed.
Replacing move() by moveto() is easy, because I made the move() block by
copying "move(#,0,0)" 54 times, putting in the object numbers and "scattered"
coordinates, then changing the coordinates to their calculated new values. But
before I started calculating, I copied this block to an empty text document and
replaced move() with moveto(). After copying the FKiSS cnf to what will become
the FKiSS2 cnf, I just have to paste the moveto() block over the move() block.
A new cel is needed for snap-to: a tiny square of 3 by 3 pixels (PlayFKiSS
may not detect collision for one single pixel), positioned in the middle of each
piece in the puzzle grid under object numbers #74 to #127, with a fix value of
999. In GIMP, I'll make this square, duplicate the Slicer layer, and then copy
and paste the square in the middle of each piece in the duplicate layer.
Hovering over a pixel with the cursor tells me its coordinates in the status
bar, so I can note the coordinates of each object-to-be from the XCF, to be
added to the set coordinates, without having to open the KiSS viewer. The square
is exported as "snapto.cel".
The snap-to objects can be put under the backgrounds in the object
declaration block to hide them from sight; collision detection will happen
nevertheless. I put their object declaraton lines above those of the backgrounds
for testing, then later cut and paste them to their final place.
Beginning with first piece #1 and first snap-to object #74, when a piece
object "hits" a snap-to object, a sound (of snapping my fingers, that I
recorded) is played using the FKiSS action "sound()" - which, because it depends
on a combination of viewer, soundfile support, operating system and hardware,
does not work on all viewers! - and the piece object is moved into its initial
position (copied and pasted from the set coordinates line). The in() event is
only triggered if the two objects were absolutely not overlapping before. There
is another event, stillin(), to see if two objects are still overlapping, but at
what interval do you test that, or is it tested only if the object moves? And
I've found that stillin() is spotty with some viewers. I'll put it in to realign
any slightly displaced pieces, but if you nudge the piece out of place, and want
it to snap back to its position, you may have to drag it a distance away, drop
it, then drag it over its snap-to object again.
I must repeat: stillin() is not reliable! In GnomeKiSS, if a piece snaps in
place and I tug it a few pixels, it returns to its place. If I yank it away, it
returns to its place but then snaps back to where I dragged it. This will not
work well with what I've planned below, so the stillin()s have been removed.
The mechanism to detect puzzle completion also relies on collision. Two,
optionally three cels are needed: a small shape like a rectangle, moved to track
progress, the same shape, but stationary, and, optionally, a button to make them
visible (to let the user follow the progress) or not. The first two shapes have
to be small enough to fit in the set window 55 times in a row, either vertically
or horizontally, without touching. The set dimensions are 580x480, so assuming
I'm using a strip along the top of the screen, I have 580 pixels. Let's say I
reserve 30 pixels for an on/off button, that leaves 550 pixels which is
conveniently 10 pixels per position. There must be room on either side, so the
small shape must be 8 or ideally 6 pixels wide.
Also, instead of just being an on/off button, the button will bring up the
settings panel with an on/off setting added.
The bars will both be rectangles in different colours, 6 pixels wide, 10
pixels high; I made a chequered background of 10x10 squares to draw them on. The
button, 30x30 pixels, will be a bit more fancy. I select a soft round brush and
change its settings, if necessary, to make it the size of the button; make a new
layer, and click once with the brush to make a hazy round dot on it; make a new
layer under it, and make that layer active; use the elliptic selection tool to
draw a circle around the dot, and flood-fill that circle with a darker shade of
that colour. If I like the how the resulting shape turns out, I merge the two
layers.
The code added to show, unmap and remap the button, and open the settings:
Doesn't that mean I can press the button and open the settings in mid-game,
thereby forcing the game to restart? It does, and I'll solve that when
overhauling the settings panel, after I finish the progress bar code.
To see how the puzzle is coming along, each time a piece goes in its right
place, the progress bar moves a fixed distance to the right, until, at the 54th
movement, it hits the stationary bar. Of course, pieces being layered, sometimes
you have to drag the placed piece away to rescue a piece that got lost under it.
So in() moves the bar to the right, but out() moves the bar back to the left. I
alter the puzzle piece collision code as follows:
That's a lot of repetition, but having to repeat code is the bane of early
FKiSS versions, and the reason why FKiSS isn't really suited to making games. It
got better with each version, though. Ironically, fks.cnf is very long because
sticking to legacy code makes a lot of repetition necessary, yet precisely
legacy viewers may choke on such a huge cnf.
What happens when the progress bar hits the end bar? The standard reaction is
to show a "you did it!" message, which the user can click on to restart the
game. The message, like the settings screen, must cover all pieces, which could
shift from their spot otherwise, but should, apart from its message, be
transparent enough to show the finished puzzle underneath. Clicking the message
unmaps it and opens the settings panel with its start button. The code to add:
To allow the user to change the settings mid-game without restarting, the
settings panel, which had a puzzle piece button, an underlay button and a start
button, will have a background button, a progress bar button and a Return button
added to it. The background button takes over the background's colour cycling,
the progress bar button makes the progress and finish bars visible or invisible,
and the Return button makes the settings screen disappear.
Space being cramped on the left side of the settings panel, these buttons
will be added in a column on the right. This column will need a separate object
number, #132, and "423,90" is added to the first line in the object coordinates
block. (For any object coordinates added for set 0, don't forget to add an
asterisk for sets 1 to 9.) This should be the last object needed.
The settings panel will grow a bit and get new lettering - I love trying out
new fonts - so setting2.cel will replace settings.cel. Unlike settings.cel which
is superimposed on a picture of the finished puzzle, setting2.cel will be partly
transparent so you can see the puzzle pieces change while cycling through the
styles, but can't touch them. The top right button (button4.cel) reads "Return",
but as you can't return to a game you haven't started yet, will initially be
unmapped to show the blank dummy (button4a.cel) underneath. The middle button
(button5a/b/c.cel) cycles the background, while the button6a/b.cel at the bottom
makes the progress cels transparent or opaque rather than mapping and unmapping
them, as unmapped cels can't trigger collision detection; to indicate this, the
Yes and No buttons have a picture of opaque and transparent progress bars on
them. To keep the font consistent between the left and the right column,
button3.cel gets two replacements reading "start" and "restart", while
button2c.cel is replaced by button2d.cel.
The cels "button4.cel" ("Return") and "button3b.cel" ("Restart") must be
unmapped under initialize(). Because the restart button overlies the start
button and is only unmapped when opening the set, the user only sees "Start" the
first time, and "Restart" for every replay. Pressing the pink settings button
(object #130) now maps both #73 and #132.
The Return button simply unmaps both objects of the setting panel, and remaps
object #130, the pink settings button. It is blank when starting a new game, by
unmapping button4.cel under initialize(), but also when presenting the settings
for a new game after clicking on object #131, the "finished" message.
The code for colour-cycling backgrounds is easily transplanted to the
settings by replacing "press background cel" with "press button 5", and adding
an unmap() for that button, or remapping buttons as the case may be:
As said earlier, the progress bars can't be unmapped, but only made
transparent, as unmapped objects don't trigger collision detection. They are set
by the action "transparent()" (supported from FKiSS1b onwards) to a value of 254
rather than the maximum 255, because, depending on the viewer, a completely
transparent object may not trigger collision detection either. As transparent(),
like move(), doesn't set an absolute value but changes a current value, going
back from near-invisible to fully visible requires a negative value.
Concerning the existing buttons: I replaced "button2c.cel" with
"button2d.cel" and "button3.cel" with "button3a.cel". I then copied the code for
button3a.cel and replaced its name by "button3b.cel", because the Start and
Restart button do exactly the same! Then it occurred to me that I could both
point them to a single block of code with a very short timer:
That concludes the cnf for FKiSS2.
The FKiSS2 cnf has a serious fault that can only be addressed by version 2.1:
the settings buttons don't keep up with the current situation. This is a problem
when restarting, or changing the settings halfway through. Because opening the
settings always remaps all settings cels, if the background is already blue and
the background button is green, I have to click away the green button and the
blue button before I can change the background to red. Ditto the underlay and
puzzle style, and, worst of all, the progress bar button, which doesn't work
with absolute values, so I can't just keep clicking the button until it aligns
with what I'm seeing. I want the buttons to reflect the current settings, and
while I'm at it, I'd like a way to recover puzzle pieces that get lost under
other pieces. FKiSS2.1 has what I need, in the form of conditional actions.
The first step, after copying "puzzfk2.cnf" to "puzzfk21.cnf", is to make a
new warning cel to say the viewer doesn't support FKiSS2.1 rather than FKiSS2,
and to have it unmapped under "version(3)".
FKiSS2.1, which despite its name adds as much new functionality as FKiSS2,
has the following three pairs of conditional timer actions:
if(not)mapped(), if(not)fixed, and if(not)moved(). It also
has setfix(), to change an object's fix value, and the collision
detection duo collide() and apart(), which I won't use, as they
need cel names, and snapto.cel, being used in 54 objects, is a very ambiguous
cel. The timers ifmapped() and ifnotmapped() also need a cel name (the other
four need object numbers), but the cels I have in mind are mostly unique.
The syntax is simple: if(not)mapped("name.cel",timer,delay). So when for
instance the green background might be unmapped - which should change what
button is shown when the settings panel opens - I'll set a conditional alarm to
also unmap the green background button. For the puzzle pieces, I can check if
the first of the flat and the outlined puzzle pieces are mapped. The underlays
are not so simple; one of them, "example.cel", is an ambiguous cel. And the
progress bars are not unmapped at all. I'll need two sneaky extra cells to deal
with these two problem cases. It doesn't matter what they look like, as they'll
be hidden under the red background, and just so I don't have to add anything to
the coordinates block, they'll share an object number with one of the red tiles,
since those are never unmapped. This should do it:
These two copies will have to be mapped and unmapped by the settings buttons.
Note that, now that slicerbw.cel being unmapped may cause button2b.cel to be
unmapped also, clicking on button2a.cel explicitly has to map the underlying
button2b.cel.
Now everything is ready to set the conditional timers when the settings panel
is mapped after clicking the pink button or finishing the puzzle, both of which
open the settings panel. Under the existing code for "press(#130)" and
"press(#131)", I add the following:
At the bottom of the FKiSS block, I add the following alarms:
That concludes the settings, but I'm not done yet! Instead of hoping that
fitted puzzle pieces aren't nudged out of place, I intend to fix them. The code
will change so that when puzzle pieces collide with their snapto object, they
are moved into place and get a fix value of 32767, which is considered
"maximally fixed", ie. no amount of clicking and dragging will budge them
(although not all viewers treat this fix value that way), and the progress bar
moves forward; there will be no moving back.
Since the pieces, once in place, can't be displaced, the "finished" message
neither has to cover them nor be transparent, so I replace it with a smaller
message positioned above the puzzle. As the FKiSS code only refers to this
message by its object number and never by its cel name, it doesn't need any
changes. I do need to change the one-but-last set of coordinates under set #0
from "90,90" to "90,0".
I mentioned earlier that catch() and drop(), used to "lift" puzzle pieces,
only work on objects that are not maximally fixed. When the pieces that snap in
place become maximally fixed before letting go of the mouse button, there may be
no drop() event, in which case the "lifted" piece remains visible and
overshadows neighbouring pieces. So every drop() must be replaced with
release(), which happens whenever the mouse lets go of the cel, no matter what
the fix value.
But what if other pieces "fall" under the immovably fixed ones? To retrieve
them, the pink button will get a companion blue button, by copying it, resizing
the canvas to make room under the pink button, moving the button down into that
new space and using "Colours", "Colorize". And the blue button will, using
ifnotfixed(), move all loose pieces off the puzzle area and back to the sides.
The blue button will belong to the same object, #130, as the pink button, so its
mapping and unmapping is already taken care of, but for clicking purposes, both
buttons must now be addressed individually, instead of by their object number.
Code-wise, I must replace all "drop(" with "release(", remove all out()
actions, add "setfix(#object,32767)" to all in() actions, and replace any
instance of "press(#130)" by "press("setbtn.cel")". Since the pieces are fixed
while playing, they must be unfixed with "setfix(#object,0)" on restarting. In
the object declaration block, I copy and paste the line for the pink button and
change the celname to "movebtn.cel". Then I can add the new code: when the blue
button is pressed, ifnotfixed(#object,timer,1) is repeated for every object 1 to
54, followed by 54 alarms, each of which moves its object to a position around
the puzzle's perimeter by copying the coordinates from the moveto() block. Since
I've already used ten alarms, the alarm numbers added will range from 11 to 64.
The most playable cnf so far is done. I love version 2.1!
Up to FKiSS2.1, syntax was developed by Japanese fans, which is why KiSS
viewers written by Japanese programmers, such as KiSSLD, tend to support at most
that version. FKiSS3 came out of discussions on a mailing list followed by
mostly Americans, and was largely developed by Chad Randall, author of PlayFKiSS
and C++ programmer. As such, it's less paperdoll scripting commands, and more
programming language. It has if-endif blocks, simple variables,
goto-constructions using labels, and let-actions to query every aspect of the
situation. Labels are like alarms, but without the delay. In programming
language terms, labels are like includes, and they save a lot of repetition.
FKiSS3 introduces an action for cels and objects that may be on top of, but
should not get in the way of, other cels and objects: ghost(). A
"ghosted" cel or object may be mapped, but mouseclicks pass through it as if it
were unmapped. The syntax is "ghost(object number/celname,1)" to ghost
something, and "ghost(object number or celname,0)" to make it clickable again.
Unfortunately the earliest FKiSS3-capable viewer, PlayFKiSS, does this the other
way round. What's needed to make code compatible with both approaches is a
"ghost test", using an almost wholly transparent cel overlaying the whole
playfield. This cel is ghosted in the regular way under initialize(), and a
"ghosting" variable is set to 1. The user will click on the playfield at least
once, so if this cel is not in fact ghosted by the viewer, this will cause a
press() event, upon which the cel will be ghosted the "wrong" way, and the
"ghosting" variable is set to 0. This variable will be used by anything else
that needs ghosting. Variables in FKiSS3 have fixed names consisting of just a
(case-insensitive) letter, or a letter and a single number, for instance, "P" or
"B5", and can be set through the let() action, for instance: "let(B5,1)". For
simplicity's sake, the name chosen for the ghosting variable is "G".
Creating a ghost testing cel is easy; it's a solid white rectangle of 580x480
pixels that I create in GIMP by choosing to make a new file, filling in the
height and width, and exporting the result as "ghostest.cel". This cel is a
whopping 1Mb, so I decide to use the tiling principle and divide the total size
by 4, remaking ghostest.cel as a rectangle of 145x120 pixels instead, to cover
the playfield as sixteen additional objects. I'd hoped not to add any more
object numbers, but in the FKiSS4 cnf I expect to slim down the cnf again by
throwing a lot of object numbers out. I already plan to throw out all snapto.cel
objects in this cnf, but the objects after that would have to be renumbered, so
I'll save that for last. As with all new objects, I add the ghost test object
coordinates to the coordinates block by hand; since the ghost-testing objects
are all the same size, their coordinates are easy to calculate.
I also make a new warning cel for FKiSS3, copy "puzzfk21.cnf" to
"puzzfk3.cnf", add the new cels to the object definition block and raise
"version(n)" by one. Under version(4), which is only processed if the viewer
understands FKiSS3 commands, I add code to ghost the testing objects and set the
ghosting variable to its default value. Below alarm(0) comes the code to
reverse-ghost if the testing cel is still clickable. Since the tiled testing cel
is ambiguous, I ghost the sixteen object numbers rather than the cel; generally,
an event happens for all instances of the cel, so the press() event can use the
cel name, but actions are applied only to the first instance. (Under FKiSS4, I
hope to combine all objects into one with offset tags.) Once the start button is
clicked, the testing cel has served its purpose; its instances are unmapped,
ghosting variable G is used to set the value of unghosting variable U, and
non-interactive parts of the set, like the progress bars, are ghosted using the
variable. The unghosting variable U will prove its worth later on.
While I'm at it, to clean up the code, I move all button code blocks directly
below the ghost press() event, in the right order, from button 1 to button 6,
followed by the two round buttons and the finishing screen. The FKiSS block is
now structured as follows: initialize(), begin() and version(), plus three
alarms that are needed for initialization; the ghost check; all button press
events; all set() events; code to raise pieces and show a drop shadow when
clicked on; code for when the pieces have been placed correctly; and the alarms
from alarm(3) onward, which will be replaced by labels, that will be added to
the bottom of the FKiSS code block. Labels are events written as
"label(number)", and called from another event with the actions "gosub(number)"
(carry out label code, and when finished, return to process rest of calling
event code) or "goto(number)" (stop processing calling event code, just go to
label code). There are other commands to call labels; this set won't need them.
Any block of code that has to be copied and pasted from one event to another,
belongs under a label. Here is a list:
My plan for the labels:
Revisiting the start button, and the ghosting code I just added to it: the
existing code under that is replaced by "let(S,1) goto(0)", where the action
"let(x,y)" is used to set variable x to the value of y, which is either a number
or another variable. The restart button sets S to 2 instead of 1, then also
calls the label. The return button only calls the label, as S should normally
have a value of 0.
The if-else-end construction introduced in FKiSS3 is common in programming
languages, although each language may have a subtly different syntax, like
having to add "then" after "if". The "if" part is a condition, which in FKiSS3
can only compare two numerical values, a comparison which is baked into all of
its possible syntax:
Like an opening and a closing bracket, every "if" word has to be followed by
an endif(); any code has to go between the two, the result being an if-end
block. Such code may include the catch-all condition "else()", making the
existing block an if-else-end block, and nested if-end blocks, which are blocks
within blocks. For clarity's sake, the if, endif and the code between them each
start on a new line, and the code between if and endif is indented; if the code
contains a block, that block is indented even further. A purely theoretical
example:
This should work, but UltraKiSS, for one, does not like nested if-blocks, and
will pop up error messages about them. So, for the sake of compatibility, I'll
avoid them.
Writing the first label is a combination of cut and paste, and the use of
if-end constructions. First, the settings screen is unmapped and the buttons are
mapped, because that always happens. Then, if S is 0, that's it, we're done:
goto(5) goes to the (un)ghosting label, ignoring any instructions below it. If
label(0) does not jump to label(5) but continues processing its own code, that
means S is 1 or 2, and the progress objects need to be (re)mapped. If 2, the
puzzle was restarted, so D must be set to 0, the puzzle pieces must be unfixed,
and the progress bar repositioned. (In the previous cnfs, repositioning the
progress bar had to wait until after the pieces were re-scattered, in case it
was moved by a collision event during the scattering, but these collision events
will be removed from the code.) Finally, S is set to 0, gosub(5) takes care of
unghosting and returns to the last instruction in label(0), a goto() that calls
label(2), which scatters the pieces with help from label(3). Woohoo! We're doing
some real programming here!
Next label: bringing up a correctly mapped settings screen. First, the events
that call the label, or set variables that the label needs. The code under the
pink button and the finish message, both of which call label(1), is now
considerably simpler. Note, again, the rationale for using gosub() versus
goto(); the button press() event uses goto() because that's the last command in
this event block anyway, but the press() event for the finish message uses
gosub() so it can follow up the label by unmapping the return button, which
should not be visible at the start of the game.
FKiSS2.1 depended on the mapped state of a cel to show the right buttons on
the settings panel, but FKiSS3 has variables to keep track of various states, so
snapto1.cel and snapto2.cel can be deleted from the object definition and FKiSS
code blocks. The variables used for the puzzle piece type, underlay, background
and visibility of the progress bar will be C, C1, C2 and C3 respectively. Their
initial value, when the set loads, is 0, which means everything is mapped and
the topmost cel is visible. For each layer unmapped, the value goes up by 1. For
instance, C=0 means flat pieces, C=1 means outlined pieces and C=2 means
bevelled pieces. The progress bar variable, C3, only has values 0 (opaque) and 1
(transparent). The values are set by clicking the first, second, fifth and sixth
settings buttons:
Using these variables, label(1) will now do the work of both the code deleted
from under the pink button and the finish message, and the alarms 4 to 10, which
can also be deleted. For the first three buttons, if the variable's value is
higher than 0, the top button should always be unmapped, but the button under
that must only be unmapped if the value is exactly 2. The label's last action is
to call label(5) which ghosts the puzzle pieces.
The next label will have a huge amount of code, because it has to test if a
puzzle piece object is unfixed and if so, move it somewhere near one of the
playground's edges - and it must do so for every object individually,
using an if-end block. Fortunately, the code to decide where to move the piece
will not have to be repeated for every object, as it's under a separate label.
Label(2) is called from the (re)startbutton via label(0), or directly via the
blue button, which has all its code, as well as alarms 11 to 74, deleted and
replaced by:
This label uses the FKiSS3 action "letfix(variable,object)", which, if that
was not obvious, takes the fix value of the object and stores it in the
variable. (FKiSS3 has many actions of this type, such as letobjectx(),
letmousex(), lettransparent() etc.)
Variables X and Y (names chosen for an obvious reason) are helpfully filled
by label(3). This is why labels are a thing of beauty: the same code can be
reused instead of having to be copied and pasted under every single one one of
54 objects. The new command "random(variable,starting value, maximum value)"
would also be a thing of beauty, if it worked better. According to the
documentation I have, the range of possible outcomes is in fact one less than
the second number, so "random(V,1,2)", which should, like a coinflip, give V a
value of 1 or 2, will only make it 1; counterintuitively, I must write
"random(V,1,3)". And while this coinflip construction, when repeated 54 times,
should come out as half ones and half twos, it is, in GnomeKiSS, all twos, and
UltraKiSS, while spreading the results better, likewise favours the higher
outcome. I remember something about random() needing a larger range of values to
be properly random, so I'll try again, picking a high maximum value and reduce
that to a number between 1 and 4, each value representing an edge of the
puzzle's playfield:
Of course, instead of reducing R to a smaller number to determine one of four
ways to fill X and Y, I could fill X and Y directly. If on a vertical edge,
coordinate x would be 0 (on the left) or 490 (on the right), while coordinate y
would be a random number between 0 (top) and 390 (bottom), putting the piece
anywhere along that edge. For a horizontal edge, this would be roughly the other
way round. You'd think that in a 580x480 square, the maximum values would be 580
and 480, but from those maximums, I have to subtract respectively the width and
the height of the biggest puzzle piece, including the drop shadow. Also, the
pieces should not be exactly lined up, so the coordinate that sticks a piece to
one of four edges will be randomized a bit as well. Here's the third attempt,
with an even wider range:
This does not work well in GnomeKiSS, which does not seem to like nested
blocks in combination with random(), or an else() between two nested if-else-end
blocks; it appears to ignore the second else(), stacking all pieces in every
corner but the bottom left one. Nor will GnomeKiSS let me change the value of a
variable inside an if-end block based on that variable, at least not within the
same event:
The solution is to replace "set x to 0", which in this example is meant to
prevent further processing, with exitevent(), which achieves the same by leaving
the event block, skipping any code that comes after it. Written out without
nested blocks, label(3) becomes:
Brilliant! Works like a charm! The fourth label requires the deleting of all
in() events, including those of the progress objects, because rather than
waiting for a puzzle piece to collide with a hidden dot, FKiSS3 can check, the
moment you release an object, what its position is, and can compare that
position to what it should be, using variables. There is already a release()
event for each individual puzzle piece cel - to unmap its dropshadow equivalent
- but now there is going to be a separate release() event for the object number,
because this concerns the position on the screen, which is a property of
objects. The release() event will use the FKiSS3 commands letobjectx() and
letobjecty(), while the label uses two of its mathematical functions: add() and
sub().
The gosub() implies there's more code below, but I want to show how label(4)
decides whether or not the piece "fits". For both the x and y axis, I want the
difference between what the coordinate is, and what it should be, and to add
those two differences; if the total difference is below a certain threshhold
(and that is much more accurate than having a puzzle piece collide with a dot)
it counts as a fit. The difference has to be a positive number, so I subtract
the smaller value from the larger one.
There's that exitevent() again: if the piece doesn't fit, variable P, which
contained the released piece's object number, is made empty, and the label is
told to quit (because P does not immediately become empty) and, having been
called through gosub(), gives back control to the release() event. But we're in
the middle of an if-else-end block here, so let's continue:
Instead of having to write "play a sound" under each collision event, I now
need to do it only once, under label(4); that makes it much easier to write code
for, say, a Mute button. I also don't have to wait for two progress objects to
collide, because in this same label, variable D (for "done") keeps count of the
number of pieces placed, and when it reaches the maximum of 54, does the stuff
that needs to happen when the puzzle is completed. But the object release()
event still has stuff to do; if P still has the same value as its object number
after calling label(4), the object has to snap to the right coordinates (stored
in P0 and P1), and become fixed and ghosted (using the G variable set in the
ghost-testing stage).
Why ghost the piece once it is placed? Well, now that the puzzle's progress
is counted through clicking and releasing rather than via collision, clicking
repeatedly on a piece that is already in the right place can raise the value of
variable D, so the puzzle may act as if finished when it is only half done.
Since the piece is fixed, I could replace release() by drop() which doesn't work
for maximally fixed objects, but firstly, not every viewer agrees on what is the
right value for "maximally fixed"; secondly, not even all viewers agree on this
use of drop(); and thirdly, ghosting has another advantage: I can now fish lost
pieces out from under the ghosted ones. Even if I can't see the pieces that have
slipped under others, clicking on where I think they are will raise their
visible, drop-shadow version if I guessed correctly, and allow me to drag them
to the side.
I put label(5) off to the last moment in order to have a good think about it.
If the settings screen is visible, all pieces must be ghosted, whether they are
already fixed in place or not. That is a relatively short block of code, so I
should first check whether the settings screen is mapped. But if I test for that
first, the "else" block - what to do if the settings screen is not mapped
- will be huge, because if the settings are unmapped after clicking "Return", I
must only unghost the unfixed and therefore unplaced pieces, which means testing
the fix value of 54 objects, just like in label(2). But I can avoid using else()
at all by putting exitevent() inside the if-end block, so that anything under
the block is only carried out if anything inside the block is not.
In this case, I use letmapped() instead of setting a variable whenever
something maps or unmaps the setting screen, because I don't care what mapped or
unmapped it, I just want a simple yes/no answer. If it is unmapped, I also don't
care whether the player clicked "Return" or "Restart", because if the puzzle was
restarted, the puzzle pieces have already been unfixed by label(0) before it
issued "gosub(5)", so the rule that only unfixed pieces must be unghosted, still
applies. At this point I am glad to have put the "right" (ie. "works in the
current viewer") values in variables G and U just after the set was loaded, so I
can now use ghost() with these variables.
If you made it this far through the tutorial, congratulations, you may be a
programmer. If you want to see the full code, it's in the finished set at the bottom of this tutorial. The last adjustment I had to make was
to delete objects #74 to #127 from the object definition block, remove their
coordinates from under set 0 in the coordinates block (I had to count carefully
to delete the right ones) and under the other sets (I just deleted the last 54
asterisks under set 1, and copied its total block to sets 2 to 9), renumber
objects #128-#148 to #74-#94 in the trimmed-down object definition block, and
change those object numbers to their new numbers wherever they occur in the
FKiSS code block.
FKiSS4 is a continuation of the FKiSS3 development that started with Chad
Randall and the later version of PlayFKiSS, and then continued for a while after
I left the mailing list. In short, there are two phases to FKiSS4, and the last
PlayFKiSS supports only the first phase (and not always well, as it was a beta).
The two players that support FKiSS4 all the way are the java viewer UltraKiSS by
William Miles, and !PlayKiSS for RiscOS by Nick
Roberts, who wrote up a comprehensive FKiSS reference page that I'm very
grateful for right now.
When it comes to reducing the amount of code, FKiSS4 is a godsend, starting
in the object declaration block, with new tags comparable to "%t", the old
transparency tag. The most useful of these is the %u tag that has cels start out
unmapped, so I don't have to unmap the more than 150 drop-shadow puzzle pieces
under initialize(). The second most useful is the %g tag, ghosting cels at load
time with no worries over whether it should be "ghost(x,1)" or "ghost(x,0)". (I
would still need the ghost-testing cels for determining how to ghost and unghost
on the fly, of course. FKiSS4-capable viewers should get it right, but given
that ghost() was used in sets written for PlayFKiSS, UltraKiSS has a setting to
reverse the way ghost() is parsed, for the sake of compatibility.) Finally,
there are the incidentally very useful %x and %y tags, giving cels an offset
within an object, which deserve an illustrated explanation.
Suppose there is a KiSS set of an anime character, skipping with hands
pointed outwards in that typical sassy anime way, and the anime character has a
winter outfit that includes a pair of fluffy red mittens. Because the base doll
is not facing the front but half turned away, to keep up the illusion of three
dimensions, the right mitten has to pass under the winter coat, which has to
pass under the left mitten. To this end, the mittens must be two different cels.
They should be also be one object, always stay at the same distance from each
other, and move together when dragged.
Cels are normally cropped; there is no more empty space around them than
strictly necessary. Their image height and width is like an invisible box, the
upper left corner of which determines their position. But if two or more cels
need to maintain a certain position relative to each other, the space around
each of them needs to be a big box that they all fit in. Any space downwards or
to the right can be trimmed, but the upper left points of the boxes surrounding
them must be at the same coordinates. That is why the left mitten has a lot of
empty space at the top, while the right mitten has a large stretch of empty
space to the left. This space acts as an offset point, pushing the left mitten
down and the right mitten to the side.
The offset tags in FKiSS4 would allow both mitten cels to be cropped right to
their outline, because the job of that empty space - keeping the mittens in a
certain position relative to each other - would be done by the tags, which would
tell the cels to always stay the specified distance away from their shared upper
left corner.
Why would I need separate offset tags, when the cel's image size itself acts
like an offset point? Because a big image size, even if most of it is empty
space, can mean a big filesize, especially if the image is a CKiSS cel. And
offset tags are great for, wait for it, tiling! Consider this: to cut down on
filesize, I have a background cel that is smaller than the background, and must
be projected on that background several times, one projection under the other,
to completely cover it. Because the projections have different positions, I have
to assign them different object numbers. But with these offset tags, I can
define the same cel multiple times in the same object, giving the cel instances
different offset points to fit them under each other, and still just use one
object number, with one set of coordinates, and manipulate the object with one
single command. And if the command I want to use requires the cel's name, I can
also assign all instances of this very ambiguous cel to the same cel group, and
use the cel group name instead. (More on cel groups below.)
There is no better example for this than the ghost test object, which in the
previous "puzzfk3.cnf" was sixteen objects for the purpose of tiling, but which,
in the newly started "puzzfk4.cnf", will be just object #0, an object number it
will share with any other large, static cels, like the backgrounds, and whose
coordinates in the coordinates block of set 0 will be 0,0. As the object number
is not unique to this collection of cel instances, these cel instances will be
assigned the cel group name "!GhostTest", consisting of sixteen times the same
cel, the first one in the top left corner, the rest stacked beside and below it
at the distances set by %x and/or %y. (Where %x or %y are not specified, they
are the default value, ie. 0.)
Cel group names always begin with an exclamation mark, don't need quotes, and
ideally (in practice, this can vary) can be used by any command that accepts a
cel name. Lumping a lot of cels together under a name and applying commands to
that name really cuts down on the volume of code. Instances of an ambiguous cel
can also be referred to separately by giving them each their own cel group name,
where the "group" is just one cel instance. Both uses of cel groups are not
mutually exclusive, as a cel instance can be assigned to more than one group.
Finally, cel groups are needed for frames, a quick method to cycle through
mapped/unmapped states; this will be used for the settings panel and the puzzle
pieces. In all, cel groups are a versatile tool for writing compact code.
Cel groups can even supplement version(). I did mention that the later
version of PlayFKiSS doesn't support all of FKiSS4? To my knowledge, it does not
support frames and cel groups. That is why the above example includes the two
warning cels: the top cel has its own cel group, "!Warning". In this later
PlayFKiSS version, version(5) will trigger, but as this cnf uses cel groups, the
warning cel should stay up, and not be unmapped. That is why, under version(),
the unmap() event will not use "warning5.cel", but "!Warning". (The transparency
warning is invisible anyway, unless the viewer doesn't support transparency, and
will be unmapped along with the rest of cel group "!Intro.") The FKiSS2.1
conditional timer ifmapped() will, if warning5.cel is still mapped (ie. the
viewer doesn't understand cel groups), trigger alarm(2) and close the set.
The ghost test looks much like in the FKiSS3 cnf, but I want to use the cel
group name instead of the original sixteen object numbers. It should be
possible, according to the FKiSS reference page, to use "ghost(GhostTest,1)",
but UltraKiSS refuses to accept a cel group name with ghost(), so I must use its
object number, #0. Not a big deal, as the other parts of object #0 are either
ghosted via the %g tag or unmapped at this point. The important thing is that
!GhostTest can be used with press() and unmap().
Due to offset tags and cel group names, all object numbers that have
coordinates 0,0 have been changed to object #0. All object numbers that don't
have coordinates 0,0, but that are connected with objects that do, such as the
lower tiles of tiled backgrounds, have been changed to object #0 with offsets.
All object numbers at coordinates 90,90, or connected to the settings screen,
will become object #55. The puzzle pieces retain object numbers #1 to #54, of
course, the finishing screen becomes object #56, and there will be a new
progress bar, object #57. The extra object coordinates, or their asterisks in
the empty sets, can be deleted. (No example code for the coordinates, it should
be clear how to do this by now.) Like the ghost test cels in cel group
"!GhostTest", all intro parts of object #0 are assigned to cel group "!Intro"
for quick unmapping.
In the example below, note the %u tag for cels that would otherwise be
unmapped under initialize(). Also, note that anything after the semicolon that
doesn't start with "!" or "%" is treated as a comment, so no need to put a
second semicolon before the actual comments. (Except when using frames, which
I'll get to when declaring the settings screen cels.)
The settings screen gets two extra buttons, "Mute" and "Edges" (unmaps all
except the edge pieces) and becomes a bit bigger; I use the same settings screen
cel, but add a bar below it for the new stuff.
And now for frames! The settings screen buttons, backgrounds, underlays and
puzzle pieces also get cel group names, but the buttons and any cels they affect
will additionally get frames to replace the "ifmapped()" tests in FKiSS2.1, and
cooperate with the button variables in FKiSS3. The syntax for frames is
"!CelgroupName : n n n etc" where each "n" is a frame number. After the last
frame number, if I have comments to add, I do put them after a new semicolon.
Cels in a cel group with no frame number are always mapped; otherwise, they
are mapped only when their "frame" (think of a frame in a film reel) is "active"
(like the film frame currently in front of the projector). Frames start at 0,
and I assume frame 0 is active (the cels assigned to that frame are mapped) by
default. (At least for UltraKiSS, I later discover this assumption is
incorrect.) In the example below, all settings cels are in the frameless cel
group "!Settings", but the button cels are also in the first, second or third
frame of cel groups like "!BackgroundBtn", "!PieceBtn" etc. In the object
declaration block, the lines for the new cels are added above that of the
existing settings cel, the lower part of which is almost transparent (a way to
cover pieces and stop them from being clicked in pre-ghost() versions), but
would discolour any cels below it.
Skipping the puzzle pieces for now, to go straight to the bottom of the
object declaration block: the underlays and backgrounds are now object #55 and
object #0, with offsets as needed. Meant to be unclickable, they all have ghost
tags. The frame number each background is assigned to, is the same as the frame
number of the corresponding button in !BackgroundBtn. The underlays are in cel
group !Underlay, with two frames; the corresponding button cel group,
!UnderlayBtn, has three frames, but setting !Underlay to a frame that it has no
cels in, makes it unmap all its cels, which in this case is exactly what should
happen.
Under version(5), alarm(0) is set to unmap the intro screen and bring up the
settings. Since the settings screen is mapped but hidden under the intro screen,
this can be done with the beautifully simple "unmap(!Intro)". But I notice that
some settings buttons are gone when the settings screen first opens, and when I
click the settings buttons (see code in next paragraph) they don't react at
first. I use letframe(), and assume that because these buttons are in a
frameless cel group followed by a framed cel group, their frame is not 0 by
default, and needs to be set to 0 before the buttons are used, with setframe():
The code for pressing the buttons now works with frames, so, although I still
use the C[number] variables, I don't have to spell things out for every
individual button cel any more. Note that for backgrounds and puzzle pieces, the
number of frames in the group and its button group is the same; for underlays,
it's one less; and the progress bar, which no longer has to be transparent and
has been redesigned, doesn't use frames to (un)map itself, only its button does.
(It does use frames, and variable D, to display its progress, on which more
later.)
The new Mute and Edge buttons, like the progress bar button, only have frames
to quickly display the right button when the settings screen is opened; their
frame numbers are stored in variables that, since FKiSS4 allows longer
filenames, are called SoundOff and EdgesOnly.
Unlike the Mute button which simply stores a variable to later decide whether
or not to play the snap-to sound, the Edge button is meant to unmap or remap all
puzzle pieces that are not edge pieces (as it can be easier to lay out the edge
of a puzzle first). But all puzzle pieces already display one of three frames,
and, if unmapped and then remapped, might reappear showing the wrong frame, or
something. To avoid that mess and the reams of code for checking and setting
frames, I will simply add three frames for edge pieces. To take for example the
object declarations of two puzzle pieces, one an edge piece, the other not:
The difference between the two pieces is that the edge piece has two frames,
while the other has one. At frames 0 to 2, both pieces will be mapped; at 3 to
5, the non-edge piece will vanish. Because the button for puzzle piece styles is
meant to have the same frame number as cel group !Pieces, in the higher frame
range, the button will also disappear - unless the frame number of !Pieces is
adjusted using the separate variable EdgesOnly. The code for the Edge button -
which demonstrates why, in the object declaration block, the button's frames are
0 and 3 - adds its value to C, the current piece style button frame, in TempVar,
a new variable used anyplace where a value has to be calculated on the spot, and
TempVar sets the frame number for !Pieces.
The last two lines of the edge button code replace the last line of the piece
style button code, so that it doesn't map any pieces that should stay unmapped:
Giving the buttons frames makes it easier to map them and the cels they
affect, but also helps to show the right buttons when the settings screen
appears after pressing the "finished" message or the pink button in the top left
corner. In the FKiSS3 cnf, the button states were already stored in variables;
now, in label(1), rather than using if-blocks to match a value to a cel-mapping
action, the variables can be directly used to set the buttons' frames.
Before I move on to label 5 and FKiSS4's version of the do-while loop, I'll
finish the object declaration block with the dropshadow pieces and the new
progress bar, the latter of which is both brilliant and a piece of work. The
dropshadow pieces are always unmapped, except when puzzle pieces are clicked on.
Having three styles, they are also given three frames, and three extra if they
are edge pieces, but instead of being one large cel group, they have an
individual cel group per object number. I've given a short example of two puzzle
pieces in the object declaration block earlier, below is the same for their
dropshadow equivalent:
The main difference between the puzzle pieces and their dropshadow twins is
that the latter have no frame 0. Instead of having to code catch() and release()
events for every puzzle piece cel, I now have one catch() and one release()
event for "!Pieces", and while either event has to cover 54 possibilities, at
least I can use setframe() instead of typing out every possible celname.
To map the right dropshadow piece, the frame to set the dropshadow cel group
to is put in TempVar; beware, setframe() uses the cel group name as the
first parameter, but in letframe() the cel group name comes second. The
FKiSS4 action letcatch() assigns the number of an object being dragged to
a variable, in this case ObjNo. Having filled these two variables, I count down
the values of ObjNo from 1 to 54, to set the right frame for the right cel
group. Luckily for me, FKiSS4 has something that FKiSS3 sorely lacked: the
condition elseifequal(), allowing me to work my way down the line without
nested if-blocks and exitevent() solutions. The example below is for objects 1
and 11, rather than the full 54.
When using UltraKiSS in PlayFKiSS compatibility mode, an error pops up at
load time saying that catch() needs an object or cel name, presumably due to the
compatibility option "Enable Catch events on Fixed or Sticky objects", which
means that catch() may now have to deal with non-zero fix values, and fix value
is attached to a cel-object combination, but can't be deduced from the cel group
name. Despite the error, the set works anyway, presumably because every part of
!Pieces is unfixed until placed, at which point it becomes ghosted, and catch()
can't affect it anyway. Since ghosting the pieces has made the difference
between catch() and press() irrelevant, I change "catch(!Pieces)" to
"press(!Pieces)".
Unmapping the dropshadow piece is similar, except now I only need ObjNo, as
the drop shadow cel group will always be set to frame 0, to unmap all cels in
it. This is why I made the drop shadow frames one higher than the corresponding
puzzle piece frames; for the drop shadow pieces, I didn't want the frames to
start at 0. ObjNo is still filled with the same object number I just clicked on,
so I'm not using letcatch() here; since release() means no more dragging,
letcatch() might not even work, anyway. I do, however, set ObjNo to 0 when I'm
done.
While I'm on the subject of release(), in the FKiSS3 cnf I use this with
celnames to unmap drop shadow pieces, and with object numbers to 1. check if a
puzzle piece is within 10 pixels of being placed correctly, 2. make it snap to
its position and ghost it, incrementing the progress variable D, and 3. play a
sound and adjust the progress bar. For the object release(), I fill five
variables and call label(4) for the calculation, so I don't have to repeat it
for every object. The five variables are: P for object number (voided under
label 4 if the piece is not well-placed), P0 and P1 (filled in by hand) with the
object's correct coordinates, and P2 and P3 (filled by letobjectx() and
letobjecty()) with the object's current coordinates.
But in FKiSS4, I can use a variable, instead of an object number, in commands
that take an object. And instead of supplying the correct coordinates, I can use
letinitx() and letinity() that put an object's initial coordinates
in a variable, these initial coordinates also being the correct ones! So,
immediately under "release(!Pieces)", above all the setframe() checks for drop
shadow pieces, I use the already filled ObjNo instead of an object number in the
following block of code:
(Why, if fix value becomes moot because the puzzle piece is ghosted, do I
still fix it? Because I need to be able to check if a piece is already in its
right place for the settings and scatter buttons, and while there is a letfix()
command to check fix value, there is no letghost() equivalent.)
The code above contains the calculation formerly under label(4), and could
take all code from label(4), but I've decided to keep settings-related code
under that separate label, for clarity. A sound is now only played, and progress
only shown, if the settings allow it:
But, how could I forget, in FKiSS4 gosub() and goto() can take a variable
instead of a number. Since press() and release() essentially set a cel group to
a frame number, I can, instead of the endless procession of elseifequal()
commands under both these events, define 54 labels, one for each piece; set
variable ToFrame for these labels to use; and call these labels using a
combination of ObjNo and TempVar (I can't just use ObjNo, as the labels can't
start at 1, labels 1-5 already being in use). Clicking on pieces now executes
the following:
While releasing them does this:
Below, a shortened example of the labels being called, each with just one
action. (According to the FKiSS reference page, since labels and alarms can have
the same names as variables now, I could also define a label with the literal
name "TempVar" which would be called instead, ignoring all numbered labels.
Which would defeat the purpose in this case.) To keep the cnf organized, the new
labels go under label(5).
Now that I've condensed a lot of code under "press(!Pieces)" and
"release(!Pieces)", it's time to explain how my new and improved progress bar
works. It is now object #57, yet in the code examples above, it is always
referred to by its cel group name, as "setframe(!ProgressBar,55)" or
"setframe(!ProgressBar,D)". The first action unmaps the object, as its highest
frame number is only 54, while the second sets the frame to the same number as
the pieces placed. No longer a rectangle moving towards another rectangle,
object #57 is an empty base (frame 0) with a single bar cel repeated across the
base 54 times, its offset increasing 6 pixels for every frame. Visually, the bar
seems to fill up, as every time the frame number is raised, another bar appears.
The amount of code in the object declaration block is enormous. It starts
with a simple 1-frame line at the top:
But the "progbar.cel" line occurs 54 times, each time adding previous frames
to its own, as otherwise the progress bar would appear to be a line moving
forward instead of a bar filling up. A few lines down, it looks like this:
I'm learning something about frames: at first I thought that frame 0 is the
default, and a cel group with frames would initially only show the cels in frame
0. It shows them all. I don't know if this is unique to UltraKiSS or true of
FKiSS4 viewers generally, but just after loading, all frames show and none of
them is properly active until after the first setframe(). That would explain why
letframe() only seems to work after a setframe() for that same cel group. It
certainly means that I have to initialize the progress bar by adding the
following code to alarm(0):
Before dealing with drop shadows and piece placement, I revised the code that
makes the settings screen appear and show all the right buttons, in label(1),
the last line of which was a call to label(5), where the puzzle pieces are
ghosted while the settings screen is open, and, if unfixed (and therefore not
yet placed), unghosted after the settings screen closes. In the first part of
label(5), instead of ghosting objects #1 to #54, I try to ghost !Pieces, which
UltraKiSS doesn't accept, saying that ghost() needs a cel name, object number or
variable. In the second part, I test the fix value of every puzzle piece object
and, if it is unfixed, unghost it. But because FKiSS4 accepts a variable value
instead of an object number for letfix() and setfix(), and due to the new action
repeat(), I don't have to repeat the same code for every object in either
part. To copy a line from the FKiSS reference age:
repeat(i,d,v) Performs a gosub(i) 'd' times. Before each gosub, 'v' is set
to the index number of the call (i.e. 1 the first time, 2 the second time,
etc).
The first argument, i, is the number (or, in FKiSS4, possibly the name) of a
label. Of course repeat() has to do a gosub(), as it doesn't call the label
once, but several times. How often does it call the label? That is the second
argument, d. But if it calls the label, say, 12 times, doesn't the label do
exactly the same thing every time? Not necessarily, because the third argument,
v, is a variable that goes up in value each time the label is called. So for the
first call, v=1, the next time, v=2 etc. and the label can use if-blocks to do
different things depending on the value of v. Or, the label uses v as an object
number. You can see where this is going:
Label(SetGhost) is an incredibly elegant solution to processing a contiguous
series of objects. First, unless the settings screen is open and F0 is 0,
label(SetGhost) sets F0 to the fix value of the object number in ObjNo. Either
way, if F0 is 0, the ghost value (0 or 1), which has been set once in label(5),
is applied to this object number. Due to the repeat() command, this needs to be
written out only once for all 54 objects.
Most buttons on the settings screen have been addressed: what remains are the
(re)start and return buttons. The return button simply closes the settings
screen; the start button also unghosts and scatters the puzzle pieces and sets
the progress bar to zero; the restart button does all that, unfixes all pieces
and resets the progress variable.
The code under the start button now ghosts all of object #0, so part of that
object nees unghosting; apart from that, the button code is unchanged. It sets
variable S and calls label(0), which closes the settings screen, optionally
restarts the game, and now also unghosts the top left corner buttons. Label(0)
always calls label(5), and if (re)starting, also label(2). The FKiSS4 version of
label(0) is tightened up a bit by using cel groups and setframe():
Sadly, UltraKiSS will not let me use setfix() with a cel group name either,
so
Label(Unfix) is even simpler than label(SetGhost):
The piece-scattering code in label(2) uses label(3) to calculate a random X
and Y coordinate. Since label(2) just goes down a list of objects, checking
whether an object is unfixed and if so, running label(3) to come up with
coordinates for it, I thought I could move the fix test and placement to
label(3), and restrict label(2) to:
Somehow, the code moved from label(2) to label(3) made the latter not work
any more, leaving most pieces in place. So I restored the old label(3) and put
the old label(2) code in an intermediate label, and once again, things worked.
That concludes the tutorial. I've you've made it to the end,
congratulations! To see the source or play the puzzle, download
puzzconc.lzh here.
Intro
Getting pictures
Making a puzzle in Palapeli
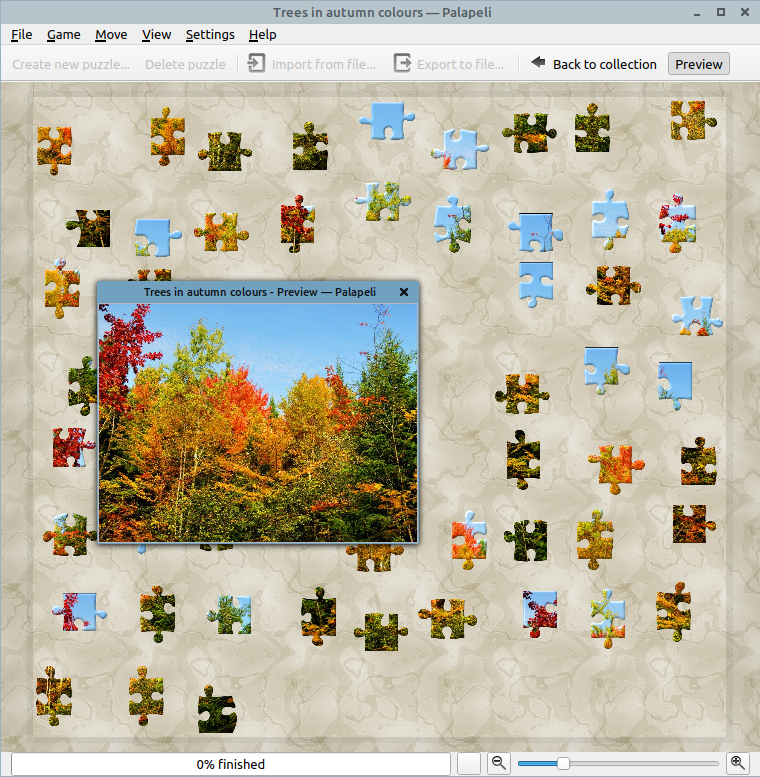

Palapeli's playfield.


Palapeli's top-of-screen buttons.


First puzzle-creating dialog.
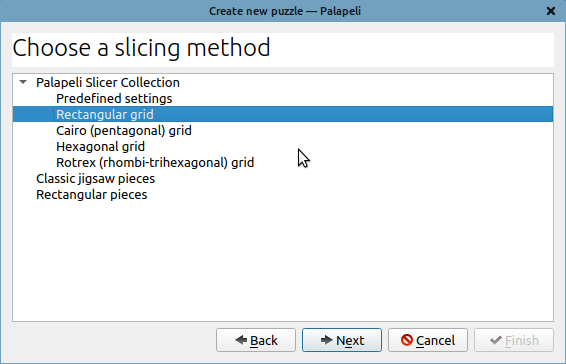

Second puzzle-creating dialog.
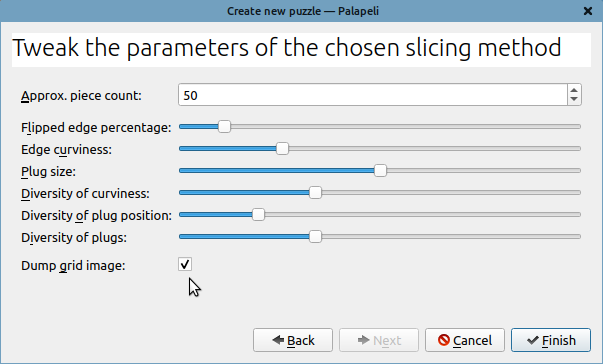

Third puzzle-creating dialog.
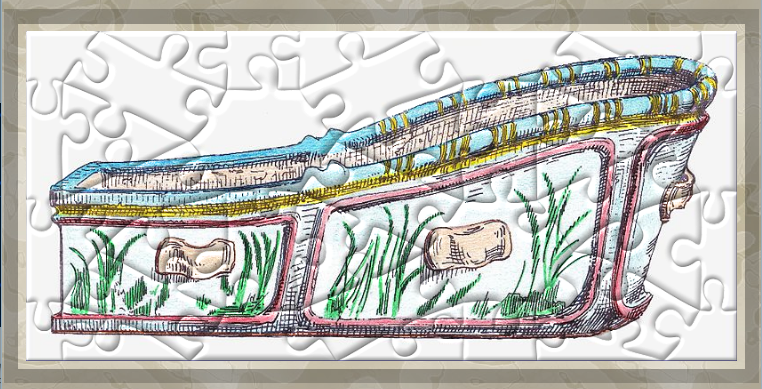

A weirdly cut puzzle.
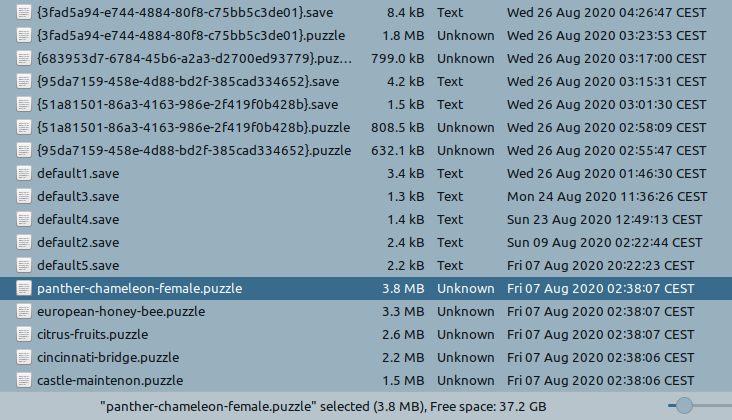

Only the default puzzles have proper names.
Making a puzzle in xjig
usage : xjig [
xjig -file wonkrain.jpg -w 3 -h 2 -ww 100 -wh 55
gives me the following six-piece mini puzzle with flippable pieces:

This screenshot needs no shrinking.
       Any image-file in GIF, JPEG, or PPM format can be used  as  the  source
       for  the puzzle, which is then randomly created regarding the sizes se‐
       lected by the options.
So PNG is out.
       Puzzles can be doubled sided so you might have to flip the tiles to the
       correct side to let them snap together.
OPTIONS
   Tile Selection
       -file name  use the specified file as the source image for the puzzle

       -side p     select the side of the image to be on  top,  if  you  don't
                   like the mess with the double sided tiles.
xjig -file [(path/)filename] -w 3 -h 2 -ww 100 -wh 55 -side 0
NAME
xjig-random - a random jigsaw puzzle
SYNOPSIS
xjig-random
Can't locate File/HomeDir.pm in @INC (you may need to install the File::HomeDir module)
(@INC contains:
/etc/perl
/usr/local/lib/x86_64-linux-gnu/perl/5.28.1
/usr/local/share/perl/5.28.1
/usr/lib/x86_64-linux-gnu/perl5/5.28
/usr/share/perl5 /usr/lib/x86_64-linux-gnu/perl/5.28
/usr/share/perl/5.28 /usr/local/lib/site_perl
/usr/lib/x86_64-linux-gnu/perl-base) at /usr/games/xjig-random line 11.
BEGIN failed--compilation aborted at /usr/games/xjig-random line 11.
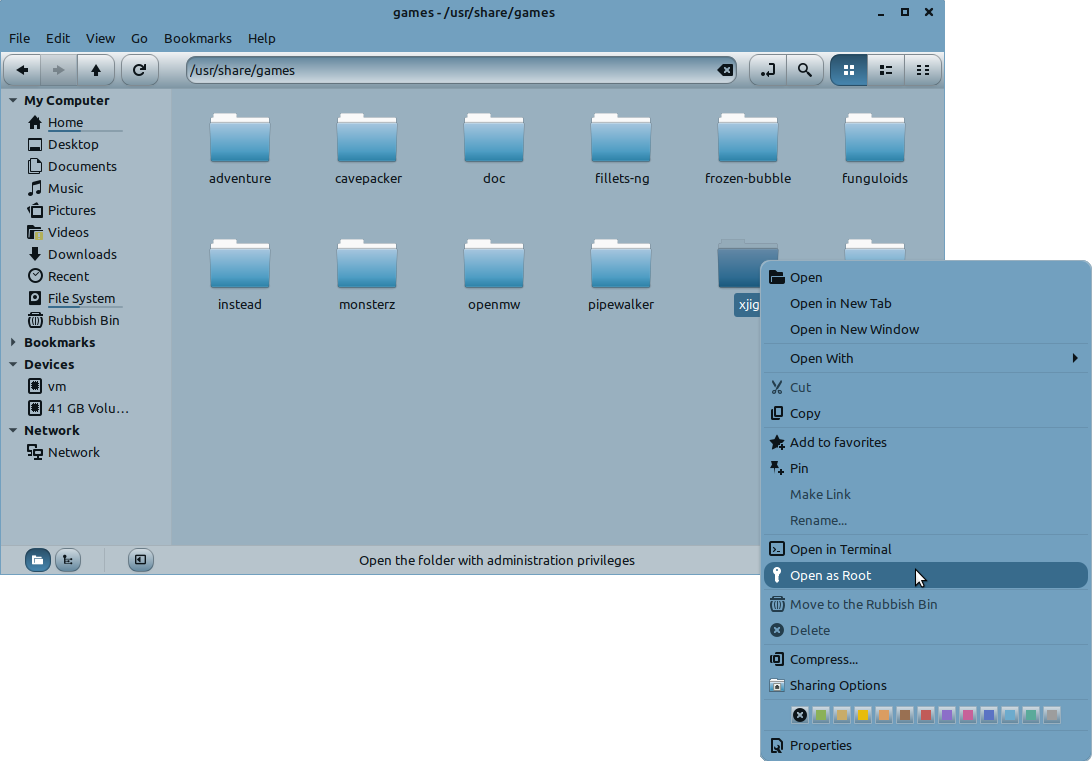

How ordinary users add new puzzle images to root-owned directories.
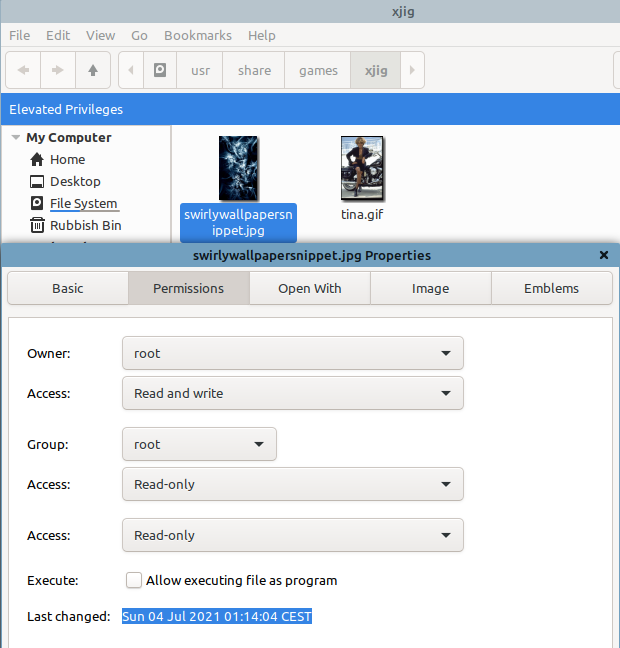

Don't forget to change file ownership.
cd ~/xjigsaw
xjigsaw
./xjigsaw


The puzzle creation screen in all its glory.
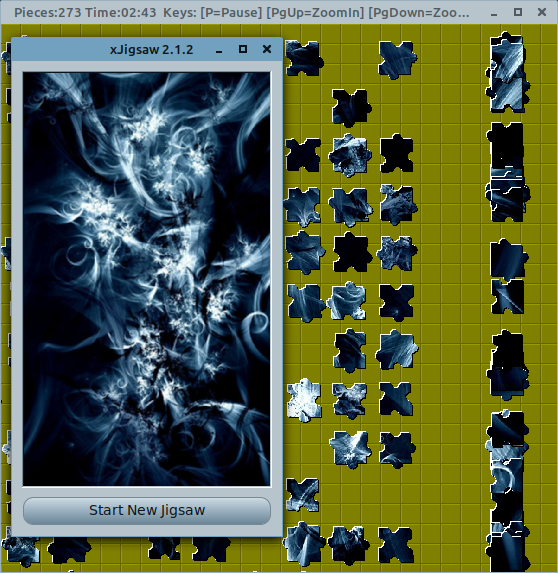

The puzzle board.

Instead of downloading, why not just install?

Extra info while installing.


Options to prevent flipped pieces and regulate rotation.
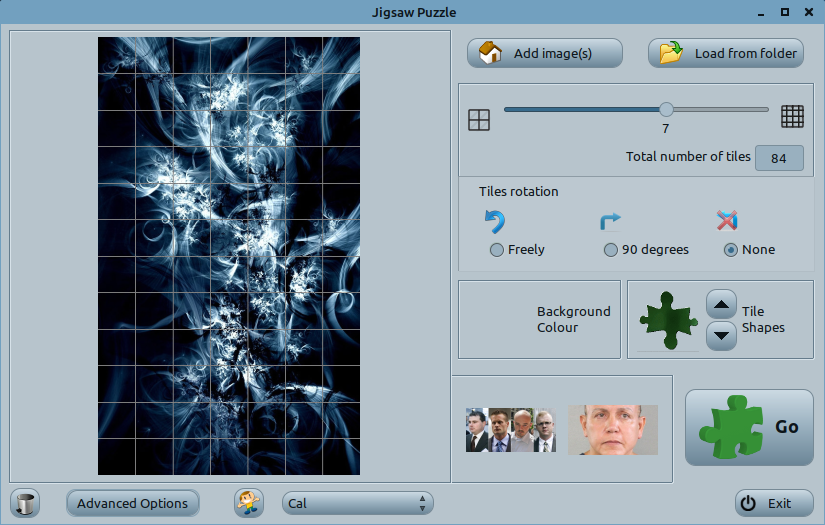

Ready to make that puzzle.
xjig -file "/home/username/Desktop/swirlywallpapersnippet.jpg"
Making a layered image file puzzle

A zoomed-out example of the image and its jigsaw puzzle grid.
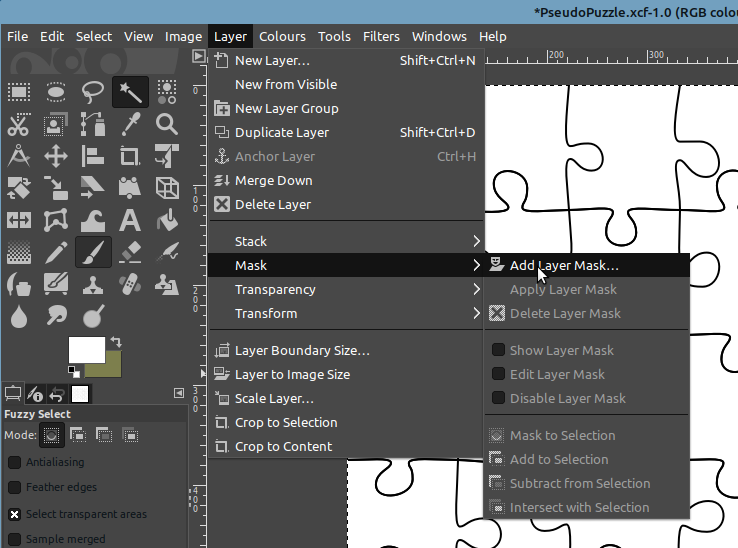

Making a mask for this layer.
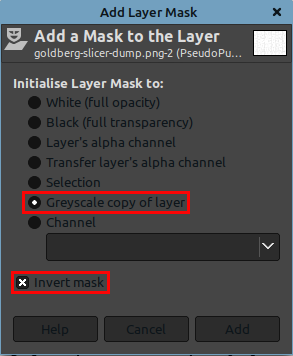

Mask settings: use greyscale, invert mask.

The base image and its jigsaw puzzle grid.
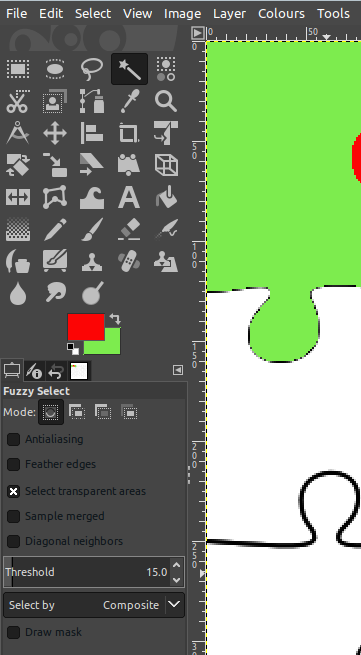

Settings for the Magic Wand, or Fuzzy Select as GIMP calls it.
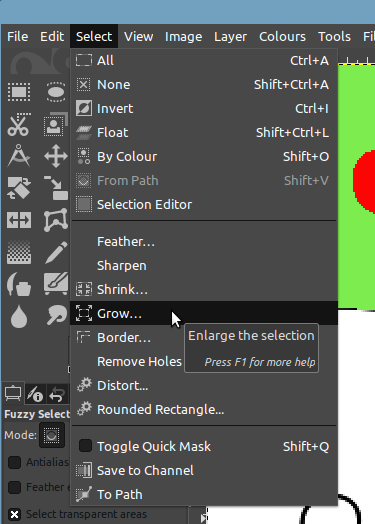

Growing the selection to chip away at the black lines.
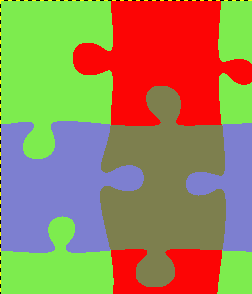

One corner of the puzzle.

Your new layer should look like this.
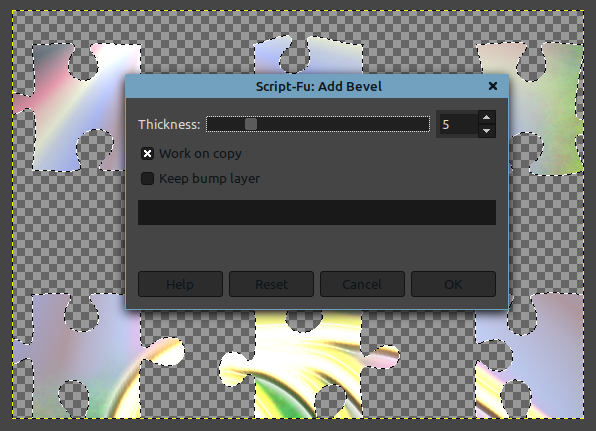

Warning: may create new file.
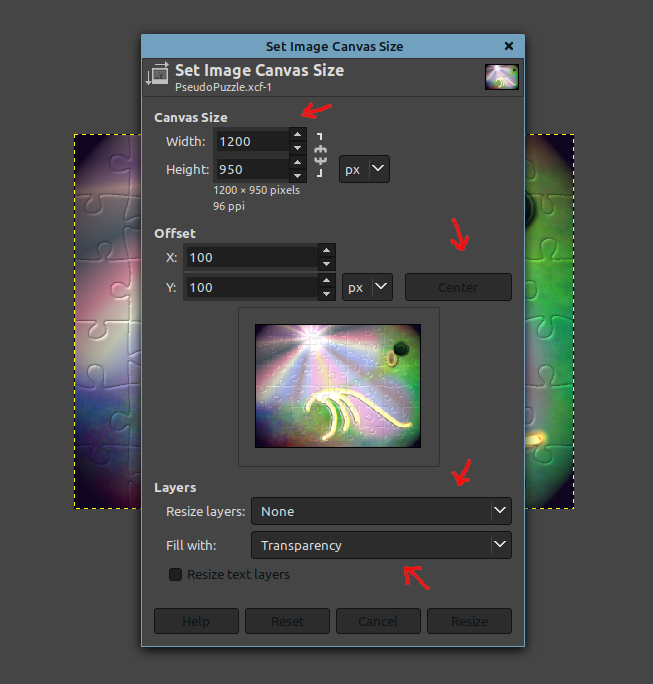

Giving the puzzle a border.

The puzzle is complete.
Making a jigsaw puzzle KiSS set
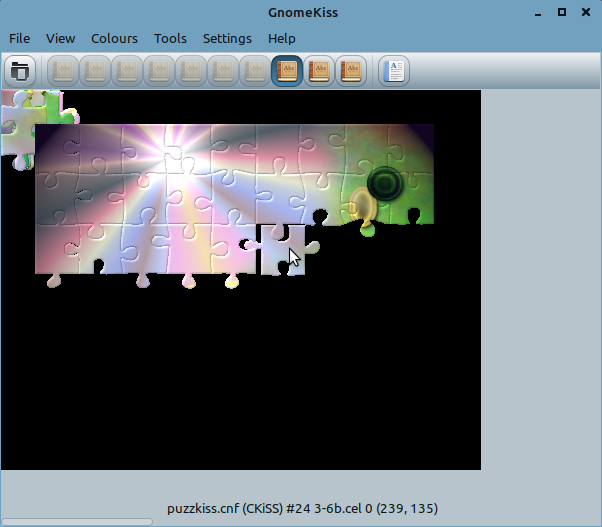

A makeshift KiSS configuration to see if the pieces came out OK.
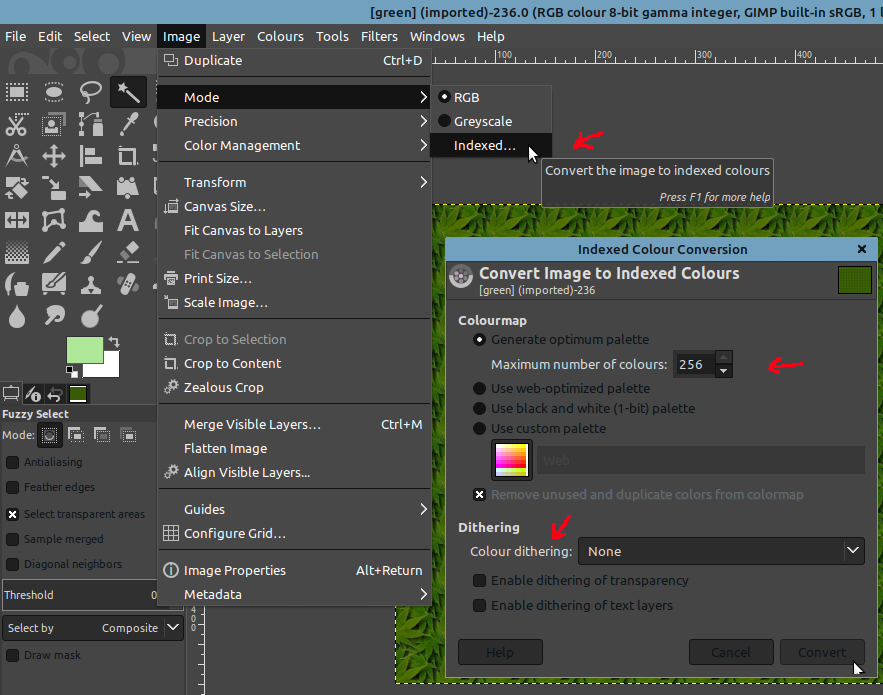

Menu choice and dialog squashed into one screenshot.
Making a jigsaw puzzle KiSS set - KiSS version
; comment: optionally name of set and author, extra notes
%palette.kcf ; palette filename for indexed cels, 16 palettes allowed, none for CKiSS
(580,480) ; board size
[0
; This colour index number in the set's palette is the colour of the border
; around the set, if the viewer window is bigger than the set size.
; So if the set's palette file's first colour (colour 0) is purple, the area
; around the set screen will be purple. CKiSS cels don't need kcf files, so
; the border colour will be the viewer's default.
;   (Blank line inserted for legibility)
; Below are the object declarations: object, cel, palette, set(s), comment.
#0.999 bird.cel         *0 :0                   ; a bird cel locked in place
; Object 0 (all counting starts at 0) is locked in place, as shown by the
; period followed by a number, which means it won't budge until it's been
; clicked 999 times. Maximum lock number 32767. The "*0" refers to which kcf
; the cel gets its colours from, CKiSS uses no kcfs, so 0. After the colon come
; the set numbers, this immobile bird is only displayed in the first set.
#1     bird.cel         *0 :  1 2 3 4 5 6 7 8 9 ;%t200 a draggable bird cel
; Same cel, different object, in all sets except the first.
; Note the way all columns are aligned, also for better legibility.
; The "%t200" changes cel transparency (0=opaque, 255=invisible) and, since it
; follows a semicolon (comment) is actually FKiSS! Plain KiSS viewers may not
; respect this transparency tag.
;   (Blank line inserted again, below follows object coordinates per set.)
; set #0 You don't have to add the set name as comment, it's for clarity.
$0 20,20 *
; Above, the first object is at 20 pixels down and right from the top left
; corner while the second is an asterisk (not placed). For set 1 to set 9, it's
; the other way round.
; The coordinate block for a set begins with "$", but the number after the $ is
; not the set number but the default internal palette, and thereby background
; colour, for that set. (For CKiSS, just leave it at 0.)
; If there are 128 objects in a set (the maximum for older viewers) you would
; have 128 coordinates or asterisks after each $. If you edited by hand, imagine
; how confusing it would be without those set numbers in the comments!
; set #1
$0 * 20,20
; set #2
$0 * 20,20
; set #3
$0 * 20,20
; set #4
$0 * 20,20
; set #5
$0 * 20,20
; set #6
$0 * 20,20
; set #7
$0 * 20,20
; set #8
$0 * 20,20
; set #9
$0 * 20,20
%palette.kcf
(580,480)
[0
#0.999 bird.cel         *0 :0                   ;
#1     bird.cel         *0 :  1 2 3 4 5 6 7 8 9 ;%t200
$0 20,20 *
$0 * 20,20
$0 * 20,20
$0 * 20,20
$0 * 20,20
$0 * 20,20
$0 * 20,20
$0 * 20,20
$0 * 20,20
$0 * 20,20
; A proof-of-concept puzzle KiSS set by Cal, 2021
(580,480)
[0
#0.999 example.cel      *0 :0                   ; inside intro screen
#55.999  intro.cel      *0 :0                   ; intro screen title
#56.999  introb.cel     *0 :0                   ; intro screen left
#57.999  introb.cel     *0 :0                   ; intro screen right
#58.999  intros.cel     *0 :0                   ; intro screen subscript
; Puzzle pieces
#1  1-1.cel             *0 :  1 2 3             ; flat puzzle pieces, sets 1-3
#2  1-2.cel             *0 :  1 2 3             ;
   [and so on until]
#53 6-8.cel             *0 :  1 2 3             ;
#54 6-9.cel             *0 :  1 2 3             ;
#1  1-1o.cel            *0 :        4 5 6       ; outlined puzzle pieces, sets 4-6
   [and so on until]
#54 6-9o.cel            *0 :        4 5 6       ;
#1  1-1b.cel            *0 :              7 8 9 ; bevelled puzzle pieces, sets 7-9
   [and so on until]
#54 6-9b.cel            *0 :              7 8 9 ;
; backgrounds
#0.999 example.cel      *0 :      3     6     9 ;%t128 the base image
#0.999 slicerbw.cel     *0 :    2     5     8   ;%t128 puzzle shapes
#55.999 green.cel       *0 :  1 2 3             ; green maple screen
#56.999 greentl.cel     *0 :  1 2 3             ; green tiling 4x
#57.999 greentl.cel     *0 :  1 2 3             ;
#58.999 greentl.cel     *0 :  1 2 3             ;
#59.999 greentl.cel     *0 :  1 2 3             ;
#55.999 blue.cel        *0 :        4 5 6       ; blue gritty screen
#56.999 bluetl.cel      *0 :        4 5 6       ; blue tiling 3x
#57.999 bluetl.cel      *0 :        4 5 6       ;
#58.999 bluetl.cel      *0 :        4 5 6       ;
#55.999 red.cel         *0 :              7 8 9 ; red leather screen
#56.999 redtl.cel       *0 :              7 8 9 ; red tiling 3x
#57.999 redtl.cel       *0 :              7 8 9 ;
#58.999 redtl.cel       *0 :              7 8 9 ;
; set #0
$0 * * * * * * * * * * * * * * * * * * * * * * * * * * * * * * * * * * * * * *
 * * * * * * * * * * * * * * * * * * * * * *
; set #1
$0 * * * * * * * * * * * * * * * * * * * * * * * * * * * * * * * * * * * * * *
 * * * * * * * * * * * * * * * * * * * * * *
; set #2
$0 * * * * * * * * * * * * * * * * * * * * * * * * * * * * * * * * * * * * * *
 * * * * * * * * * * * * * * * * * * * * * *
[etc. to set 9]
; set #0
$0 90,90 * * * * * * * * * * * * * * * * * * * * * * * * * * * * * * * * * * *
 * * * * * * * * * * * * * * * * * * * 0,0 0,90 490,90 0,390 *
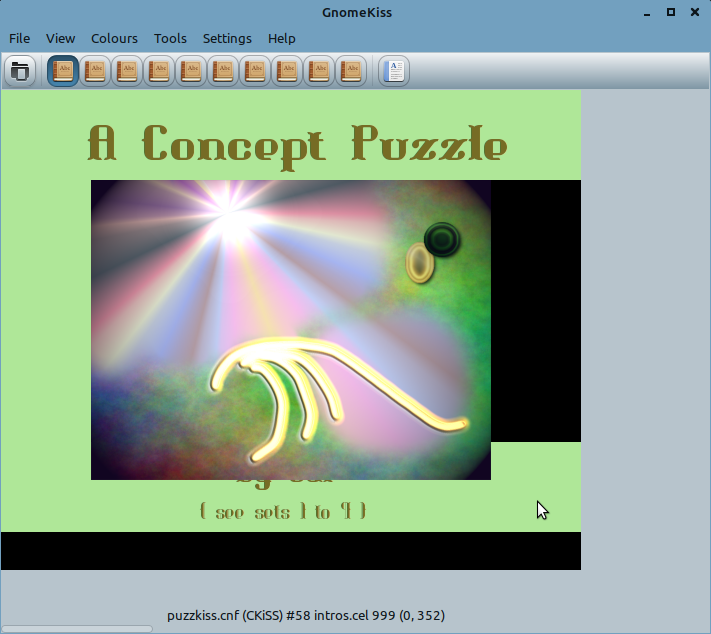

Riddle me this.
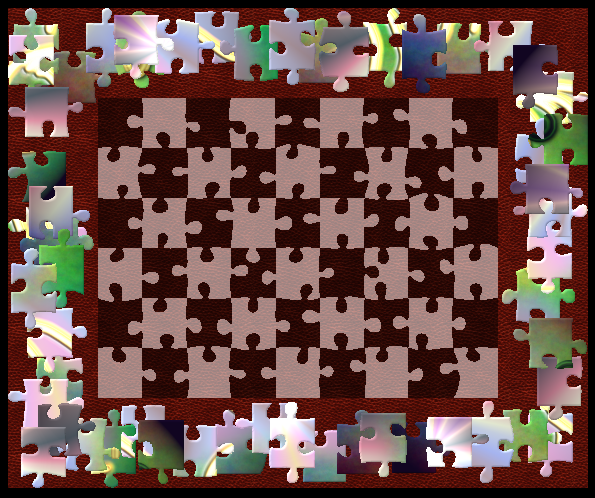

Stage 1 of the end product.
Making a jigsaw puzzle KiSS set - FKiSS version
;@EventHandler
;@initialize()
;@begin()
;@version()
Line 468] Unknown configuration command: @begin()


Despite the subscript, that puzzle will never appear.
(580,480)
[0
;
; Object declaration block
;
; warning
#66.999  warning.cel    *0 :0                   ;
#65.999  warningt.cel   *0 :0                   ;%t255
; intro screen
#62.999  example.cel    *0 :0                   ; new object!
#63.999  intro.cel      *0 :0                   ; new object! intro screen title
#64.999  introb.cel     *0 :0                   ; new object! intro screen left
#61.999  introb.cel     *0 :0                   ; intro screen right
#60.999  intros1.cel    *0 :0                   ; DIFFERENT intro screen subscript
[all the other cel declarations, now only on set 0]
;
;@EventHandler
; If the viewer handles FKiSS, it makes the warning disappear:
;@initialize()
;@  unmap("warning.cel") ; or unmap(#66)
; example.cel covers slicerbw.cel but is transparent, so...
;@  unmap("slicerbw.cel")
;@begin()
; A three-second timer gets rid of the intro screen and transparency warning.
;@  timer(0,3000) ; timers are in milliseconds
; The alarm event doesn't have to be put immediately under the timer action
;@alarm(0) ; when timer 0 is up
;@  unmap(#60) unmap(#61) unmap(#62) unmap(#63) unmap(#64) unmap(#65)
;
;  ** Object coordinates **
;
; set #0 - we have a bunch of extra objects added to the end!
$0 90,90 90,90 119,90 177,90 221,90 267,90 295,90 354,90 385,90 444,90 90,138
 130,124 164,139 222,124 251,136 311,124 346,139 397,126 430,138 90,177 120,190
 177,174 208,190 267,175 295,190 356,175 387,185 445,174 90,240 134,225 164,239
 222,240 254,239 311,226 356,239 400,228 432,236 90,275 120,290 178,274 209,289
 267,276 294,288 356,274 385,289 444,275 90,339 134,326 166,338 221,325 253,339
 311,325 342,338 400,325 432,339 0,0 0,80 0,180 0,280 0,380 0,390 490,90
 90,90 0,0 0,90 180,295 180,180
[header and object declarations above]
; backgrounds
#0.999 example.cel      *0 :0                   ;%t128 the base image
#0.999 slicerbw.cel     *0 :0                   ;%t128 puzzle shapes
#55.999 green.cel       *0 :0                   ; green maple screen
#56.999 greentl.cel     *0 :0                   ; green tiling 4x
#57.999 greentl.cel     *0 :0                   ;
#58.999 greentl.cel     *0 :0                   ;
#59.999 greentl.cel     *0 :0                   ;
#55.999 blue.cel        *0 :0                   ; blue gritty screen
#67.999 bluetl.cel      *0 :0                   ; blue tiling 3x
#68.999 bluetl.cel      *0 :0                   ; with new object numbers!
#69.999 bluetl.cel      *0 :0                   ;
#55.999 red.cel         *0 :0                   ; red leather screen
#70.999 redtl.cel       *0 :0                   ; red tiling 3x
#71.999 redtl.cel       *0 :0                   ; with new object numbers!
#72.999 redtl.cel       *0 :0                   ;
;
[FKiSS code]
;
; set #0 - we have six more objects to tack onto the end!
$0 90,90 90,90 119,90 177,90 221,90 267,90 295,90 354,90 385,90 444,90 90,138
 130,124 164,139 222,124 251,136 311,124 346,139 397,126 430,138 90,177 120,190
 177,174 208,190 267,175 295,190 356,175 387,185 445,174 90,240 134,225 164,239
 222,240 254,239 311,226 356,239 400,228 432,236 90,275 120,290 178,274 209,289
 267,276 294,288 356,274 385,289 444,275 90,339 134,326 166,338 221,325 253,339
 311,325 342,338 400,325 432,339 0,0 0,80 0,180 0,280 0,380 0,390 490,90
 90,90 0,0 0,90 180,295 180,180 0,96 0,224 0,352 0,96 0,224 0,352
; Colour-cycle backgrounds by clicking on top bar:
;@press("green.cel")
;@  unmap("green.cel") unmap(#56) unmap(#57) unmap(#58) unmap(#59)
;@press("blue.cel")
;@  unmap("blue.cel") unmap(#67) unmap(#68) unmap(#69)
;@press("red.cel")
;@  map(#55) map(#56) map(#57) map(#58) map(#59) map(#67) map(#68) map(#69)
; Settings panel
#73.999  button1a.cel   *0 :0                   ; puzzle piece button flat
#73.999  button1b.cel   *0 :0                   ; puzzle piece button outline
#73.999  button1c.cel   *0 :0                   ; puzzle piece button bevel
#73.999  button2a.cel   *0 :0                   ; underlay button picture
#73.999  button2b.cel   *0 :0                   ; underlay button pieces
#73.999  button2c.cel   *0 :0                   ; underlay button none
#73.999  button3.cel    *0 :0                   ; start button
#73.999  settings.cel   *0 :0                   ; panel
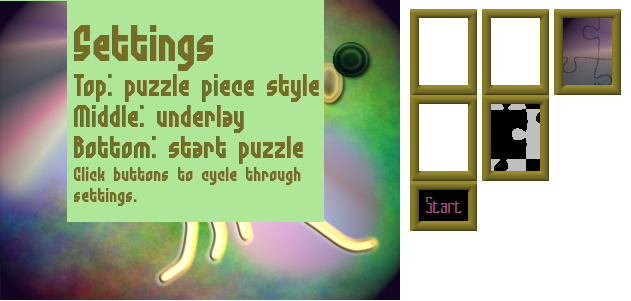

The panel parts laid out side by side.
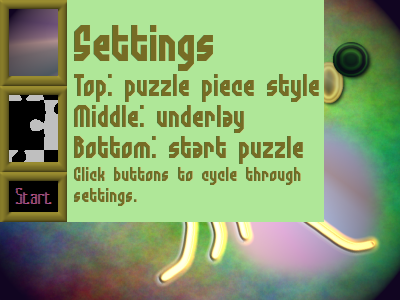

To play, you have to get past the settings panel.
; Press setting:puzzle piece button
;@press("button1a.cel")
;@  unmap("button1a.cel") unmap("1-1.cel") unmap("1-2.cel") unmap("1-3.cel")
;@  unmap("1-4.cel") unmap("1-5.cel") unmap("1-6.cel") unmap("1-7.cel")
   [etc. until all flat puzzle cels are unmapped]
;@press("button1b.cel")
;@  unmap("button1b.cel") unmap("1-1o.cel") unmap("1-2o.cel") unmap("1-3o.cel")
;@  unmap("1-4o.cel") unmap("1-5o.cel") unmap("1-6o.cel") unmap("1-7o.cel")
   [etc. until all outlined puzzle cels are unmapped]
;@press("button1c.cel")
;@  map("button1a.cel") map("button1b.cel") map(#1) map(#2) map(#3) map(#4)
;@  map(#5) map(#6) map(#7) map(#8) map(#9) map(#10) map(#11) map(#12) map(#13)
   [etc. until #54]
; Press setting:underlay button
;@press("button2a.cel")
;@  unmap("button2a.cel") unmap(#0) map("slicerbw.cel")
;@press("button2b.cel")
;@  unmap("button2b.cel") unmap(#0)
;@press("button2c.cel")
;@  map("button2a.cel") map("button2b.cel") map(#0) unmap("slicerbw.cel")
;@press("button3.cel")
;@  unmap(#73)
;@  move(#1,415,-53) move(#2,383,66) move(#3,-72,-83) move(#4,197,319) move(#5,-254,329)
;@  move(#6,-295,-11) move(#7,-3,315) move(#8,120,220) move(#9,-314,322) move(#10,-60,257)
[AND! SO! ON!]
; Always go back to set 0
;@set(1)
;@  changeset(0)
;@set(2)
;@  changeset(0)
;@set(3)
;@  changeset(0)
[etc. to set 9]
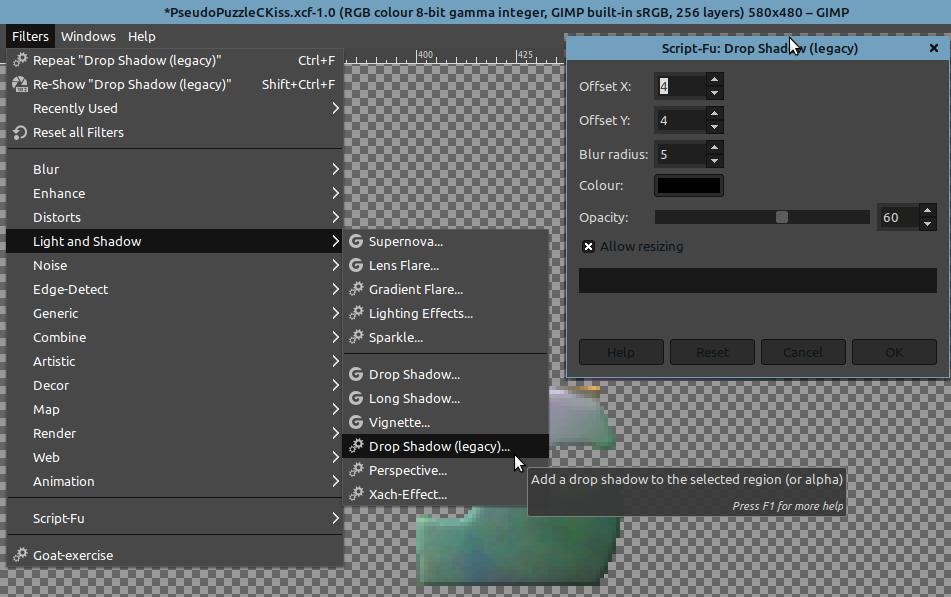

Adding a (legacy) drop shadow.

What you will see when you click on this piece.
;@catch("1-1b.cel") ; Lift piece when grabbing it with the mouse
;@  map("1-1bds.cel")
;@drop("1-1b.cel") ; Unmap lifted piece and drop shadow when releasing it
;@  unmap("1-1bds.cel")
;@catch("1-2b.cel")
;@  map("1-2bds.cel")
;@drop("1-2b.cel")
;@  unmap("1-2bds.cel")
[repeated ad nauseam for 3x54 objects]
Making a jigsaw puzzle KiSS set - FKiSS2 version
; warning
#66.999  warning2.cel   *0 :0                   ; this cel replaces warning.cel
[etc]

;@EventHandler
;@initialize()
; don't unmap warning cel here, that happens under version()
; example.cel covers slicerbw.cel but is transparent, so...
;@  unmap("slicerbw.cel")
[also, unmap ALL 162 puzzle pieces with dropshadow]
;
;@begin()
; the timer for alarm(0) is now under version()
;@  timer(2,2000) ; switch set off in 2 seconds unless version() prevents it
;
;@alarm(1) ; dummy wrapper for FKiSS-only viewers
;@version(2)
;@  timer(2,0) ; turn timer for alarm(2) off
;@  unmap("warning2.cel") ; now for FKiSS2
;@  timer(0,3000) ; unmap intro cel in 3 seconds
;
;@alarm(2)
;@  quit() ; may not close set but hopefully stops anything set does
;@begin()
;@  timer(2,2000) ; quitting alarm
;
; A three-second timer gets rid of the intro screen.
;@alarm(1) ; dummy wrapper for FKiSS-only viewers
;@  timer(2,0) ; in case begin() started timer(2) after version() stopped it
;@version(2)
;@  timer(2,0) ; no need to quit
;@  timer(1,1000) ; forestall alarm2 (if version() is processed before begin())
;@  unmap("warning2.cel")
;@  timer(0,3000) ; unmap intro cel in 3 seconds
;
;@alarm(2) ; if FKiSS2 not supported
;@  quit()


The snap-to objects are the tiny neon pink dots.
; 54 snap-to objects
#74.999 snapto.cel      *0 :0                   ;
#75.999 snapto.cel      *0 :0                   ;
   [continue until]
#127.999 snapto.cel     *0 :0                   ;
; Snap-to code
;@in(#1,#74)
;@  sound("snapto.wav") moveto(#1,90,90)
;@stillin(#1,#74)
;@  sound("snapto.wav") moveto(#1,90,90)
;@in(#2,#75)
;@  sound("snapto.wav") moveto(#2,119,90)
;@stillin(#2,#75)
;@  sound("snapto.wav") moveto(#2,119,90)
[etc.]


A collage of zoomed-in stages and final button.
[object definition block, under intro screen cels]
#130.999 setbtn.cel     *0 :0                   ; settings button
#129.999 bar2.cel       *0 :0                   ; end bar
#128.999 bar1.cel       *0 :0                   ; progress bar

[added under initialize()]
;@  unmap(#128) unmap(#129) unmap(#130)

[added below alarm(0) and its unmapping actions]
;@press(#130) ; open settings
;@  unmap(#130) map(#73)

[add #128, #129, #130 to start button code]
;@press("button3.cel")
;@  unmap(#73) map(#128) map(#129) map(#130)
[tacked onto the end of the moveto()s, which may move the progress bar by causing out():]
;@  moveto(#128,33,0) ; reposition progress bar

; set #0
$0 [add after existing coordinates] 33,0 573,0 0,0
[and add three asterisks to all the other sets]
;@in(#1,#74)
;@  sound("snapto.wav") moveto(#1,90,90)
;@  move(#128,10,0) ; this moves the progress bar horizontally
;@out(#1,#74)
;@  move(#128,-10,0) ; this sets the progress bar back until next in()
;@in(#2,#75)
;@  sound("snapto.wav")  moveto(#2,119,90)
;@  move(#128,10,0) ; this moves the progress bar horizontally
;@out(#2,#75)
;@  move(#128,-10,0) ; this sets the progress bar back until next in()
[etc. to objects #54 and #127]
[object definition block, above #130, under intro screen cels]
#131.999 finished.cel   *0 :0                   ;

[add another unmap under initialize()]
;@  unmap(#128) unmap(#129) unmap(#130) unmap (#131)

[add at bottom of FKiSS block]
; progress bar hits finish
;@in(#128,#129)
;@  map(#131) unmap(#128) unmap(#129) ; map end screen, unmap progress
;@  unmap(#130) ; don't open settings while "finished" cel is shown
; click ending away, which opens settings
;@press(#131)
;@  unmap(#131) map(#73)

; set #0
$0 [add after existing coordinates] 90,90
; Settings panel
; new stuff
#132.999  button4.cel    *0 :0                   ; Return button
#132.999  button4a.cel   *0 :0                   ; blank button
#132.999  button5a.cel   *0 :0                   ; green bg button
#132.999  button5b.cel   *0 :0                   ; blue bg button
#132.999  button5c.cel   *0 :0                   ; red bg button
#132.999  button6a.cel   *0 :0                   ; progbar on button
#132.999  button6b.cel   *0 :0                   ; progbar off button
;
; old stuff
#73.999  button1a.cel   *0 :0                   ; puzzle piece button flat
#73.999  button1b.cel   *0 :0                   ; puzzle piece button outline
#73.999  button1c.cel   *0 :0                   ; puzzle piece button bevel
#73.999  button2a.cel   *0 :0                   ; underlay button picture
#73.999  button2b.cel   *0 :0                   ; underlay button pieces
#73.999  button2d.cel   *0 :0                   ; underlay button none - NEW CEL!
#73.999  button3b.cel   *0 :0                   ; REstart button on top - NEW CEL!
#73.999  button3a.cel   *0 :0                   ; start button - NEW CEL!
#73.999  setting2.cel   *0 :0                   ; panel - NEW CEL!

; set #0
$0 [add after existing coordinates] 423,90
;@initialize()
; example.cel covers slicerbw.cel but is transparent, so...
;@  unmap("slicerbw.cel")
;@  unmap (#128) unmap (#129) unmap (#130) unmap (#131) unmap("button3b.cel") unmap("button4.cel")
[...]
[almost at bottom of FKiSS block]
;@press(#130) ; open settings
;@  unmap(#130) map(#73) map (#132)


The beautiful new settings panel.
; Press setting:return
;@press("button4.cel")
;@  map(#130) unmap (#65) unmap(#132)
[...]
[all the way at bottom of FKiSS block]
; click ending away, which opens settings WITHOUT RETURN BUTTON
;@press(#131)
;@  unmap(#131) map(#73) map(#132) unmap("button4.cel")
; Press setting:backgrounds button
;@press("button5a.cel")
;@  unmap("button5a.cel")
;@  unmap("green.cel") unmap(#56) unmap(#57) unmap(#58) unmap(#59)
;@press("button5b.cel")
;@  unmap("button5b.cel")
;@  unmap("blue.cel") unmap(#67) unmap(#68) unmap(#69)
;@press("button5c.cel")
;@  map("button5a.cel") map("button5b.cel")
;@  map(#55) map(#56) map(#57) map(#58) map(#59) map(#67) map(#68) map(#69)
; Press setting:progress bar visible
;@press("button6a.cel")
;@  unmap("button6a.cel") transparent(#128,254) transparent(#129,254)
;@press("button6b.cel")
;@  map("button6a.cel") transparent(#128,-254) transparent(#129,-254)
; Press start to unmap panel and scatter pieces
;@press("button3a.cel")
;@  timer(3,1)
;@press("button3b.cel")
;@  timer(3,1)
;@alarm(3)
;@  unmap(#73) unmap(#132) map(#128) map(#129) map(#130)
;@  moveto(#1,505,37) moveto(#2,502,156) moveto(#3,105,7) moveto(#4,418,409) moveto(#5,13,419)
[etc.]
Making a jigsaw puzzle KiSS set - FKiSS2.1 version
; warning
#66.999  warning3.cel   *0 :0                   ; this cel replaces warning2.cel

; version(3) and upwards still need the wrapper alarm!
;@alarm(1) ; dummy wrapper for FKiSS-only viewers
;@  timer(2,0) ; in case begin() started timer(2) after version() stopped it
;@version(3) ; replaces version(2), rest of code stays the same
;@  timer(2,0) ; no need to quit
;@  timer(1,1000) ; forestall alarm2 (if version() is processed before begin())
;@  unmap("warning3.cel")
;@  timer(0,3000) ; unmap intro cel in 3 seconds
[added two differently named cels for ifnotmapped()]
#72.999 redtl.cel       *0 :0                   ; hey buddy, care to share your number?
#72.999 snapto1.cel     *0 :0                   ; just a copy of snapto.cel, is mapped when example.cel is
#72.999 snapto2.cel     *0 :0                   ; ditto, is mapped when progress bars are visible
[adding snapto1.cel and snapto2.cel to buttonpress code]
;@press("button6a.cel")
;@  unmap("button6a.cel") unmap("snapto2.cel") transparent(#128,254) transparent(#129,254)
;@press("button6b.cel")
;@  map("button6a.cel") map("snapto2.cel") transparent(#128,-254) transparent(#129,-254)
   [...]
;@press("button2a.cel")
;@  unmap("button2a.cel") unmap(#0) map("slicerbw.cel") map("button2b.cel")
;@  unmap("snapto1.cel")
   [...]
;@press("button2d.cel")
;@  map("button2a.cel") map("button2b.cel") map(#0) unmap("slicerbw.cel") map("snapto1.cel")
;@  ifnotmapped("1-1.cel",4,1) ifnotmapped("1-1o.cel",5,1) ; puzzle pieces
;@  ifnotmapped("snapto1.cel",6,1) ifnotmapped("slicerbw.cel",7,1) ; underlays
;@  ifnotmapped("green.cel",8,1) ifnotmapped("blue.cel",9,1) ; backgrounds
;@  ifnotmapped("snapto2.cel",10,1) ; if progress bar not visible
; Alarms to unmap settings buttons
;@alarm(4)
;@  unmap("button1a.cel")
;@alarm(5)
;@  unmap("button1b.cel")
;@alarm(6)
;@  unmap("button2a.cel")
;@alarm(7)
;@  unmap("button2b.cel")
;@alarm(8)
;@  unmap("button5a.cel")
;@alarm(9)
;@  unmap("button5b.cel")
;@alarm(10)
;@  unmap("button6a.cel")
#131.999 finishsm.cel *0 :0 ; replaces finished.cel
#130.999 setbtn.cel     *0 :0                   ; settings button
#130.999 movebtn.cel    *0 :0                   ; button to move loose pieces off field
;
[...]
;
;@press("button3b.cel") ; restart: remove fix, then reposition via timer
;@  setfix(#1,0) setfix(#2,0) setfix(#3,0) setfix(#4,0) setfix(#5,0) setfix(#6,0)
[etc. until object #54]
;@  timer(3,1)
;
[...]
;
;@release("1-1.cel") ; release() replaces drop()
;@  unmap("1-1ds.cel")
[etc. until cel "6-9b.cel"]
;
[...]
;
;@press("setbtn.cel") ; open settings
;@  unmap(#130) map(#73) map(#65)
;@  ifnotmapped("1-1.cel",4,1) ifnotmapped("1-1o.cel",5,1) ; puzzle pieces
[etc. for other settings buttons]
;
[...]
;
; Snap-to code and progress
;@in(#1,#74)
;@  sound("snapto.wav") moveto(#1,90,90) setfix(#1,32767) ; setfix() added
;@  move(#128,10,0) ; move progress bar forward
[out() event removed, etc. up to #54]
;
[...]
;
; Rescatter loose pieces by moving them to initial positions
;@press("movebtn.cel")
;@  ifnotfixed(#1,11,1) ifnotfixed(#2,12,1) ifnotfixed(#3,13,1) ifnotfixed(#4,14,1)
[etc. to ifnotfixed(#54,64,1)
;
;@alarm(11)
;@  moveto(#1,505,37)
;@alarm(12)
;@  moveto(#2,502,156)
[etc. to alarm(64)]
Making a jigsaw puzzle KiSS set - FKiSS3 version
; warning
#66.999  warning4.cel   *0 :0                   ;
#65.999  warningt.cel   *0 :0                   ;%t255
; ghost test tiles, almost transparent
#133.999 ghostest.cel   *0 :0                   ;%t254
#134.999 ghostest.cel   *0 :0                   ;%t254
#135.999 ghostest.cel   *0 :0                   ;%t254
#136.999 ghostest.cel   *0 :0                   ;%t254
#137.999 ghostest.cel   *0 :0                   ;%t254
#138.999 ghostest.cel   *0 :0                   ;%t254
#139.999 ghostest.cel   *0 :0                   ;%t254
#140.999 ghostest.cel   *0 :0                   ;%t254
#141.999 ghostest.cel   *0 :0                   ;%t254
#142.999 ghostest.cel   *0 :0                   ;%t254
#143.999 ghostest.cel   *0 :0                   ;%t254
#144.999 ghostest.cel   *0 :0                   ;%t254
#145.999 ghostest.cel   *0 :0                   ;%t254
#146.999 ghostest.cel   *0 :0                   ;%t254
#147.999 ghostest.cel   *0 :0                   ;%t254
#148.999 ghostest.cel   *0 :0                   ;%t254
[rest of object declaration block]

[initialize(), begin(), wrapper alarm]
;@version(4)
;@  timer(2,0) ; no need to quit
;@  timer(1,1000) ; forestall alarm2 (if version() is processed before begin())
;@  unmap("warning4.cel")
;@  timer(0,3000) ; unmap intro cel in 3 seconds
;@  let(G,1)  ; the ghosting variable
;@  ghost(#79,1) ghost(#80,1) ghost(#81,1) ghost(#82,1) ghost(#83,1) ghost(#84,1) ghost(#85,1) ghost(#86,1)
;@  ghost(#87,1) ghost(#88,1) ghost(#89,1) ghost(#90,1) ghost(#91,1) ghost(#92,1) ghost(#93,1) ghost(#94,1)

; ghost press() event after alarm(0)
;@press("ghostest.cel")  ; this proves that ghost(x,1) didn't work
;@  let(G,0)
;@  ghost(#133,0) ghost(#134,0) ghost(#135,0) ghost(#136,0) ghost(#137,0) ghost(#138,0) ghost(#139,0) ghost(#140,0)
;@  ghost(#141,0) ghost(#142,0) ghost(#143,0) ghost(#144,0) ghost(#145,0) ghost(#146,0) ghost(#147,0) ghost(#148,0)

; Press setting: (re)start
;@press("button3a.cel") ; start button
; Calculate unghosting variable, now that ghosting variable has the right value.
;@  ifequal(G,1)
;@    let(U,0)
;@  else
;@    let(U,1)
;@  endif
; unmap ghost testing objects
;@  unmap(#133) unmap(#134) unmap(#135) unmap(#136) unmap(#137) unmap(#138) unmap(#139) unmap(#140)
;@  unmap(#141) unmap(#142) unmap(#143) unmap(#144) unmap(#145) unmap(#146) unmap(#147) unmap(#148)
; ghost non-interactive elements with variable (backgrounds, underlays, progress bars)
;@  ghost(#0,G) ghost(#55,G) ghost(#56,G) ghost(#57,G) ghost(#58,G) ghost(#59,G)
;@  ghost(#67,G) ghost(#68,G) ghost(#69,G) ghost(#70,G) ghost(#71,G) ghost(#72,G)
;@  ghost(#128,G) ghost(#129,G)
[rest of startbutton code, and code for other buttons]

; set #0
$0 [add after existing coordinates] 0,0 145,0 290,0 435,0 0,120 145,120 290,120 435,120 0,240 145,240 290,240 435,240 0,360 145,360 290,360 435,360
[and add 16 asterisks to other sets]
; Press setting: (re)start
;@press("button3a.cel")
[all the ghosting code I just added to the start button!! plus:]
;@  let(S,1) goto(0)
;@press("button3b.cel")
;@  let(S,2) goto(0)
;
; Press setting: return
;@press("button4.cel")
;@  goto(0)
ifequal()
ifnotequal()
ifgreaterthan()
iflessthan()
else()
endif()
; B must be the same as A if A is 1, else A is set to 2 or 0:
;@  ifequal(A,1) ; A is 1
; a nested block:
;@    ifnotequal(B,A)
;@      let(B,A)
;@    endif()
;@  else() ; A is not 1
;@    ifgreaterthan(A,1) ; A is more than 1
;@      let(A,2)
;@    else() ; A is 0 or negative
;@      let(A,0)
;@    endif()
;@  endif()
; **LABELS**
;
;@label(0)
; Unmap settings, remap buttons
;@  unmap(#73) unmap(#132) map(#130)
;@  ifequal(S,0) ; return button
;@    goto(5) ; we're done here! (note extra indentation)
;@  endif() ; every if-block needs a closing endif
; (re)start code
; Map progress objects on (re)start
;@  map(#128) map(#129)
;@  ifequal(S,2) ; REstart button
; Unfix objects, reposition progress bar, reset D
;@    setfix(#1,0) setfix(#2,0) setfix(#3,0) setfix(#4,0) setfix(#5,0) setfix(#6,0) setfix(#7,0) setfix(#8,0) setfix(#9,0)
;@    setfix(#10,0) setfix(#11,0) setfix(#12,0) setfix(#13,0) setfix(#14,0) setfix(#15,0) setfix(#16,0) setfix(#17,0) setfix(#18,0)
;@    setfix(#19,0) setfix(#20,0) setfix(#21,0) setfix(#22,0) setfix(#23,0) setfix(#24,0) setfix(#25,0) setfix(#26,0) setfix(#27,0)
;@    setfix(#28,0) setfix(#29,0) setfix(#30,0) setfix(#31,0) setfix(#32,0) setfix(#33,0) setfix(#34,0) setfix(#35,0) setfix(#36,0)
;@    setfix(#37,0) setfix(#38,0) setfix(#39,0) setfix(#40,0) setfix(#41,0) setfix(#42,0) setfix(#43,0) setfix(#44,0) setfix(#45,0)
;@    setfix(#46,0) setfix(#47,0) setfix(#48,0) setfix(#49,0) setfix(#50,0) setfix(#51,0) setfix(#52,0) setfix(#53,0) setfix(#54,0)
;@    moveto(#128,33,0) let(D,0)
;@  endif()
; Reset S
;@  let(S,0)
; Label 5 will unghost the pieces
;@  gosub(5)
; Label 2 will scatter the pieces
;@  goto(2)
; Press button: settings
;@press("setbtn.cel")
;@  unmap(#130) goto(1)

; Press finish screen: open settings WITHOUT RETURN BUTTON
;@press(#131)
;@  unmap(#131) gosub(1) unmap("button4.cel")
; Press setting: puzzle piece button
;@press("button1a.cel")
;@  let(C,1) ; ADDED
;@  unmap("button1a.cel")
;@  unmap("1-1.cel")
[etc]
;@press("button1b.cel")
;@  let(C,2) ; ADDED
;@  unmap("button1b.cel")
;@  unmap("1-1o.cel")
[etc]
;@press("button1c.cel")
;@  let(C,0) ; ADDED
;@  map("button1a.cel") map("button1b.cel")
;@  map("1-1.cel")
[etc]

; Press setting: underlay button
;@press("button2a.cel")
;@  let(C1,1) ; ADDED, and delete "unmap("snapto1.cel")"
;@  unmap("button2a.cel") unmap(#0) map("slicerbw.cel") map("button2b.cel")
;@press("button2b.cel")
;@  let(C1,2) ; ADDED
;@  unmap("button2b.cel") unmap(#0)
;@press("button2d.cel")
;@  let(C1,0) ; ADDED, and delete "map("snapto1.cel")"
;@  map("button2a.cel") map("button2b.cel") map(#0) unmap("slicerbw.cel")

[code for buttons 3 and 4]

; Press setting: backgrounds button
; ADDED code to set C2
;@press("button5a.cel")
;@  let(C2,1) unmap("button5a.cel")
;@  unmap("green.cel") unmap(#56) unmap(#57) unmap(#58) unmap(#59)
;@press("button5b.cel")
;@  let(C2,2) unmap("button5b.cel")
;@  unmap("blue.cel") unmap(#67) unmap(#68) unmap(#69)
;@press("button5c.cel")
;@  let(C2,0) map("button5a.cel") map("button5b.cel")
;@  map(#55) map(#56) map(#57) map(#58) map(#59) map(#67) map(#68) map(#69)
;
; Press setting: progress bar visible
; ADDED code to set C3, REMOVED code to map and unmap snapto2.cel
;@press("button6a.cel")
;@  let(C3,1) unmap("button6a.cel") transparent(#128,254) transparent(#129,254)
;@press("button6b.cel")
;@  let(C3,0) map("button6a.cel") transparent(#128,-254) transparent(#129,-254)
;@label(1)
; First, map whole settings screen
;@  map(#73) map(#132)
; Show the right puzzle piece button
;@  ifgreaterthan(C,0)
;@    unmap("button1a.cel")
;@  endif()
;@  ifequal(C,2)
;@    unmap("button1b.cel")
;@  endif()
; Show the right underlay button
;@  ifgreaterthan(C1,0)
;@    unmap("button2a.cel")
;@  endif()
;@  ifequal(C1,2)
;@    unmap("button2b.cel")
;@  endif()
; Show the right background
;@  ifgreaterthan(C2,0)
;@    unmap("button5a.cel")
;@  endif()
;@  ifequal(C2,2)
;@    unmap("button5b.cel")
;@  endif()
; Show the right progress bar transparency
;@  ifequal(C3,1)
;@    unmap("button6a.cel")
;@  endif()
; Finally, ghost puzzle pieces
;@  goto(5)
; Press button: rescatter loose pieces
;@press("movebtn.cel")
;@  goto(2)
;@label(2)
; Scatter pieces, if unfixed, uses label(3) to set X, Y
;@  letfix(F,#1)
;@  ifequal(F,0)
;@    gosub(3) moveto(#1,X,Y)
;@  endif()
;@  letfix(F,#2)
;@  ifequal(F,0)
;@    gosub(3) moveto(#2,X,Y)
;@  endif()
[repeat right up to object #54]
;@label(3)
; Pick one of four edges: 1 and 2 vertical, 3 and 4 horizontal
;@  random(R,1,101)  ; pick a number between 1 and 100
;@  ifgreaterthan(R,50)  ; upper half?
;@    ifgreaterthan(R,75)  ; upper quarter?
;@      let(R,4)
;@    else()  ; nope, lower quarter
;@      let(R,3)
;@    endif()
;@  else()
;@    ifgreaterthan(R,25)  ; same principle for lower half
;@      let(R,2)
;@    else()
;@      let(R,1)
;@    endif()
;@  endif()
;@label(3)
; Pick one of four edges
;@  random(R,1,401) ; for a value between 1 and 400
;@  ifgreaterthan(R,200) ; horizontal edge
;@    random(X,1,490) ; pick a horizontal position along top/bottom edge
;@    ifgreaterthan(R,300) ; placed at bottom edge
;@      random(Y,390,396)
;@    else() ; placed at top edge
;@      random(Y,1,6)
;@    endif()
;@  else() ; vertical edge
;@    random(Y,1,390) ; pick a vertical position along left or right edge
;@    ifgreaterthan(R,100) ; placed on right side
;@      random(X,490,496)
;@    else() ; placed on left side
;@      random(X,1,6)
;@    endif()
;@  endif()
if x>2
  do stuff
  sadly, "elseif X>1" is not possible in FKISS3 and nested ifs act funny, so...
  set x to 0 <-this does not happen!!
endif
if x>1 <-can also be x>2 since setting to 0 did not work
  do stuff that should not happen if x>2, but does happen
endif
x will probably have value 0 after quitting this code block, but that's too late
;@label(3)
; Pick one of four edges
;@  random(R,1,401) ; for a value between 1 and 400
;@  ifgreaterthan(R,200)
;@    random(X,1,490) ; pick a spot along horizontal edge
;@  else()
;@    random(Y,1,390) ; pick a spot, along vertical edge
;@  endif
;@  ifgreaterthan(R,300) ; stick to bottom
;@    random(Y,390,396)
; We're done here, let's LEAVE!
;@    exitevent()
;@  endif
;@  ifgreaterthan(R,200) ; stick to top
;@    random(Y,1,6)
; LEAVING!
;@    exitevent()
;@  endif()
;@  ifgreaterthan(R,100) ; hug right side
;@    random(X,490,496)
;@  else() ; hug left side
;@    random(X,1,6)
;@  endif()
;@release(#1)
; set P to object number
;@  let(P,1)
; set P0 and P1 to the correct values (the initial values from the coordinates block) for this object
;@  let(P0,90) let(P1,90)
; store current coordinates of this object in P2 and P3
;@  letobjectx(P2,#1) letobjecty(P3,#1)
; label checks if piece close enough to right position
;@  gosub(4)
;@label(4)
; Check if puzzle piece placed: find positive difference on x and y axis
;@  ifgreaterthan(P0,P2) ; desired and actual x coordinate
;@    sub(P4,P0,P2)
;@  else()
;@    sub(P4,P2,P0)
;@  endif()
;@  ifgreaterthan(P1,P3) ; ditto for y coordinate
;@    sub(P5,P1,P3)
;@  else()
;@    sub(P5,P3,P1)
;@  endif()
; Find total difference, reset P and quit if too large
;@  add(P6,P5,P4)
;@  ifgreaterthan(P6,10)
;@    let(P,0) ; to let piece know it doesn't fit
;@    exitevent()
;@  else()
; Piece is placed: play sound, move bar, augment total in variable D
;@    sound("snapto.wav") add(D,D,1) move(#128,10,0)
;@  endif()
; Is the puzzle finished? Then unmap buttons and progress bars, map finish screen.
;@  ifequal(D,54)
;@    unmap(#128) unmap(#129) unmap(#130) map(#131)
;@  endif()
[continued code under "release(#1)"]
; is variable still equal to object#? then snap-to, fix and ghost
;@  ifequal(P,1)
;@    moveto(#1,P0,P1) setfix(#1,32767) ghost(#1,G)
;@  endif()
[repeat this whole block for objects #2 to #54, setting P to object number and P0/P1 to object's initial coordinates]
;@label(5)
; Ghost all pieces if settings screen is showing.
;@  letmapped(G0,"setting2.cel") ; put a value in variable G0
;@  ifequal(G0,1) ; yes, it is mapped
;@    ghost(#1,G) ghost(#2,G) ghost(#3,G) ghost(#4,G) ghost(#5,G) ghost(#6,G) ghost(#7,G) ghost(#8,G) ghost(#9,G)
;@    ghost(#10,G) ghost(#11,G) ghost(#12,G) ghost(#13,G) ghost(#14,G) ghost(#15,G) ghost(#16,G) ghost(#17,G) ghost(#18,G)
;@    ghost(#19,G) ghost(#20,G) ghost(#21,G) ghost(#22,G) ghost(#23,G) ghost(#24,G) ghost(#25,G) ghost(#26,G) ghost(#27,G)
;@    ghost(#28,G) ghost(#29,G) ghost(#30,G) ghost(#31,G) ghost(#32,G) ghost(#33,G) ghost(#34,G) ghost(#35,G) ghost(#36,G)
;@    ghost(#37,G) ghost(#38,G) ghost(#39,G) ghost(#40,G) ghost(#41,G) ghost(#42,G) ghost(#43,G) ghost(#44,G) ghost(#45,G)
;@    ghost(#46,G) ghost(#47,G) ghost(#48,G) ghost(#49,G) ghost(#50,G) ghost(#51,G) ghost(#52,G) ghost(#53,G) ghost(#54,G)
;@    exitevent() ; no else() needed
;@  endif
; Else unghost unfixed pieces
;@  letfix(F0,#1) ; put fix value in variable F0
;@  ifequal(F0,0) ; if fix value is 0
;@    ghost(#1,U) ; use ghost() with the unghosting value
;@  endif()
[repeat the unghosting code for every object up to #54.]
Making a jigsaw puzzle KiSS set - FKiSS4 version
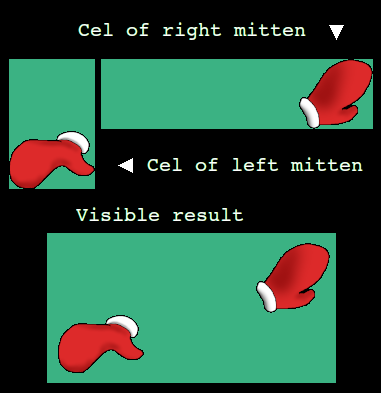

Mitten cels showing their image size.
; warning
#0.999 warning5.cel     *0 :0                   ;%x180 %y180 !Warning
#0.999 warningt.cel     *0 :0                   ;%t255 %x180 %y295 !Intro
;
; ghost test tiles, almost transparent
#0.999 ghostest.cel     *0 :0                   ;%t254 !GhostTest
#0.999 ghostest.cel     *0 :0                   ;%t254 %x145 !GhostTest
#0.999 ghostest.cel     *0 :0                   ;%t254 %x290 !GhostTest
#0.999 ghostest.cel     *0 :0                   ;%t254 %x435 !GhostTest
#0.999 ghostest.cel     *0 :0                   ;%t254 %y120 !GhostTest
#0.999 ghostest.cel     *0 :0                   ;%t254 %x145 %y120 !GhostTest
#0.999 ghostest.cel     *0 :0                   ;%t254 %x290 %y120 !GhostTest
#0.999 ghostest.cel     *0 :0                   ;%t254 %x435 %y120 !GhostTest
#0.999 ghostest.cel     *0 :0                   ;%t254 %y240 !GhostTest
#0.999 ghostest.cel     *0 :0                   ;%t254 %x145 %y240 !GhostTest
#0.999 ghostest.cel     *0 :0                   ;%t254 %x290 %y240 !GhostTest
#0.999 ghostest.cel     *0 :0                   ;%t254 %x435 %y240 !GhostTest
#0.999 ghostest.cel     *0 :0                   ;%t254 %y360 !GhostTest
#0.999 ghostest.cel     *0 :0                   ;%t254 %x145 %y360 !GhostTest
#0.999 ghostest.cel     *0 :0                   ;%t254 %x290 %y360 !GhostTest
#0.999 ghostest.cel     *0 :0                   ;%t254 %x435 %y360 !GhostTest
;@initialize()
[all the cels that were unmapped here have the %u tag, so initialize() is empty now]
[begin, alarm(1)]
;@version(5)
;@  timer(2,0) ; no need to quit
;@  timer(1,1000) ; forestall alarm2 (if version() is processed before begin())
;@  unmap(!Warning) ; only if viewer supports cel groups
;@  ifmapped("warning5.cel",2,2000) ; else, quitting alarm
;@  timer(0,3000) ; unmap intro cel in 3 seconds
;@  let(G,1)  ; the ghosting variable
;@  ghost(#0,1) ; #0 should have been !GhostTest, but alas
;
;@press(!GhostTest)  ; this proves that ghost(x,1) didn't work
;@  let(G,0)
;@  ghost(#0,0) ; again, #0 should have been !GhostTest

; Press setting: (re)start
;@press("button3a.cel") ; start button
; Now that G is known, set U
;@  ifequal(G,1)
;@    let(U,0)
;@  else
;@    let(U,1)
;@  endif
;@  unmap(!GhostTest)
[non-interactive cels that were ghosted here now have the %g tag]
[but two buttons, being in object #0, are unintentionally also ghosted]
; Unghost two buttons which are part of object #0
;@  ghost("setbtn.cel",U) ghost("movebtn.cel",U)
;@  let(S,2) goto(0)
; intro screen
#0.999 example.cel      *0 :0                   ;%x90 %y90 !Intro (inside intro screen)
#0.999 intro.cel        *0 :0                   ;!Intro (intro screen title)
#0.999 introb.cel       *0 :0                   ;%y90 !Intro (intro screen left)
#0.999 introb.cel       *0 :0                   ;%x490 %y90 !Intro (intro screen right)
#0.999 intros1.cel      *0 :0                   ;%y390 !Intro (intro screen subscript)
; finished screen
#56.999 finishsm.cel    *0 :0                   ;%u
; Settings and scatter buttons
#0.999 setbtn.cel       *0 :0                   ;%u !Buttons (settings button)
#0.999 movebtn.cel      *0 :0                   ;%u !Buttons (button to move loose pieces off field)

Two new settings.
; added to bottom of settings panel
#55.999  button7b.cel   *0 :0                   ;%y222 !Settings !MuteBtn : 0 ;sound on
#55.999  button7a.cel   *0 :0                   ;%y222 !Settings !MuteBtn : 1 ;sound off
#55.999  button8a.cel   *0 :0                   ;%x333 %y222 !Settings !EdgesBtn : 0 ;show all pieces
#55.999  button8b.cel   *0 :0                   ;%x333 %y222 !Settings !EdgesBtn : 3 ;unmap non-edge pieces
; NOTE EdgesBtn has frame 0 and 3, instead of 0 and 1!
#55.999  setting3.cel   *0 :0                   ;%y222 !Settings
; Settings panel
#55.999  button4.cel    *0 :0                   ;%u %x333 !Settings Return button
#55.999  button4a.cel   *0 :0                   ;%x333 !Settings blank button
#55.999  button5a.cel   *0 :0                   ;%x333 !Settings !BackgroundBtn : 0 ;green bg button
#55.999  button5b.cel   *0 :0                   ;%x333 !Settings !BackgroundBtn : 1 ;blue bg button
#55.999  button5c.cel   *0 :0                   ;%x333 !Settings !BackgroundBtn : 2 ;red bg button
#55.999  button6c.cel   *0 :0                   ;%x333 !Settings !ProgressBtn : 0 ;progbar on button
#55.999  button6d.cel   *0 :0                   ;%x333 !Settings !ProgressBtn : 1 ;progbar off button
#55.999  button1a.cel   *0 :0                   ;!Settings !PieceBtn : 0 ;puzzle piece button flat
#55.999  button1b.cel   *0 :0                   ;!Settings !PieceBtn : 1 ;puzzle piece button outline
#55.999  button1c.cel   *0 :0                   ;!Settings !PieceBtn : 2 ;puzzle piece button bevel
#55.999  button2a.cel   *0 :0                   ;!Settings !UnderlayBtn : 0 ;underlay button picture
#55.999  button2b.cel   *0 :0                   ;!Settings !UnderlayBtn : 1 ;underlay button pieces
#55.999  button2d.cel   *0 :0                   ;!Settings !UnderlayBtn : 2 ;underlay button none
#55.999  button3b.cel   *0 :0                   ;%u !Settings REstart button on top
#55.999  button3a.cel   *0 :0                   ;!Settings start button
#55.999  setting2.cel   *0 :0                   ;!Settings
#55.999 example.cel     *0 :0                   ;%t128 %g !Underlay : 0 ;the base image
#55.999 slicerbw.cel    *0 :0                   ;%t128 %g %u !Underlay : 1 ;puzzle shapes
#0.999 green.cel        *0 :0                   ;%g !Background : 0 ;green maple screen
#0.999 greentl.cel      *0 :0                   ;%g %y80 !Background : 0 ;green tiling 4x
#0.999 greentl.cel      *0 :0                   ;%g %y180 !Background : 0
#0.999 greentl.cel      *0 :0                   ;%g %y280 !Background : 0
#0.999 greentl.cel      *0 :0                   ;%g %y380 !Background : 0
#0.999 blue.cel         *0 :0                   ;%g !Background : 1 ;blue gritty screen
#0.999 bluetl.cel       *0 :0                   ;%g %y96 !Background : 1 ;blue tiling 3x
#0.999 bluetl.cel       *0 :0                   ;%g %y224 !Background : 1
#0.999 bluetl.cel       *0 :0                   ;%g %y352 !Background : 1
#0.999 red.cel          *0 :0                   ;%g !Background : 2 ;red leather screen
#0.999 redtl.cel        *0 :0                   ;%g %y96 !Background : 2 ;red tiling 3x
#0.999 redtl.cel        *0 :0                   ;%g %y224 !Background : 2
#0.999 redtl.cel        *0 :0                   ;%g %y352 !Background : 2
;@alarm(0)
; Set frame to 0 so buttons respond at the first click
;@  setframe(!PieceBtn,0) setframe(!UnderlayBtn,0) setframe(!BackgroundBtn,0) setframe(!ProgressBtn,0)
;@  setframe (!MuteBtn,0) setframe (!EdgesBtn,0)
; Unmap intro screen
;@  unmap(!Intro)
; Press setting: puzzle piece button
;@press(!PieceBtn) ; works for all three buttons in this group
;@  letframe(C,!PieceBtn) ; but which button/frame did I click on?
;@  ifequal(C,2)
;@    let(C,0) ; back to zero
;@  else()
;@    add(C,C,1) ; raise frame number by one
;@  endif()
;@  setframe(!PieceBtn,C) ; show next button
;@  setframe(!Pieces,C) ; show corresponding puzzle piece style
;
; Press setting: underlay button
;@press(!UnderlayBtn)
;@  letframe(C1,!UnderlayBtn)
;@  ifequal(C1,2)
;@    let(C1,0) ; back to zero
;@  else()
;@    add(C1,C1,1) ; raise frame number by one
;@  endif()
;@  setframe(!UnderlayBtn,C1)
;@  setframe(!Underlay,C1) ; !Underlay has only frames 0/1, so frame 2 will unmap it

[(re)start and return button code...]

; Press setting: backgrounds button
;@press(!BackgroundBtn)
;@  letframe(C2,!BackgroundBtn)
; Go to next (or back to first) button
;@  ifequal(C2,2)
;@    let(C2,0) ; back to zero
;@  else()
;@    add(C2,C2,1) ; raise frame number by one
;@  endif()
; Use frames to change to next button, and to next background.
;@  setframe(!BackgroundBtn,C2)
;@  setframe(!Background,C2)
;
; Press setting: progress bar visible
; Button has frames, bar is (un)mapped
;@press(!ProgressBtn)
;@  letframe(C3,!ProgressBtn)
;@  ifequal(C3,0)
;@    let(C3,1)
;@    setframe(!ProgressBar,55) ; unmap by setting to undefined frame
;@  else()
;@    let(C3,0)
;@    setframe(!ProgressBar,D) ; map to current progress
;@  endif()
;@  setframe(!ProgressBtn,C3)
; Press setting: mute
;@press(!MuteBtn)
;@  letframe(SoundOff,!MuteBtn)
;@  ifequal(SoundOff,0)
;@    let(SoundOff,1)
;@  else()
;@    let(SoundOff,0)
;@  endif()
;@  setframe(!MuteBtn,Soundoff)
; Puzzle pieces
#1  1-1.cel             *0 :0                   ;!Pieces : 0 3 ; flat puzzle pieces
#11 2-2.cel             *0 :0                   ;!Pieces : 0

#1  1-1o.cel            *0 :0                   ;!Pieces : 1 4 ; outlined puzzle pieces
#11 2-2o.cel            *0 :0                   ;!Pieces : 1

#1  1-1b.cel            *0 :0                   ;!Pieces : 2 5 ; bevelled puzzle pieces
#11 2-2b.cel            *0 :0                   ;!Pieces : 2
; Press setting: show edges only
;@press(!EdgesBtn)
;@  letframe(EdgesOnly,!EdgesBtn)
;@  ifequal(EdgesOnly,0)
;@    let(EdgesOnly,3) ; Note: 3!!
;@  else()
;@    let(EdgesOnly,0)
;@  endif()
;@  setframe(!EdgesBtn,EdgesOnly)
;@  add(TempVar,C,EdgesOnly) ; EdgesOnly will add either 3 or 0
;@  setframe(!Pieces,TempVar)
; Press setting: puzzle piece button
;@press(!PieceBtn)
;@  letframe(C,!PieceBtn)
;@  ifequal(C,2)
;@    let(C,0) ; back to zero
;@  else()
;@    add(C,C,1) ; raise frame number by one
;@  endif()
;@  setframe(!PieceBtn,C)
;@  add(TempVar,C,EdgesOnly) ; EdgesOnly will add either 3 or 0
;@  setframe(!Pieces,TempVar)
; Press button: settings
; NOTE: these buttons are now part of object #0, so use their cel group !Buttons to unmap them.
;@press("setbtn.cel")
;@  unmap(!Buttons) goto(1)

[...]

; Press finish screen: unmap filled progress bar, open settings WITHOUT RETURN BUTTON
; NOTE: it's not worth fiddling with frames just for the return button, unmap it directly.
;@press(#56)
;@  unmap(#56) setframe(!ProgressBar,55) gosub(1) unmap("button4.cel")

[...]

;@label(1)
; First, map whole settings screen
;@  map(!Settings)
; Show the right puzzle piece button
;@  setframe(!PieceBtn,C)
; Show the right underlay button
;@  setframe(!UnderlayBtn,C1)
; Show the right background button
;@  setframe(!BackgroundBtn,C2)
; Show the right progress bar button
;@  setframe(!ProgressBtn,C3)
; Show the right mute button
;@  setframe(!MuteBtn,SoundOff)
; Show the right edge button
;@  setframe(!EdgesBtn,EdgesOnly)
; Finally, ghost puzzle pieces
;@  goto(5)
; Drop shadow pieces
#1  1-1ds.cel           *0 :0                   ;!Ds01 : 1 4 ; flat puzzle pieces
#11 2-2ds.cel           *0 :0                   ;!Ds11 : 1

#1  1-1ods.cel          *0 :0                   ;!Ds01 : 2 3 ; outlined puzzle pieces
#11 2-2ods.cel          *0 :0                   ;!Ds11 : 2

#1  1-1bds.cel          *0 :0                   ;!Ds01 : 3 6 ; bevelled puzzle pieces
#11 2-2bds.cel          *0 :0                   ;!Ds11 : 3
; Lift pieces when selecting them
;@catch(!Pieces)
;@  letframe(TempVar,!Pieces) ; get style from cel group
;@  add(TempVar,TempVar,1) ; add one for dropshadow style group
;@  letcatch(ObjNo) ; put dragged object number in variable ObjNo
;@  ifequal(ObjNo,1)
;@    setframe(!Ds01,TempVar)
;@  elseifequal(ObjNo,11) ; long live elseifequal()
;@    setframe(!Ds11,TempVar)
;@  endif()
;@release(!Pieces)
;@  ifequal(ObjNo,1)
;@    setframe(!Ds01,0) ; frame 0 unmaps all, this is why I moved the frames up
;@  elseifequal(ObjNo,11)
;@    setframe(!Ds11,0)
;@  endif()
;@  let(ObjNo,0) ; empty letcatch var after release
; FIRST check placement
; correct values
;@  letinitx(P0,ObjNo) letinity(P1,ObjNo)
; store current coordinates
;@  letobjectx(P2,ObjNo) letobjecty(P3,ObjNo)
; Check if puzzle piece placed: find positive difference on x and y axis
;@  ifgreaterthan(P0,P2)
;@    sub(P4,P0,P2)
;@  else()
;@    sub(P4,P2,P0)
;@  endif()
;@  ifgreaterthan(P1,P3)
;@    sub(P5,P1,P3)
;@  else()
;@    sub(P5,P3,P1)
;@  endif()
; Find total difference, place and ghost piece if small enough
;@  add(P6,P5,P4)
;@  iflessthan(P6,11)
;@    moveto(ObjNo,P0,P1) setfix(ObjNo,32767) ghost(ObjNo,G) gosub(4)
;@  endif()
;@label(4)
; Piece is placed: play sound, show progress on bar, augment total in variable D
;@  ifequal(SoundOff,0)
;@    sound("snapto.wav")
;@  endif()
;@  add(D,D,1)
;@  ifequal(C3,0)
;@     setframe(!ProgressBar,D)
;@  endif()
; Is the puzzle finished? Then unmap buttons (but leave filled progress bar), and map finish screen.
;@  ifequal(D,54)
;@    unmap(!Buttons) map(#56)
;@  endif()
; Lift pieces when selecting them
;@press(!Pieces)
;@  letframe(ToFrame,!Pieces) ; get style from cel group
;@  add(ToFrame,ToFrame,1) ; add one for dropshadow style group
;@  letcatch(ObjNo) ; put dragged object number in variable ObjNo
;@  add(TempVar,ObjNo,5) ; use label(6) to label(59) for objects 1-54
;@  goto(TempVar)
; Aaaaand we're done!
; Unmap dropshadows and check placement
;@release(!Pieces)
; FIRST check placement
   [etc]
;@  iflessthan(P6,11)
;@    moveto(ObjNo,P0,P1) setfix(ObjNo,32767) ghost(ObjNo,G) gosub(4)
;@  endif()
; Call label to unmap dropshadow piece
;@  add(TempVar,ObjNo,5) let(ToFrame,0) let(ObjNo,0)
;@  goto(TempVar)
;@ label(6)
;@  setframe(!Ds01,ToFrame)
  [...]
;@ label(16)
;@  setframe(!Ds11,ToFrame)
  [...]
;@ label(59)
;@  setframe(!Ds54,ToFrame)
[this one appears when the 54th piece is put in place]
#57.999  progbar.cel    *0 :0                   ;%g %x326 %y8 !ProgressBar : 54
#57.999 progbar.cel *0 :0 ;%g %x296 %y8 !ProgressBar : 49 50 51 52 53 54
and still lower, like this:
#57.999  progbar.cel    *0 :0                   ;%g %x188 %y8
;!ProgressBar : 31 32 33 34 35 36 37 38 39 40 41 43 42 44 45 46 47 48 49 50 51 52 53 54
and the base at the bottom, which has to be mapped in every frame, looks like
this:
#57.999 progback.cel *0 :0 ;%g !ProgressBar : 0 1 2 3 4 5 6 7 8 9 10 11 12 13 14 15 16 17 18 19 20 21 22 23 24 25 26 27 28 29 30 31 32 33 34 35 36 37 38 39 40 41 43 42 44 45 46 47 48 49 50 51 52 53 54
; Make progress bar empty
;@  setframe(!ProgressBar,0)
;@label(5)
; Ghost all pieces if settings screen is showing.
;@  letmapped(G0,"setting2.cel")
;@  ifequal(G0,1)
;@    let(ToGhost,G) ; the ghost value
;@    let(F0,0)
; Else unghost unfixed pieces.
;@  else
;@    let(ToGhost,U) ; the unghost value
;@  endif
;@  repeat(SetGhost,54,ObjNo)
;@label(SetGhost)
;@  ifnotequal(G0,1)
;@    letfix(F0,ObjNo)
;@  endif()
;@  ifequal(F0,0)
;@    ghost(ObjNo,ToGhost)
;@  endif()
;@label(0)
; Unmap settings, remap buttons
;@  unmap(!Settings) map(!Buttons)
;@  ifequal(S,0) ; return button
;@    goto(5)
;@  endif()
; (re)start code
;@  ifequal(S,2) ; REstart button: Unfix objects, reset D
;@    setfix(!Pieces,0) let(D,0)
;@  endif()
; Map progress bar according to settings
;@  ifequal(C3,0)
;@    setframe(!ProgressBar,D)
;@  endif()
; Reset S
;@  let(S,0)
; Label 5 unghosts pieces, label 2 will scatter them
;@  gosub(5) goto(2)
;@ setfix(!Pieces,0) let(D,0)
becomes
;@ let(D,0) repeat(Unfix,54,ObjNo)
;@label(Unfix)
;@  setfix(ObjNo,0)
;@label(2)
; Scatter pieces, if unfixed, uses label(3) to set X, Y per piece
;@  repeat(3,54,ObjNo)
;@label(2)
; Scatter pieces, if unfixed, uses label(3) to set X, Y per piece
;@  repeat(Scatter,54,ObjNo)
;
;@label(Scatter)
;@  letfix(F,ObjNo)
;@  ifequal(F,0)
;@    gosub(3) moveto(ObjNo,X,Y)
;@  endif()


The FKiSS4 version of the finished set.
