This is going to be a very short how-I, the only reason for its existence being that I didn't think this was possible at all. When I first bought the Acer Aspire Timeline 5810T, I was very happy with it. But any machine develops defects over time, and after a while the mouse key started to either ignore clicks or treat them as multiple or double clicks. It's a nuisance to select a list of picture files to move them, only to have them all open in cascading windows that fill up the screen. Or getting killed in a computer game because the character moved three squares instead of one.

As shown in the photo above, the mouse button is one solid bar, which I thought would be good for keeping crumbs out. It see-saws over a central pivot so I can push it down on the left or the right. (The chipped paint in the picture shows which side was used more often.) When it comes to crumb access, though, there seems to be room enough around the circumference of the bar. So either crumbs were getting in, or the touchpad's mouse button mechanism itself was malfunctioning.
With this in mind, I websurfed for ways to either replace the touchpad (complicated, voids warranty) or prise off the bar and clean underneath it. A link I found by someone who was suffering from advanced touchpad mouse-button problems shows how to do the first and which tiny part has to be replaced (as opposed to the whole touchpad). As for removing the mouse button to clean underneath, it was generally held to be impossible. Better buy a new touchpad, or, wait, a new laptop.
Not ready to part with this laptop or break it though clumsiness while trying to replace some part of it, I kept surfing, and found a Youtube video of someone removing a laptop's mouse buttons to clean under them. The laptop was an entirely different brand, and its mouse buttons a different shape, but the principle was the same: the button on the Acer Aspire is held in place by little plastic flanges, and inserting something under the button to make it bend a bit would make the flanges shoot out of their holes. What I inserted under the plastic bar (very carefully, so as not to break anything) was the blade of a penknife, so, despite being careful, some paint was scratched off. After much patience, the bar popped off.
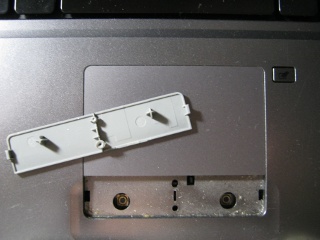

The first thing I saw was that a noticeable amount of dirt had gathered under the mouse button, and the second thing I saw was that it shouldn't have mattered, since attached to the mouse button were two plastic points that pressed straight down on two contact points below the space where the dirt had collected. However, cleaning out the dirt and, again carefully, popping the plastic bar back in place did improve the mouse button's responsiveness. It still didn't work as well as when the laptop was new, though, so maybe the electronic part containing the contact points may have to be replaced some time. For now, I try to avoid using the mouse buttons, tapping on the touchpad instead.
(NB. This laptop model does seem to have a problem with badly wired touchpads, as I came across plenty of complaints while looking for info on touchpad mouse buttons. But the touchpad on this laptop has always worked well. Touch wood.)
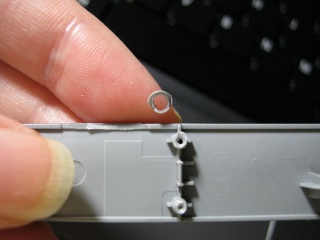
In closing, a picture of the central pivot point of the mouse button, shown below. The remarkable thing is not that there are two central pivot points and a central pivot bar, corresponding with the central holes shown in the two pictures above, but that the topmost point, which is placed over a larger hole than the bottom point, has a thin plastic ring around its end that came off quite easily when the plastic bar was handled. Is this ring just a bit of junk left by the production process, or necessary to prevent the pivot point getting jammed in the hole it is placed over? Anyway, it came off, and the mouse button still works fine.